Contiv is an Open source project driven primarily by Cisco for policy based networking, storage and cluster management for containerized applications. In this blog, I will cover some of the hands-on stuff that I tried with Contiv Networking. I used the sample examples provided in Contiv documentation as starting point. For Contiv networking basics, you can refer to my previous blog here.
Contiv environment
I followed the “Contiv getting started” guide to setup a two node Contiv cluster with Vagrant. I started the cluster in Packet baremetal cloud. Contiv netmaster runs in one of the nodes, Contiv netplugin is installed in both the nodes.
git clone https://github.com/contiv/netplugin
cd netplugin; make demo
Following command shows the 2 node Vagrant cluster:
root@contiv:~/netplugin# vagrant status
Current machine states:

netplugin-node1           running (virtualbox)
netplugin-node2           running (virtualbox)
Following are the business details of the sample application that I have used in this blog:
- Clients can talk to webserver using secure(http) and unsecure(https) methods in “test” network.
- Clients can talk to webserver using only secure method(https) in “prod” network.
- This application is run in default tenant network.
Following picture shows the Contiv object model for this application:
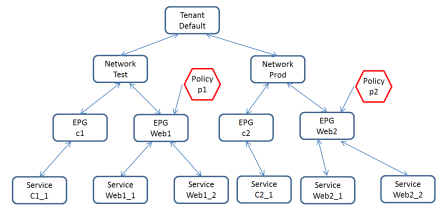
Following commands creates this application using “netctl” CLI:
# Network
netctl net create test --subnet=10.1.1.0/24
netctl net create prod --subnet=20.1.1.0/24

# Create policy
netctl policy create p1
netctl policy rule-add p1 1 -g c1 -n test -direction=in -protocol=tcp -action=deny
netctl policy rule-add p1 2 -g c1 -n test -direction=in -protocol=tcp -port=80 -action=allow -priority=10
netctl policy rule-add p1 3 -g c1 -n test -direction=in -protocol=tcp -port=443 -action=allow -priority=10

netctl policy create p2
netctl policy rule-add p2 4 -g c2 -n prod -direction=in -protocol=tcp -action=deny
netctl policy rule-add p2 5 -g c2 -n prod -direction=in -protocol=tcp -port=443 -action=allow -priority=10

# Create group and associate with network and policy
netctl group create test c1
netctl group create test web1 -policy=p1
netctl group create prod c2
netctl group create prod web2 -policy=p2

# Create services
docker run -d --net web1.test --name web1_1 --dns 10.1.1.2 nginx
docker run -d --net web1.test --name web1_2 --dns 10.1.1.2 nginx
docker run -ti --net c1.test --name c1_1 --dns 10.1.1.2 smakam/myubuntu:v3

docker run -d --net web2.prod --name web2_1 --dns 20.1.1.2 nginx
docker run -d --net web2.prod --name web2_2 --dns 20.1.1.2 nginx
docker run -ti --net c2.prod --name c2_1 --dns 20.1.1.2 smakam/myubuntu:v3 bash
I have used “nginx” container for web service and “smakam/myubuntu:v3” container for client service. “smakam/myubuntu:v3” is inherited from “ubuntu” Container and it has network tools installed in addition.
Let’s login to client Container “c1_1” and check that it is able to reach service “web1.test.default”. Following output shows that the ping request is getting load balanced between “web1_1.test.default” and “web1_2.test.default”.
# ping -c1 web1.test.default
PING web1.test.default (10.1.1.5) 56(84) bytes of data.
64 bytes from 10.1.1.5: icmp_seq=1 ttl=64 time=0.120 ms

--- web1.test.default ping statistics ---
1 packets transmitted, 1 received, 0% packet loss, time 0ms
rtt min/avg/max/mdev = 0.120/0.120/0.120/0.000 ms
# ping -c1 web1.test.default
PING web1.test.default (10.1.1.6) 56(84) bytes of data.
64 bytes from 10.1.1.6: icmp_seq=1 ttl=64 time=6.13 ms

--- web1.test.default ping statistics ---
1 packets transmitted, 1 received, 0% packet loss, time 0ms
rtt min/avg/max/mdev = 6.137/6.137/6.137/0.000 ms
To check that the policy is working, lets login to “c1_1” service and check that only port 80 and 443 is open in “web1” service as specified by policy “p1”.
# nc -zvw 1 web1.test.default 79-81
nc: connect to web1.test.default port 79 (tcp) timed out: Operation now in progress
nc: connect to web1.test.default port 79 (tcp) timed out: Operation now in progress
Connection to web1.test.default 80 port [tcp/http] succeeded!
nc: connect to web1.test.default port 81 (tcp) timed out: Operation now in progress
nc: connect to web1.test.default port 81 (tcp) timed out: Operation now in progress
# nc -zvw 1 web1.test.default 442-444
nc: connect to web1.test.default port 442 (tcp) timed out: Operation now in progress
nc: connect to web1.test.default port 442 (tcp) timed out: Operation now in progress
nc: connect to web1.test.default port 443 (tcp) failed: Connection refused
nc: connect to web1.test.default port 443 (tcp) failed: Connection refused
nc: connect to web1.test.default port 444 (tcp) timed out: Operation now in progress
nc: connect to web1.test.default port 444 (tcp) timed out: Operation now in progress
As we can see above, only port 80 and 443 is open. We are getting connection refused for port 443 because we have not enabled the authentication scheme for https.
To check that the policy is working, lets login to “c2_1” and check that only port 443 is open in “web2” service as specified by policy “p2”.
root@78871d2b3159:/# nc -zvw 1 web2.prod.default 79-81
nc: connect to web2.prod.default port 79 (tcp) timed out: Operation now in progress
nc: connect to web2.prod.default port 79 (tcp) timed out: Operation now in progress
nc: connect to web2.prod.default port 80 (tcp) timed out: Operation now in progress
nc: connect to web2.prod.default port 80 (tcp) timed out: Operation now in progress
nc: connect to web2.prod.default port 81 (tcp) timed out: Operation now in progress
nc: connect to web2.prod.default port 81 (tcp) timed out: Operation now in progress
root@78871d2b3159:/# nc -zvw 1 web2.prod.default 442-444
nc: connect to web2.prod.default port 442 (tcp) timed out: Operation now in progress
nc: connect to web2.prod.default port 442 (tcp) timed out: Operation now in progress
nc: connect to web2.prod.default port 443 (tcp) failed: Connection refused
nc: connect to web2.prod.default port 443 (tcp) failed: Connection refused
nc: connect to web2.prod.default port 444 (tcp) timed out: Operation now in progress
nc: connect to web2.prod.default port 444 (tcp) timed out: Operation now in progress
In the above example, we have specified the policy manually. In the example below, we will try the same usecase by specifying policy as a JSON file and using contiv-compose.
Following policy specifies the tenant, user, network and policy details:
{
	"LabelMap`" : {
		"Tenant" : "io.contiv.tenant",
		"NetworkIsolationPolicy" : "io.contiv.policy"
	},

	"UserPolicy" : [

		{ "User":"vagrant",
		  "DefaultTenant": "default",
		  "Networks": "test,prod",
		  "DefaultNetwork": "prod",
		  "NetworkPolicies" : "TrustApp,WebDefault,WebSecure",
		  "DefaultNetworkPolicy": "TrustApp" }
	],

	"NetworkPolicy" : [
		{ "Name":"AllPriviliges",
		  "Rules": ["permit all"]},

		{ "Name":"WebDefault",
		  "Rules": ["permit tcp/80", "permit tcp/443"] },

		{ "Name":"WebSecure",
		  "Rules": ["permit tcp/443"] },

		{ "Name":"TrustApp",
		  "Rules": ["permit app"] }
	]
}
Following is the compose file “docker-compose-test.yml” for application using “WebDefault” policy:
web:
  image: nginx
  net: test
  labels:
   io.contiv.policy: "WebDefault"
client:
  image: smakam/myubuntu:v3
  tty: true
  net: test
  links:
   - web
Following is the compose file “docker-compose-prod.yml” for application using “WebSecure” policy:
web:
  image: nginx
  net: prod
  labels:
   io.contiv.policy: "WebSecure"
client:
  image: smakam/myubuntu:v3
  net: prod
  tty: true
  links:
   - web
I used the procedure here to install netplugin and libcompose. The first step is to create the networks:
netctl net create -s 10.11.1.0/24 test
netctl net create -s 10.11.2.0/24 prod
Following set of commands starts the application in “test” network with “WebDefault” policy. These commands are run from the directory where the policy “ops.json”is located.
contiv-compose -p test -f docker-compose-test.yml scale web=2
contiv-compose -p test -f docker-compose-test.yml up -d
Following output shows the “WebDefault” policy applied when running contiv-compose:
$ contiv-compose -p test -f docker-compose-test.yml up -d
WARN[0000] Note: This is an experimental alternate implementation of the Compose CLI (https://github.com/docker/compose)
INFO[0001] Creating policy contract from 'client' -> 'web'
INFO[0001] User 'vagrant': applying 'WebDefault' to service 'web'
INFO[0002] Project [test]: Starting project
INFO[0002] [0/2] [client]: Starting
INFO[0002] [0/2] [web]: Starting
INFO[0002] Recreating web
INFO[0002] Recreating web
INFO[0006] [1/2] [client]: Started
INFO[0010] [2/2] [web]: Started
Following set of commands starts the application in “prod” network with “WebSecure” policy.
contiv-compose -p prod -f docker-compose-prod.yml scale web=2
contiv-compose -p prod -f docker-compose-prod.yml up -d
Following output shows the “WebSecure” policy applied when running contiv-compose:
$ contiv-compose -p prod -f docker-compose-prod.yml up -d
WARN[0000] Note: This is an experimental alternate implementation of the Compose CLI (https://github.com/docker/compose)
INFO[0003] Creating policy contract from 'client' -> 'web'
INFO[0003] User 'vagrant': applying 'WebSecure' to service 'web'
INFO[0003] Project [prod]: Starting project
INFO[0003] [0/2] [web]: Starting
INFO[0003] [0/2] [client]: Starting
INFO[0007] [1/2] [web]: Started
INFO[0011] [2/2] [client]: Started
Let’s look at tenants, networks, epgs, policies created using netctl:
$ netctl tenant ls
Name
------
default

$ netctl network list
Tenant   Network  Nw Type  Encap type  Packet tag  Subnet        Gateway
------   -------  -------  ----------  ----------  -------       ------
default  test     data     vxlan       0           10.11.1.0/24
default  prod     data     vxlan       0           10.11.2.0/24

$ netctl group ls
Tenant   Group        Network  Policies
------   -----        -------  --------
default  test_client  test
default  test_web     test     test_web-in
default  prod_client  prod
default  prod_web     prod     prod_web-in

$ netctl policy list
Tenant   Policy
------   ------
default  test_web-in
default  prod_web-in

$ netctl policy rule-ls prod_web-in
Incoming Rules:
Rule  Priority  From EndpointGroup  From Network  From IpAddress  Protocol  Port  Action
----  --------  ------------------  ------------  ---------       --------  ----  ------
1     1                             prod          10.11.2.0/24    tcp       0     deny
2     2         prod_client         prod                          tcp       443   allow

$ netctl policy rule-ls test_web-in
Incoming Rules:
Rule  Priority  From EndpointGroup  From Network  From IpAddress  Protocol  Port  Action
----  --------  ------------------  ------------  ---------       --------  ----  ------
1     1                             test          10.11.1.0/24    tcp       0     deny
2     2         test_client         test                          tcp       80    allow
3     3         test_client         test                          tcp       443   allow
To test that the policy is working, we can try the following commands in client container and it should show that only port 80, 443 is exposed in “test” network and port 443 is exposed in “prod” network.
nc -zvw 1 prod_web.prod.default 79-81
nc -zvw 1 prod_web.prod.default 442-444

nc -zvw 1 test_web.test.default 79-81
nc -zvw 1 test_web.test.default 442-444

