Recently, we had a customer issue where a production GKE cluster was deleted accidentally which caused some outage till the cluster recovery was completed. Recovering the cluster was not straightforward as the customer did not have any automated backup/restore mechanism and also the presence of stateful workloads complicated this further. I started looking at some of the ways in which a cluster can be restored to a previous state and this blog is a result of that work.
Following are some of the reasons why we need DR for Kubernetes cluster:
- Cluster is deleted accidentally.
- Cluster master node has gotten into a weird state. Having redundant masters would avoid this problem.
- Need to move from 1 cluster type to another. For example, GKE legacy network to VPC native network migration.
- Move to different kubernetes distribution. This can include moving from onprem to cloud.
The focus of this blog is more from a cold DR perspective and to not have multiple clusters working together to provide high availability. I will talk about multiple clusters and hot DR in a later blog.
There are 4 kinds of data to backup in a kubernetes cluster:
- Cluster configuration. These are parameters like node configuration, networking and security constructs for the cluster etc.
- Common kubernetes configurations. Examples are namespaces, rbac policies, pod security policies, quotas, etc.
- Application manifests. This is based on the specific application that is getting deployed to the cluster.
- Stateful configurations. These are persistent volumes that is attached to pods.
For item 1, we can use any infrastructure automation tools like Terraform or in the case of GCP, we can use deployment manager. The focus of this blog is on items 2, 3 and 4.
Following are some of the options possible for 2, 3 and 4:
- Use a Kubernetes backup tool like Velero. This takes care of backing up both kubernetes resources as well as persistent volumes. This covers items 2, 3 and 4, so its pretty complete from a feature perspective. Velero is covered in detail in this blog.
- Use GCP “Config sync” feature. This can cover 2 and 3. This approach is more native with Kubernetes declarative approach and the config sync approach tries to recreate the cluster state from stored manifest files. Config sync approach is covered in detail in this blog.
- Use CI/CD pipeline. This can cover 2 and 3. The CI/CD pipeline typically does whole bunch of other stuff in the pipeline and it is a roundabout approach to do DR. An alternative could be to create a separate DR pipeline in CI/CD.
- Kubernetes volume snapshot and restore feature was introduced in beta in 1.17 release. This is targeted towards item 4. This will get integrated into kubernetes distributions soon. This approach will use kubernetes api itself to do the volume snapshot and restore.
- Manual approach can be taken to backup and restore snapshots as described here. This is targeted towards item 4. The example described here for GCP talks about using cloud provider tool to take a volume snapshot , create a disk from the volume and then manually create a PV and attach the disk to the PV. The kubernetes deployment can use the new PV.
- Use backup and restore tool like Stash. This is targeted towards item 4. Stash is a pretty comprehensive tool to backup Kubernetes stateful resources. Stash provides a kubernetes operator on top of restic. Stash provides add-ons to backup common kubernetes stateful databases like postgres, mysql, mongo etc.
I will focus on Velero and Config sync in this blog.
Following is the structure of the content below. The examples are tried on GKE cluster.
Velero
Velero was previously Heptio Ark. Velero provides following functionalities:
- Manual as well as periodic backups can be scheduled. Velero can backup and restore both kubernetes resources as well as persistent volumes.
- Integrated natively with Amazon EBS Volumes, Azure Managed Disks, Google Persistent Disks using plugins. For some storage systems like Portworx, there is a community supported provider. Velero also integrates with Restic open source project that allows integration with any provider. This link provides complete list of supported providers.
- Can handle snapshot consistency problem by providing pre and post hooks to flush the data before snapshot is taken.
- Backups can be done for the complete cluster or part of the cluster like at individual namespace level.
Velero follows a client, server model. The server needs to be installed in the GKE cluster. The client can be installed as a standalone binary. Following are the installation steps for the server:
- Create Storage bucket
- Create Service account. The storage account needs to have enough permissions to create snapshots and also needs to have access to storage bucket
- Install velero server
Velero Installation
For the client component, I installed it in mac using brew.
brew install velero
For the server component, I followed the steps here.
Create GKE cluster
gcloud beta container --project "sreemakam-test" clusters create "prodcluster" --zone "us-central1-c" --enable-ip-alias
Create storage bucket
BUCKET=sreemakam-test-velero-backup
gsutil mb gs://$BUCKET/
Create service account with right permissions
gcloud iam service-accounts create velero \
    --display-name "Velero service account"
SERVICE_ACCOUNT_EMAIL=$(gcloud iam service-accounts list \
  --filter="displayName:Velero service account" \
  --format 'value(email)')
ROLE_PERMISSIONS=(
    compute.disks.get
    compute.disks.create
    compute.disks.createSnapshot
    compute.snapshots.get
    compute.snapshots.create
    compute.snapshots.useReadOnly
    compute.snapshots.delete
    compute.zones.get
)

gcloud iam roles create velero.server \
    --project $PROJECT_ID \
    --title "Velero Server" \
    --permissions "$(IFS=","; echo "${ROLE_PERMISSIONS[*]}")"

gcloud projects add-iam-policy-binding $PROJECT_ID \
    --member serviceAccount:$SERVICE_ACCOUNT_EMAIL \
    --role projects/$PROJECT_ID/roles/velero.server
Download service account locally
This service account is needed for the installation of Velero server.
gcloud iam service-accounts keys create credentials-velero \
    --iam-account $SERVICE_ACCOUNT_EMAIL
Set appropriate bucket permission
gsutil iam ch serviceAccount:$SERVICE_ACCOUNT_EMAIL:objectAdmin gs://${BUCKET}
Install Velero server
This has to be done after setting the right Kubernetes context.
velero install \
    --provider gcp \
    --plugins velero/velero-plugin-for-gcp:v1.0.1 \
    --bucket $BUCKET \
    --secret-file ./credentials-velero
After this, we can check that Velero is successfully installed:
$ velero version
Client:
	Version: v1.3.1
	Git commit: -
Server:
	Version: v1.3.1
Install application
To test the backup and restore feature, I have installed 2 Kubernetes application, the first is a hello go based stateless application and the second is stateful wordpress application. I have forked the GKE examples repository and made some changes for this use case.
Install hello application
kubectl create ns myapp
kubetcl apply -f hello-app/manifests -n myapp
Install wordpress application
First, we need to create sql secrets and then we can apply k8s manifests
SQL_PASSWORD=$(openssl rand -base64 18)
kubectl create secret generic mysql -n myapp \
    --from-literal password=$SQL_PASSWORD
kubectl apply -f wordpress-persistent-disks -n myapp
This application has 2 stateful resource, 1 for mysql persistent disk and another for wordpress. To validate the backup, open the wordpress page, complete the basic installation and create a test blog. This can be validated as part of restore.
Resources created
$ kubectl get secrets -n myapp
NAME                  TYPE                                  DATA   AGE
default-token-cghvt   kubernetes.io/service-account-token   3      22h
mysql                 Opaque                                1      22h

$ kubectl get deployments -n myapp
NAME        READY   UP-TO-DATE   AVAILABLE   AGE
helloweb    1/1     1            1           22h
mysql       1/1     1            1           21h
wordpress   1/1     1            1           21h

$ kubectl get services -n myapp
NAME               TYPE           CLUSTER-IP    EXTERNAL-IP      PORT(S)          AGE
helloweb           LoadBalancer   10.44.6.6     34.68.231.47     80:31198/TCP     22h
helloweb-backend   NodePort       10.44.4.178   <none>           8080:31221/TCP   22h
mysql              ClusterIP      10.44.15.55   <none>           3306/TCP         21h
wordpress          LoadBalancer   10.44.2.154   35.232.197.168   80:31095/TCP     21h

$ kubectl get ingress -n myapp
NAME       HOSTS   ADDRESS        PORTS   AGE
helloweb   *       34.96.67.172   80      22h

$ kubectl get pvc -n myapp
NAME                    STATUS   VOLUME                                     CAPACITY   ACCESS MODES   STORAGECLASS   AGE
mysql-volumeclaim       Bound    pvc-3ebf86a0-8162-11ea-9370-42010a800047   200Gi      RWO            standard       21h
wordpress-volumeclaim   Bound    pvc-4017a2ab-8162-11ea-9370-42010a800047   200Gi      RWO            standard       21h

$ kubectl get pv -n myapp
kNAME                                       CAPACITY   ACCESS MODES   RECLAIM POLICY   STATUS   CLAIM                         STORAGECLASS   REASON   AGE
pvc-3ebf86a0-8162-11ea-9370-42010a800047   200Gi      RWO            Delete           Bound    myapp/mysql-volumeclaim       standard                21h
pvc-4017a2ab-8162-11ea-9370-42010a800047   200Gi      RWO            Delete           Bound    myapp/wordpress-volumeclaim   standard
Backup kubernetes cluster
The backup can be done at the complete cluster level or for individual namespaces. I will create a namespace backup now.
$ velero backup create myapp-ns-backup --include-namespaces myapp
Backup request "myapp-ns-backup" submitted successfully.
Run `velero backup describe myapp-ns-backup` or `velero backup logs myapp-ns-backup` for more details.
We can look at different commands like “velero backup describe”, “velero backup logs”, “velero get backup” to get the status of the backup. The following output shows that the backup is completed.
$ velero get backup
NAME              STATUS      CREATED                         EXPIRES   STORAGE LOCATION   SELECTOR
myapp-ns-backup   Completed   2020-04-19 14:35:51 +0530 IST   29d       default            <none>
Let’s look at the snapshots created in GCP.
$ gcloud compute snapshots list
NAME                                                             DISK_SIZE_GB  SRC_DISK                                                                             STATUS
gke-prodcluster-96c83f-pvc-7a72c7dc-74ff-4301-b64d-0551b7d98db3  200           us-central1-c/disks/gke-prodcluster-96c83f-pvc-3ebf86a0-8162-11ea-9370-42010a800047  READY
gke-prodcluster-96c83f-pvc-c9c93573-666b-44d8-98d9-129ecc9ace50  200           us-central1-c/disks/gke-prodcluster-96c83f-pvc-4017a2ab-8162-11ea-9370-42010a800047  READY
Let’s look at the contents of velero storage bucket:
gsutil ls gs://sreemakam-test-velero-backup/backups/
gs://sreemakam-test-velero-backup/backups/myapp-ns-backup/
When creating snapshots, it is necessary that the snapshots are created in a consistent state when the writes are in the fly. The way Velero achieves this is by using backup hooks and sidecar container. The backup hook freezes the filesystem when backup is running and then unfreezes the filesystem after backup is completed.
Restore Kubernetes cluster
For this example, we will create a new cluster and restore the contents of namespace “myapp” to this cluster. We expect that both the kubernetes manifests as well as persistent volumes are restored.
Create new cluster
$ gcloud beta container --project "sreemakam-test” clusters create "prodcluster-backup" --zone "us-central1-c" --enable-ip-alias
Install Velero
velero install \
    --provider gcp \
    --plugins velero/velero-plugin-for-gcp:v1.0.1 \
    --bucket $BUCKET \
    --secret-file ./credentials-velero \
    --restore-only
I noticed a bug that even though we have done the installation with “restore-only” flag, the storage bucket is mounted as read-write. Ideally, it should be only “read-only” so that both clusters don’t write to the same backup location.
$ velero backup-location get
NAME      PROVIDER   BUCKET/PREFIX                  ACCESS MODE
default   gcp        sreemakam-test-velero-backup   ReadWrite
Let’s look at the backups available in this bucket:
$ velero get backup
NAME              STATUS      CREATED                         EXPIRES   STORAGE LOCATION   SELECTOR
myapp-ns-backup   Completed   2020-04-19 14:35:51 +0530 IST   29d       default            <none>
Now, let’s restore this backup in the current cluster. This cluster is new and does not have any kubernetes manifests or PVs.
$ velero restore create --from-backup myapp-ns-backup
Restore request "myapp-ns-backup-20200419151242" submitted successfully.
Run `velero restore describe myapp-ns-backup-20200419151242` or `velero restore logs myapp-ns-backup-20200419151242` for more details.
Let’s make sure that the restore is completed successfully:
$ velero restore get
NAME                             BACKUP            STATUS      WARNINGS   ERRORS   CREATED                         SELECTOR
myapp-ns-backup-20200419151242   myapp-ns-backup   Completed   1          0        2020-04-19 15:12:44 +0530 IST   <none>
The restore command above would create all the manifests including namespaces, deployments and services. It will also create PVs and attach to the appropriate pods.
Let’s look at the some of the resources created:
$ kubectl get services -n myapp
NAME               TYPE           CLUSTER-IP     EXTERNAL-IP       PORT(S)          AGE
helloweb           LoadBalancer   10.95.13.226   162.222.177.146   80:30693/TCP     95s
helloweb-backend   NodePort       10.95.13.175   <none>            8080:31555/TCP   95s
mysql              ClusterIP      10.95.13.129   <none>            3306/TCP         95s
wordpress          LoadBalancer   10.95.7.154    34.70.240.159     80:30127/TCP     95s

$ kubectl get pv -n myapp
NAME                                       CAPACITY   ACCESS MODES   RECLAIM POLICY   STATUS   CLAIM                         STORAGECLASS   REASON   AGE
pvc-3ebf86a0-8162-11ea-9370-42010a800047   200Gi      RWO            Delete           Bound    myapp/mysql-volumeclaim       standard                5m18s
pvc-4017a2ab-8162-11ea-9370-42010a800047   200Gi      RWO            Delete           Bound    myapp/wordpress-volumeclaim   standard                5m17s
We can access the “hello” application service and “wordpress” and it should work fine. We can also check that the test blog created earlier is restored fine.
Config sync
GCP “Config sync” feature provides gitops functionality to kubernetes manifests. “Config sync” feature is installed as Kubernetes operator. When Config sync operator is installed in Kubernetes cluster, it points to a repository that holds the kubernetes manifests. The config sync operator makes sure that the state of the cluster reflects what is mentioned in the repository. Any changes to the local cluster or to the repository will trigger reconfiguration in the cluster to sync from the repository. “Config sync” feature is a subset of Anthos config management(ACM) feature in Anthos and it can be used without Anthos license. ACM provides uniform configuration and security policies across multiple kubernetes clusters. In addition to providing config sync functionality, ACM also includes policy controller piece that is based on opensource gatekeeper project.
Config sync feature can be used for 2 purposes:
- Maintain security policies of a k8s cluster. The application manifests can be maintained through a CI/CD system.
- Maintain all k8s manifests including security policies and application manifests. This approach allows us to restore cluster configuration in a DR scenario. The application manifests can still be maintained through a CI/CD system, but using CI/CD for DR might be time consuming.
In this example, we will use “Config sync” for DR purposes. Following are the components of “Config sync” feature:
- “nomos” CLI to manage configuration sync. It is possible that this can be integrated with kubectl later.
- “Config sync” operator installed in the kubernetes cluster.
Following are the features that “Config sync” provides:
- Config sync works with GCP CSR(code source repository), bitbucket, github, gitlab
- With namespace inheritance, common features can be put in abstract namespace that applies to multiple namespaces. This is useful if we want to share some kubernetes manifests across multiple clusters.
- Configs for specific clusters can be specified using cluster selector
- Default sync period is 15 seconds and it can be changed.
The repository follows the structure as below. The example below shows a sample repo with the following folders(cluster->cluster resources like quotas, rbac, security policy etc, clusterregistry->policies specific to each cluster, namespaces->application manifest under each namespace, system->operator related configs)
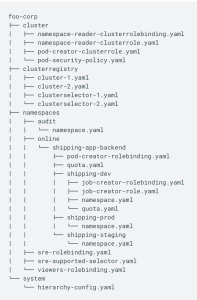
Following are the steps that we will do below:
- Install “nomos” CLI
- Checkin configs to a repository. We will use github for this example.
- Create GKE cluster, make current user cluster admin. To access private git repo, we can setup kubernetes secrets. For this example, we will use public repository.
- Install config management CRD in the cluster
- Check nomos status using “nomos status” to validate that the cluster has synced to the repository.
- Apply kubernetes configuration changes to the repo as well as to cluster and check that the sync feature is working. This step is optional.
Installation
I installed nomos using the steps mentioned here in my mac.
Following commands download and install the operator in the GKE cluster. I have used the same cluster created in the “Velero” example.
gsutil cp gs://config-management-release/released/latest/config-sync-operator.yaml config-sync-operator.yaml
kubectl apply -f config-sync-operator.yaml
To verify that “Config sync” is running correctly, please check the following output. We should see that the pod is running successfully.
$ kubectl -n kube-system get pods | grep config-management
config-management-operator-5d4864869d-mfrd6                 1/1     Running   0          60s
Let’s check the nomos status now. As we can see below, we have not setup the repo sync yet.
$ nomos status --contexts gke_sreemakam-test_us-central1-c_prodcluster
Connecting to clusters...
Failed to retrieve syncBranch for "gke_sreemakam-test_us-central1-c_prodcluster": configmanagements.configmanagement.gke.io "config-management" not found
Failed to retrieve repos for "gke_sreemakam-test_us-central1-c_prodcluster": the server could not find the requested resource (get repos.configmanagement.gke.io)
Current   Context                                        Status           Last Synced Token   Sync Branch
-------   -------                                        ------           -----------------   -----------
*         gke_sreemakam-test_us-central1-c_prodcluster   NOT CONFIGURED


Config Management Errors:
gke_sreemakam-test_us-central1-c_prodcluster   ConfigManagement resource is missing
Repository
I have used the repository here and plan to syncup the “gohellorepo” folder. Following is the structure of the “gohellorepo” folder.
$ tree .
.
├── namespaces
│   └── go-hello
│       ├── helloweb-deployment.yaml
│       ├── helloweb-ingress.yaml
│       ├── helloweb-service.yaml
│       └── namespace.yaml
└── system
    └── repo.yaml
The repository describes a namespace “go-hello” and the “go-hello” directory contains kubernetes manifests for a go application.
The repository also has the “config-management.yaml” file that describes the repo that we want to sync to. Following is the content fo the file:
# config-management.yaml

apiVersion: configmanagement.gke.io/v1
kind: ConfigManagement
metadata:
  name: config-management
spec:
  # clusterName is required and must be unique among all managed clusters
  clusterName: my-cluster
  git:
    syncRepo: https://github.com/smakam/csp-config-management.git
    syncBranch: 1.0.0
    secretType: none
    policyDir: "gohellorepo"
As we can see, we want to sync to the “gohellorepo” folder in git repo “https://github.com/smakam/csp-config-management.git”
Syncing to the repo
Following command syncs the cluster to the github repository:
kubectl apply -f config-management.yamlNow, we can look at “nomos status” to check if the sync is successful. As we can see from “SYNCED” status, the sync is successful.
$ nomos status --contexts gke_sreemakam-test_us-central1-c_prodcluster
Connecting to clusters...
Current   Context                                        Status           Last Synced Token   Sync Branch
-------   -------                                        ------           -----------------   -----------
*         gke_sreemakam-test_us-central1-c_prodcluster   SYNCED           020ab642            1.0.0
Let’s look at the kubernetes resources to make sure that the sync is successful. As we can see below, the namespace and the appropriate resources got created in the namespace “go-hello”
$ kubectl get ns
NAME                       STATUS   AGE
config-management-system   Active   23m
default                    Active   27h
go-hello                   Active   6m26s

$ kubectl get services -n go-hello
NAME               TYPE           CLUSTER-IP     EXTERNAL-IP   PORT(S)          AGE
helloweb           LoadBalancer   10.44.6.41     34.69.102.8   80:32509/TCP     3m25s
helloweb-backend   NodePort       10.44.13.224   <none>        8080:31731/TCP   3m25s

$ kubectl get deployments -n go-hello
NAME       READY   UP-TO-DATE   AVAILABLE   AGE
helloweb   1/1     1            1           7m
As a next step, we can make changes to the repo and check that the changes are pushed to the cluster. If we make any manual changes. to the cluster, config sync operator will check with the repo and push the changes back to the cluster. For example, if we delete namespace “go-hello” manually in the cluster, we will see that after 30 seconds or so, the namespace configuration is pushed back and recreated in the cluster.