Category Archives: Programming

My Multi-Agent Coding Setup to Lower LLM Cost

AI coding tools are now good enough that the question is no longer “Should I use them?” For me, the more useful question is: how do I use them without letting LLM cost grow unnecessarily?

The obvious answer is to use cheaper models. That helps, but it is not the full answer. In practice, the bigger unlock is designing the coding workflow so that I can switch between tools and models without changing the way I work.

My setup is based on separating three things that often get blurred together:

  • Editor: where I view and manually edit code.
  • Harness: the coding agent layer that reads files, edits code, runs commands, applies patches, and manages repo context.
  • Model: the LLM doing the reasoning underneath the harness.

Once these are separated, I can optimize cost more intelligently. I can use premium models when reasoning quality matters, and use lower-cost models for exploration, boilerplate, summarization, first-pass refactors, or less risky changes.

The Architecture

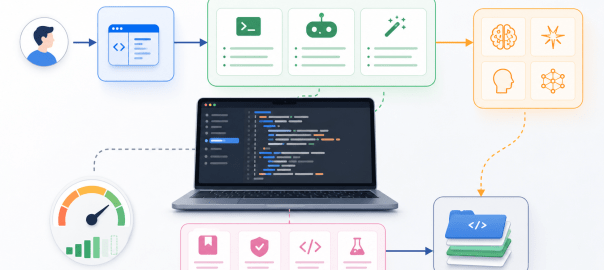
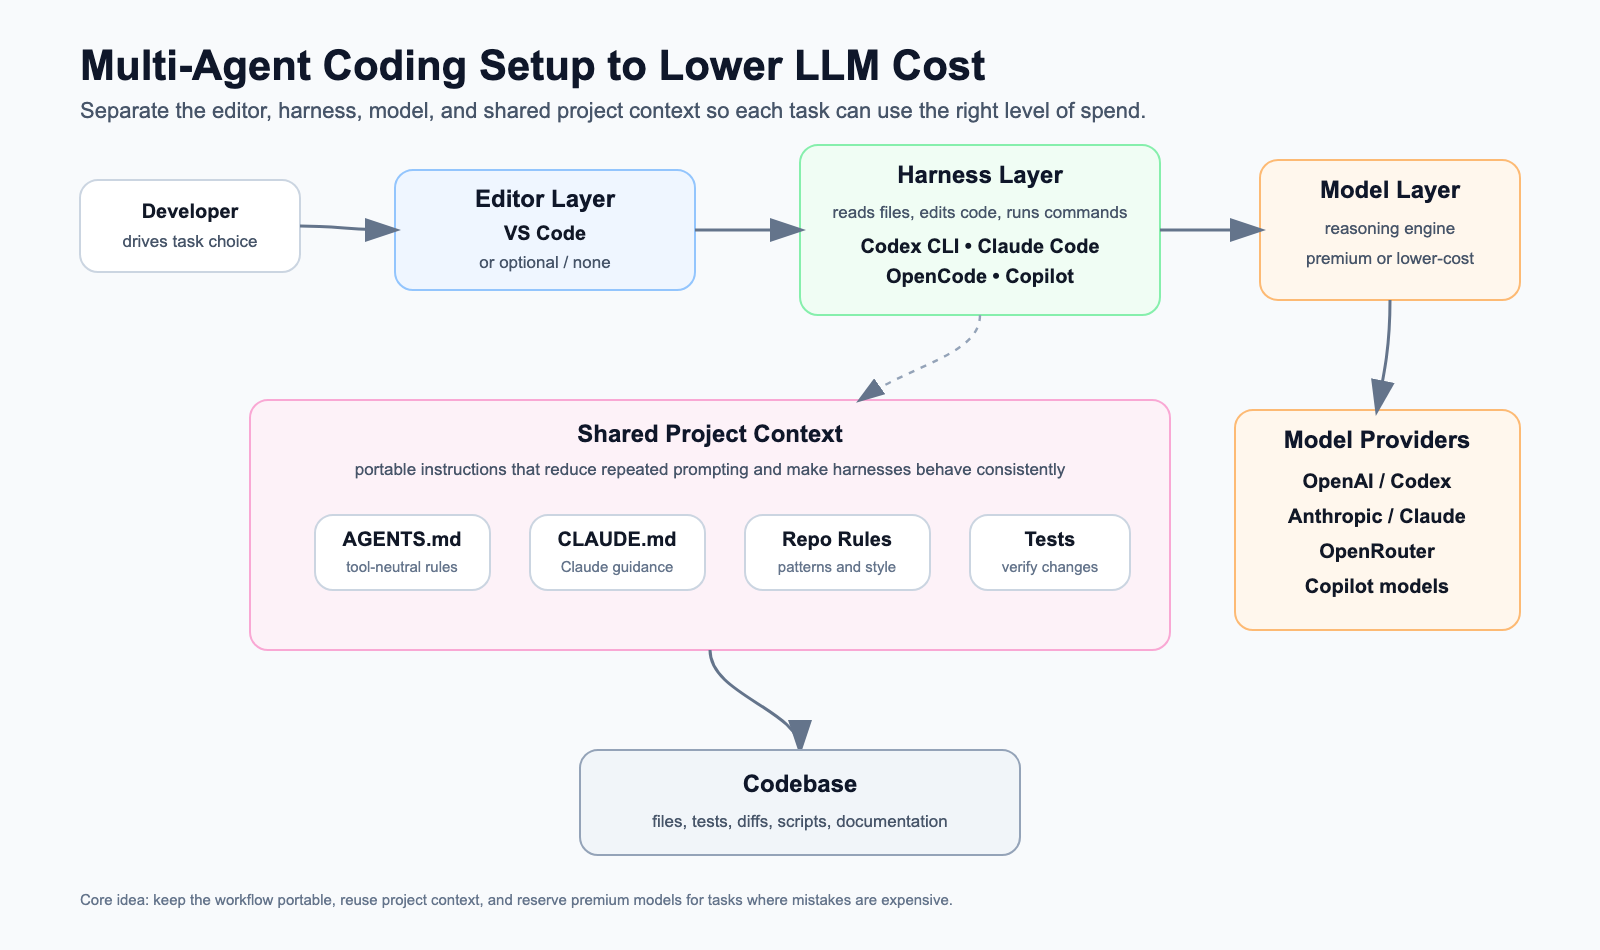
At a high level, my setup looks like this:

The important part is that the editor, harness, and model are not the same thing.

VS Code is usually my editor. Codex, Claude Code, OpenCode, Copilot, and VS Code extensions are the harness layer or harness-like coding environments. Claude, GPT/Codex models, GLM, Qwen, DeepSeek, and other models are the reasoning engines underneath.

That distinction matters because cost optimization becomes easier when the harness is portable and the model is replaceable.

Shared Project Context

The foundation of the setup is shared project context.

I try to keep repo-specific guidance in files such as:

  • AGENTS.md
  • CLAUDE.md
  • architecture notes
  • test commands
  • coding conventions
  • reusable task prompts

This avoids re-explaining the project every time I switch tools. The goal is simple: if I move from Claude Code to Codex, or from Codex to OpenCode, the new harness should still understand the important repo conventions.

This also saves tokens. Instead of dumping long explanations repeatedly into every chat, I keep durable instructions close to the codebase.

Approach 1: VS Code as Editor, Harnesses Through Extensions

This is the setup I use most often for complex projects.

Here, VS Code is the editor. It is where I read code, navigate files, review diffs, and make manual edits.

The AI harness is usually provided through VS Code extensions or integrations.

Examples:

Editor: VS Code
Harness: Copilot extension / Codex extension or CLI integration / Claude extension / OpenCode extension
Model: OpenAI / Claude / Copilot-supported models / OpenRouter-supported models
Context: AGENTS.md / CLAUDE.md / repo docs / prompts

This setup works well for me because I still want to see the code clearly. I like reviewing changes in the editor, understanding the file structure, and staying close to the diff. Maybe that is old-fashioned, but for larger projects it helps me avoid blindly accepting agent output.

The cost benefit comes from keeping VS Code constant while changing the harness or model depending on the task.

For example:

  • I may use Copilot for quick inline completions.
  • I may use Claude through a VS Code extension for complex reasoning-heavy changes.
  • I may use Codex for agentic repo work.
  • I may use OpenCode when I want more model flexibility.

The key point is that VS Code is not the whole AI coding system. It is the editor. The harness and the model can still vary underneath.

Approach 2: Harness-First Workflow

The second setup is when I work directly inside the harness.

This applies to tools like:

  • Codex CLI
  • Claude Code
  • OpenCode app

In this workflow, there may not be a separate editor involved at every step. The harness becomes the main interface. It inspects files, proposes changes, applies patches, runs tests, and iterates.

Editor: Optional / secondary
Harness: Codex CLI / Claude Code / OpenCode app
Model: Native model for that harness, or configurable provider if supported
Context: AGENTS.md / CLAUDE.md / repo docs / prompts

I use this less for complex projects because I prefer to look at the code and review changes directly in the editor. But it works well for smaller modifications, scripts, quick utilities, and contained tasks where I can verify the output easily.

For small projects, the harness-first approach can be efficient because the agent can inspect files, make changes, run commands, and iterate without needing much manual navigation.

Cost-wise, this also helps because the harness can do local exploration. It can search files, inspect only what matters, and avoid loading unnecessary context.

Approach 3: Harness Plus OpenRouter for Model Flexibility

The third setup is where the harness/model separation becomes most explicit.

Some harnesses can be configured to talk to OpenRouter or other compatible model providers. That means I can keep the same coding workflow but change the model underneath.

Editor: Optional
Harness: Codex CLI / Claude Code / OpenCode
Model: OpenRouter-routed models
Context: AGENTS.md / CLAUDE.md / repo docs / prompts

For example:

Codex CLI harness
|
v
OpenRouter provider
|
v
z-ai/glm-5.2, Claude, Qwen, DeepSeek, etc.

This is useful for experimentation and lower-cost first passes. I do not need every task to use the strongest model. Some tasks are mostly repo search, summarization, simple code generation, or mechanical refactoring. Those are good candidates for cheaper models.

Then, when I need better reasoning, I can move back to a premium model.

That said, I do not personally rely on this approach much for daily coding. It may be stable enough for some workflows, but the interface between a coding harness and a third-party model router can change. Codex, Claude Code, or OpenRouter can update their API behavior, headers, tool-calling assumptions, or model compatibility. If that breaks, the workflow breaks.

So for me, Approach 3 is useful to know and useful for experiments, but it is not my default daily setup.

Using OpenRouter with Codex CLI

Codex can be configured with profiles. That lets the default codex command keep using the normal OpenAI/Codex setup, while a separate command uses OpenRouter.

Create:

~/.codex/openrouter.config.toml

Example config:

model_provider = "openrouter"
model = "z-ai/glm-5.2"
model_reasoning_effort = "medium"
[model_providers.openrouter]
name = "OpenRouter"
base_url = "https://openrouter.ai/api/v1"
env_key = "OPENROUTER_API_KEY"
wire_api = "responses"
http_headers = { "HTTP-Referer" = "https://chatgpt.com/codex", "X-Title" = "Codex" }

Add your OpenRouter key:

echo 'OPENROUTER_API_KEY=your_key_here' >> ~/.codex/.env

Add a shell alias:

alias codex-openrouter='codex --profile openrouter'

Now:

codex

uses the normal Codex/OpenAI setup, while:

codex-openrouter

starts Codex through OpenRouter using the configured model.

Inside Codex, verify the active configuration with:

/status

To use a different OpenRouter model for one run:

codex --profile openrouter -m anthropic/claude-sonnet-4.6

The important point is that I do not have to replace my main setup. I keep the default Codex workflow intact and add OpenRouter as a separate profile.

Claude Code with OpenRouter

At a high level, the idea for Claude Code is similar: configure the harness to talk to an OpenAI-compatible endpoint or route requests through OpenRouter, where supported.

The exact setup depends on how Claude Code exposes provider configuration at that time. This is one reason I treat this approach as experimental rather than my default daily workflow.

The pattern is:

Claude Code harness
|
v
OpenRouter or compatible endpoint
|
v
Selected model

If you use this path, I would treat it as a flexible experiment rather than a guaranteed stable interface. The harness, provider, or model compatibility can change.

How I Think About Model Routing

I do not try to use the cheapest model for everything. That can backfire. A cheap model that creates bad code, misses context, or causes extra cleanup may cost more in time than it saves in tokens.

Instead, I route tasks by risk and complexity.

For example:

TaskModel Strategy
Inline completionsCopilot or editor-native tools
Repo explorationLower-cost model or configurable harness
BoilerplateLower-cost model
Simple refactorStart with lower-cost model
Complex debuggingPremium model
Architecture decisionsPremium model
Final reviewStrongest available model

The pattern is:

Use cheaper models for reversible work. Use stronger models when mistakes are expensive.

That single rule handles most cases.

My Actual Usage Pattern

My own usage looks roughly like this.

Approach 1 is my default for complex projects.

I use VS Code as the editor and switch between harnesses through extensions or integrations. I prefer this because I can inspect code, review diffs, and stay oriented.

Approach 2 is useful for smaller changes.

I use harness-first tools like Codex CLI, Claude Code, or OpenCode for scripts, contained edits, and smaller projects where the blast radius is low.

Approach 3 is mostly experimental for me.

OpenRouter gives useful model flexibility, but I do not depend on it heavily for daily coding because the connection between the harness and the model provider can change.

Where the Savings Come From

The savings are not just from cheaper tokens.

They come from a few habits:

  • keeping project context reusable
  • avoiding repeated explanations
  • using harnesses that can inspect the repo directly
  • starting with cheaper models for low-risk work
  • reserving premium models for hard reasoning
  • avoiding huge chat histories when a fresh session with repo instructions is enough
  • choosing the right harness for the task

The most expensive workflow is often the one where I paste too much context into a chat, ask an unclear question, get a partial answer, then spend more tokens correcting it.

A good harness plus good project context reduces that waste.

What about smaller Models That can run locally?

One more workflow I am watching closely is smaller models that can run locally.

I have tried a few Qwen and DeepSeek models through Ollama. My Mac has 48 GB RAM, so it can run some reasonably capable local models. But for the coding tasks I care about, the quality has not yet been strong enough for me to use them as a primary workflow.

That said, I expect this to improve. Smaller models are getting better, and coding harnesses like OpenCode can make this workflow practical if they integrate cleanly with local runtimes such as Ollama.

If this becomes good enough, the stack could look like this:

Editor: VS Code or optional
Harness: OpenCode
Model: Smaller coding-capable model running through Ollama
Cost: No per-token API cost

That would be a meaningful cost-saving path. It would not be completely free in an absolute sense, because there is still hardware cost, electricity, latency, memory pressure, and quality tradeoff. But the marginal API cost per coding task could be zero.

For now, I see this as promising but not yet my default for serious coding work. I expect that to change as smaller coding models improve.

The Tradeoffs

This setup is not free.

There are tradeoffs:

  • Different harnesses support different features.
  • Some models are better at tool use than others.
  • OpenRouter compatibility can vary by model and API behavior.
  • Cheaper models may need tighter prompts and smaller tasks.
  • Switching tools too often can hurt flow.

So I do not treat this as a rigid system. It is a practical routing strategy.

If a task is important, ambiguous, or risky, I use a stronger model. If a task is routine, exploratory, or easy to verify, I am comfortable using a cheaper model.

Final Thought

My approach to lowering LLM coding cost is not just “use cheaper models.”

It is:

Make the harness portable, make the project context reusable, and make the model replaceable.

Once those layers are separated, I can choose the right level of spend for each coding task.

VS Code can remain my editor. Codex, Claude Code, OpenCode, or Copilot can act as the harness. OpenAI, Anthropic, OpenRouter, or other providers can supply the model.

Over time, smaller models that can run locally may become another important part of this setup. If a model running through Ollama can provide good enough coding quality through a harness like OpenCode, then some workflows could move from lower-cost API models to zero marginal API cost local inference.

That flexibility is what lowers cost without forcing me to give up the benefits of high-quality AI coding tools.

AI Browsers Are Here — My Experience with Perplexity’s Comet

I have been using Perplexity’s Comet browser for the past two weeks, and it has completely changed the way I use browsers 🌐. I’ve been a Chrome user for as long as I can remember, but after trying out Comet for two weeks, I finally made it my default browser ✅.

Comet functions not just as a browser, but also as an AI assistant/agent 🤖 that automates many browser-based tasks. In this blog, I’ll share what AI browsers are, my experiences with Comet, and the use cases where I found it most useful.


❓ What is an AI Browser?

An AI browser integrates an AI agent directly into the browsing experience. This agent is aware of the activity in your tabs 🗂️ and provides recommendations and automations ⚡.

In addition to Comet from Perplexity, there are other AI browsers like Dia, Brave, and Opera. While I haven’t tried them personally, my research suggests that Comet offers much deeper AI integration 🔗.

Compared to ChatGPT’s agent, Comet runs locally on your machine 💻 and can directly control the browser. This makes it more secure 🔒 than agents like ChatGPT, where credentials are sent to external servers.


🌟 Why Did Perplexity Enter the Browser Space?

  • Most of us spend 60–70% of our workday inside browsers 🖥️.
  • Browsers are no longer just for websites; they’re the front door to SaaS apps and even AI IDEs like Replit.
  • By embedding AI into a browser, Perplexity ensures “stickiness” 📌 — you’ll keep coming back.

Building on top of Chromium (open source) was a smart move 🧠, making migration from Chrome relatively easy.


📥 Getting Comet

I joined the waitlist 📝 as soon as it opened. Currently, Comet is available to Max customers ($200/month 💸) and a limited set of Pro users. Luckily, through Airtel, I got access as a Pro subscriber 🎉.

Installed it on my MacBook 🍎, and ran it side-by-side with Chrome for two weeks.


🔄 Migration from Chrome to Comet

The migration experience was mixed:

  • ✅ Extensions came through (though not all worked perfectly).
  • ✅ Some Chrome settings migrated.
  • ❌ Bookmarks didn’t import properly.
  • ❌ Passwords, sessions, cookies, and profiles were not migrated 🔑.
  • ⚠️ Web3 wallets had to be re-imported manually.

💡 Use Cases

The more I used Comet, the more possibilities I discovered. The simplest one? “Summarize this page for me” 📝.

🛒 Shopping

  • Bigbasket
    • Query: Order toor dal (½kg), guava juice (6), almonds (200g), walnuts (200g), cilantro (100g), carrots (½kg).
    • ✅ Comet found them and added to cart. If multiple options exist, it picks randomly unless you specify (“pick cheapest” 💰).
  • Amazon: Show me all sports-related purchases I made last year 🏏
  • Comparison: Find cheapest price for Sony Bravia 55” TV across Amazon & Flipkart 📺

☁️ SaaS

  • GCP Console: Find logs with errors between 6 PM and 10 PM
  • Firebase: Check if anonymous authentication is enabled 🔐
  • YouTube: Show the videos with most views from my subscriptions in last 30 days ▶️
    • It auto-scrolls, gathers stats 📊, and summarizes.
  • Gmail: Find important unanswered emails ✉️
  • Google Calendar: Schedule a 30-min meeting with <X> tomorrow 📅
  • Google Sheets: Create a pivot table 📈 (took retries, but worked).

🌍 Social

  • X (Twitter): Show me which people I follow are from India 🇮🇳
  • LinkedIn: Make a chart of my posts vs. view counts 📊

🔗 Multi-Tool Workflows

  • Amazon.in → List vegan chocolates 🍫 that deliver in 1 day → Export to Google Sheets
  • Flipkart → Find laptops under ₹50,000 💻 with 16GB RAM → Compare specs → Export to Sheets
  • Swiggy → Find vegan restaurants near Indiranagar 🥗 → Filter for 30-min delivery → Export menu highlights to Sheets
  • The Times → Summarize top 3 EV policy articles this month ⚡🚗 → Export to Google Docs

✅ Pros vs ❌ Cons

Pros
✨ Easy migration (based on Chromium)
✨ AI “superpowers” while browsing
✨ No switching between browser ↔ AI agents
✨ Tab grouping & multi-agent parallelism
✨ Can search across multiple tabs 🔍

Cons
⚠️ Partial/inaccurate outputs (AI issue)
⚠️ Slow on complex websites 🐢
⚠️ Weak compared to Chrome in syncing & performance
⚠️ Doc editing in Google Docs is buggy
⚠️ Not available for mobiles 📱
⚠️ Security risks from prompt injection attacks 🛡️


🏁 Final Thoughts

I love the Comet browser for its AI-driven, agentic capabilities 🤖. After two weeks, I switched my default from Chrome to Comet.

I still keep Chrome as backup 🔙 for extensions and performance, but Comet shines in automation and research workflows 🌟.

Security remains a concern ⚠️ — malicious websites could hijack the AI agent — but as Comet integrates with more tools, its superpowers will only grow stronger 💪.

The Rise of CLI-Based AI Coding Agents: Claude code vs Gemini CLI

Introduction

I have been a Cursor user for vibe coding for 3 months. I was very skeptical about using Claude Code and Gemini CLI at first, since I wasn’t comfortable with the idea of using a terminal as an AI agent. But in the last 1–2 months, I’ve been trying them both — and it completely changed my opinion.

In this blog, I’ll share my experiences of using them, my favorite pick between the two, and a comparison of the three broad categories of AI-assisted coding approaches that exist today.


The Three Approaches to AI-Assisted Coding

I see broadly 3 kinds of AI-assisted coding approaches:

  • Chat interface with canvas → ChatGPT, Claude
  • IDE integrated AI tools → Cursor, Windsurf, Replit, Lovable
  • CLI-based AI agent tools → Claude Code, Gemini CLI, Warp
🧑‍💻 Category💬 Chat Interface🛠️ IDE Integrated Assist⚡ CLI-based AI Agent
Where it operatesBrowserStandalone IDE or browser (Cursor uses IDE, Lovable uses browser)Terminal or IDE
Use casePrototyping, small functions, quick answers, “throwaway weekend projects.”Augmenting the core coding loop: writing, refactoring, debugging.Automating workflows: multi-step tasks, system commands, project-wide changes.
Vibe coding stylePure “vibe coding” (conversational prompting).Hybrid of “vibe coding” + “developer assist.”Agentic + autonomous (give AI a goal and let it execute).

For a vibe coder like me, a CLI-based AI agent inside VS Code works perfectly — I get the best of both IDE and terminal with AI agent powers.


My Project: A 2-Way Translator App 🌍

To test these tools, I built a translation application.

When I visited Vietnam a few months back, I noticed cab drivers and restaurants using Google Translate effectively. But one problem stood out: only one device could be used for back-and-forth communication.

So, I decided to build a two-way translation application that solved this problem.

I drafted the following prompt (with ChatGPT’s help):

Global Translator App – MVP Requirements (Web Application)

  • Build a web app that lets two users communicate in real time via text translation.
  • Users connect via QR code or unique ID.
  • Support both text and speech.
  • Translate automatically for seamless conversation.

(Details moved to the appendix 👇)

Pre-requisites:

  • Google Translate API with GCP
  • Firebase backend

Claude Code vs Gemini CLI ⚡

🔎 Feature🤖 Claude Code🌐 Gemini CLI
📍 Location of useStandalone terminal or inside VS Code. In VS Code, Claude Code has IDE context — lets you select code and ask about it.Standalone terminal only. In VS Code, Gemini CLI has no IDE context (though Google offers Gemini Code Assist for IDE, without terminal capability).
💻 Terminal capabilityExcellent — can view files, execute commands, analyze outputs.Limited — shell commands can’t run in foreground, stateless (no persistent cd), no command completion.
⚙️ AI agent capabilityStrong coding performance; required multiple iterations but reliable.Decent, though not as strong as Claude Code.
🧪 Debugging & TestingSuperb. With terminal + MCP integration, I could run unit tests from both terminal and frontend.Limited debugging/testing due to terminal restrictions and weaker MCP tool support.
🔌 MCP integrationVery good. I integrated Playwright (UI automation) + Firebase.Okay. Playwright struggled (e.g., no 2-browser instance support). Firebase worked fine.
💸 Cost & model$20/month plan (Sonnet). Didn’t use Opus ($200/month). Sometimes hit daily quota limits.Free with generous limits (Gemini 2.5 Pro).

Verdict so far: Claude Code > Gemini CLI for most features, especially debugging and testing.
But Gemini CLI’s pricing (free) and generous usage limits are a big plus.

If Google can merge Gemini CLI with Code Assist and improve Playwright integration, it will become a fantastic package. On the other hand, Claude Code really needs a more flexible pricing tier between $20 and $200.


Project Output

  • Translation app built with Claude Code → [Demo link here]
  • Translation app built with Gemini CLI → [Demo link here]

Flow of the app:

  1. User logs in with a username (no auth to keep simple).
  2. Picks language + connects with another user via QR code or username.
  3. Supports both text + voice translation in real time.
  4. Built as a PWA → works on web + mobile.

Debugging & Testing with Claude Code 🔍

This is where Claude Code really shines:

  • Console errors are debugged + fixed automatically.
  • AI agent generates unit test cases, executes them, finds failures, and fixes them.
  • Even frontend integration testing works — thanks to MCP integration:
    • It inspects browser console logs.
    • Takes screenshots to analyze UI/UX issues (!).

I even asked Claude Code to:

  • Make a 90-second demo video of the app.
  • Simulate two users chatting with translations in the app. It worked beautifully.

Demo video created by Claude

Global Translation – User1

Global Translation – User2


Summary ✨

AI-assisted coding has matured tremendously in the last year and is now a top revenue driver among AI apps.

In my first blog on Vibe coding, I complained about limited debugging and testing with the AI coding tools. With these new coding agents, that problem feels largely solved.

Next, I’d love to see AI agents:

  • Do better system design.
  • Produce more modular code.
  • Integrate smoothly with existing codebases.

Between Claude Code and Gemini CLI → Claude Code wins hands down 🏆.
But I’m confident Gemini CLI will close the gap soon.


Appendix

Detailed prompt given for the translation application:

Tech Stack

  • Frontend Framework: React (or a similar modern JavaScript framework like Vue/Angular, but React aligns with future React Native plans)
  • Backend: Firebase (Firestore/Realtime Database for real-time chat, Authentication, Cloud Functions for server-side logic if needed)
  • Translation API: Google Cloud Translation API
  • QR Code: Open-source JavaScript libraries for QR code generation and scanning (e.g., qrcode.react, html5-qrcode)
  • Authentication: Anonymous sign-in (extendable to Gmail sign-in later)
  • Chat History: Local browser storage (e.g., LocalStorage, IndexedDB – no cloud sync for MVP)
  • Encryption: Not required for MVP
  • UI/UX: Simple, intuitive, and modern chat interface inspired by leading web messaging apps (e.g., WhatsApp Web, Telegram Web)
  • Dark Mode: Full support for dark mode from MVP

Core Features (MVP)

  • User Onboarding
    • Anonymous sign-in (no registration required for MVP)
    • Generate a unique user ID and QR code for each user upon entering the app
    • Users can choose and save a unique username, which is validated against a central Firestore database to prevent conflicts.
  • Connection Mechanism
    • QR Code Scanning: Allow users to scan another user’s QR code using their device’s webcam/camera (if available and permission granted).
    • Manual ID Entry: Provide an option to manually enter another user’s unique ID to initiate a chat.
    • Display your own QR code for others to scan.
    • The application remembers the last 5 friends you’ve connected with, allowing for quick selection from a dropdown menu.
  • Progressive Web App (PWA):
    • The application is designed to be installable on mobile and desktop

devices, offering an app-like experience with potential offline capabilities.

  • The layout is optimized to adapt and display correctly across various screen sizes, including iOS and Android mobile browsers.
  • Chat Interface
    • Real-time text chat between two users.
    • Each user selects their preferred language from a dropdown/selector. This language is the language to be used by the friend on the other side. 
    • Messages are automatically translated to the recipient’s language using Google Translate API.
    • Show both original and translated text in the chat bubble.
    • Support for dark mode.
    • Friend Online Status (Basic): It displays whether a friend is currently “Online” or “Offline” (with a “Last seen” timestamp). Note: The “offline” status is not automatically updated on browser close in the current setup.
  • Session Management
    • One-to-one chat sessions.
    • Simple chat history stored locally in the browser.
  • Language Support
    • Initial support for: Hindi, Telugu, Tamil, Kannada, English, and French.
  • Misc
    • A version number is displayed on the screen, making it easy to identify the deployed application version.

Non-Functional Requirements

  • Responsive and intuitive UI/UX, adapting well to different screen sizes (desktop, tablet, mobile browsers).
  • Fast translation and message delivery.
  • Minimal data usage.
  • Accessibility support.
  • Dark mode support.
  • Cross-browser compatibility (Chrome, Firefox, Safari, Edge).

Future Extensions (Post-MVP)

  • Native mobile applications (Android & iOS) using React Native.
  • Gmail sign-in and user profiles.
  • Speech-to-text and text-to-speech for voice communication.
  • Discover nearby users (if feasible for the web, e.g., using WebRTC data channels or location APIs).
  • Group chats.
  • Persistent chat history with cloud sync.
  • End-to-end encryption.
  • Support for additional languages.

🚀 A Guide for B.Tech CS Students to kickstart your AI journey

👋 Introduction

My daughter will be starting her B.Tech in Computer Science at MIT, Manipal this year. As a huge AI proponent, I often share the latest AI trends and tools with my family. When my daughter decided to pursue CS, she asked me several questions about AI, which inspired this blog. I hope this guide helps any student planning to specialize in CS and AI.


📚 Core Fundamentals for CSE Students

Before diving into AI, it’s crucial to master the basics. These are some of the building blocks for everything you’ll do in computer science. Following links will give you an overview of the basics before you deep-dive.


📝 General Advice for Students

In addition to doing your coursework, following tips can help you to be more practically prepared for the industry .

  • Start with Fundamentals: Focus on math, programming, data structures, and algorithms.
  • Build a Portfolio: Work on projects, participate in Kaggle competitions and hackathons, and maintain GitHub repositories.
  • Network: Join AI clubs, attend meetups, and connect with peers and professionals on LinkedIn.
  • Stay Updated: Follow AI news, research, and trends.
  • Internships: Real-world experience is invaluable—seek internships early.

🛠️ Tools to Try Out

Following is just a sample collection at this point of time. The tools change so fast so it’s very important to keep yourself updated with the latest.

  • Chatbots: ChatGPT, Gemini (Try ChatLLM, an aggregator of chatbots and other AI tools collection, its very handy)
  • Vibe Coding: Cursor, Windsurf, Replit, Pythagora (see my earlier blog for more)
  • Image Generation: DALL-E(OpenAI), Midjourney
  • Video Generation: Google Veo
  • ML Platforms: Google AI Studio(Good to experiment with Google AI models), Kaggle(Kaggle competitions are good, good for datasets and notebooks), Hugging Face(Marketplace for models, datasets and easy to share the ML work with others)
  • Automation: Zapier (AI orchestration platform connecting different AI and non-AI tools and platforms)

Note: “Vibe coding” refers to using AI-powered coding environments that help you code faster and more intuitively.


🤖 Exploring AI Domains & Career Paths

Here’s a quick overview of different AI roles, what they do, prerequisites, and how to get started. AI industry is still at its nascent stage, these roles can change as the technology matures.

RoleWhat They DoPrerequisitesHow to Get In
AI ResearcherDevelop new AI models/algorithms, advance the field, publish researchStrong math (linear algebra, stats), deep ML/DL, Python, PyTorch/TensorFlow, research skills, academic writingAdvanced courses (Master’s/PhD), join research labs, open-source, publish papers, attend conferences
ML EngineerBuild, optimize, and deploy ML models in production; manage ML systemsProgramming (Python, C++/Java), ML frameworks, software engineering, cloud (AWS/GCP/Azure), MLOps basicsEnd-to-end ML projects, internships, open-source, learn CI/CD, Docker/Kubernetes, model deployment
Data Engineer/ScientistBuild data pipelines, clean/process data, extract insights, visualize findingsPython, SQL, data wrangling, statistics, data viz, ML basics, big data tools (Spark, Hadoop)Data science/engineering courses, Kaggle, portfolio projects, internships, learn data tools and visualization
AI Application EngineerIntegrate AI models into real-world apps/products; focus on APIs and UXProgramming (Python, JS, etc.), API development, front/back-end, basic ML, UX/UIBuild AI apps, hackathons, internships, learn REST APIs, cloud deployment
AI Security & SafetyEnsure AI systems are secure/safe; address ethical, legal, and risk concernsSecurity fundamentals, cryptography, adversarial ML, AI ethics, risk, regulations, ML basicsCybersecurity/AI ethics courses, CTFs, follow AI safety research, join labs/organizations
AI Product ManagerDefine vision/strategy for AI products; bridge tech and business teamsAI/ML concepts, product management, communication, business acumen, user researchStart as engineer/analyst, PM courses, AI projects, internships, develop leadership/communication
AI Hardware SpecialistDesign/develop hardware/software (GPUs, TPUs, SDKs) for AI training/inferenceECE/CS, digital design, computer architecture, parallel computing, C/C++, CUDA, ML basicsECE/CS courses, hardware internships, FPGA/GPU projects, hardware-software co-design, follow NVIDIA/AMD/Intel

🧑‍💻 AI Basics for Students

Following is just a sample to get started with AI basics.


🤔 How Should College Students Use AI (and How Not To)?

  • Don’t: Use AI chatbots to solve class assignments directly—this can kill creativity and hinder learning.
  • Do: Use AI as a learning tool to explore new ideas, get feedback on completed assignments, and clarify concepts after self-study.
  • Tip: Treat AI as a personalized teacher—seek help only after you’ve tried solving problems yourself.

🔄 Staying Updated with AI

  • Curate Resources: Make a repository of your favorite podcasts, blogs, and YouTube channels.
  • Hands-On Practice: Try new AI tools and work on personal projects.
  • Mix Coding Styles: Combine “vibe coding” (AI-assisted) with traditional coding to strengthen your skills.

💡 Is AI Going to Take My Job?

A typical software engineer spends only 30–40% of their time coding; the rest involves architecture, design, spec reviews, cross-functional discussions, integration testing, and release processes. While AI can assist with coding, these other activities are equally critical and difficult to automate.

Even within coding, engineers must structure code, manage module interactions, choose technologies, debug, test, scale, and deploy—tasks that require human judgment. AI coding tools can boost productivity by 30–40% today, and possibly up to 70% in the next 1–2 years. However, over-reliance on these tools can erode core skills, and poorly organized AI-generated code can become hard to maintain.

There’s no substitute for strong design and coding fundamentals. Use AI tools as an assistant, not a replacement.

Jevons Paradox: If coding becomes much easier and cheaper, we’ll see more coding projects and more coders, not fewer. The demand for skilled engineers will grow as we automate more of the world.

For the next 5–10 years, CS engineers will remain essential. If AI ever surpasses humans in all aspects (AGI), it won’t just be engineers—every profession will be affected.


🌱 Final Thoughts

CS or CS with AI specialization are fields of endless possibility. Stay curious, keep building, and remember: the journey is as important as the destination. Embrace change, focus on fundamentals, and use AI as a tool to amplify your learning and creativity.


Wishing all new B.Tech CS students an exciting and rewarding journey ahead!


Picture with my lovely daughter!

🔍 Debugging Web Apps with Cursor Just Got Smarter: Evaluating Browser Assist Tools

In my previous post, I shared my experience using Vibe coding and highlighted one of the biggest challenges in that workflow: AI coding tools often lack awareness of what’s happening in the browser when you run your app.

This leads to a frustrating dev loop: you’re forced to constantly copy-paste screenshots, console errors, and network logs into your code editor just to help the AI debug your application.

Luckily, there’s a new wave of tools built on the Model Context Protocol (MCP) that bridge this gap. These browser assist tools let your AI-enhanced code editor (like Cursor) directly observe, interact with, and sometimes even control your browser — just like a real user.

Some of these tools go beyond debugging — they can actually drive the browser, making them incredibly useful for UI testing and automation as well.


🧪 Tools I Evaluated

  1. Playwright
  2. Browser MCP
  3. Browser Tools MCP

Each of these plugs into Cursor via MCP and serves a slightly different purpose.


🧠 Architecture Overview

Cursor → MCP → Browser Assist Tool → Browser → Observed by LLM → Cursor responds
  • Cursor uses Model Context Protocol (MCP) to communicate with these tools.
  • The tools interact with the browser — either controlling it or reading logs/events.
  • The data is passed to the LLM, which interprets it and responds inside Cursor.

🧩 Tool Breakdown

1. Playwright + MCP

Developed by Microsoft, Playwright is a full-featured browser automation framework that supports Chromium, Firefox, and WebKit. It works across OS platforms and supports headless execution — making it perfect for automation and CI testing.

When integrated with Cursor via MCP, it becomes a powerful browser control agent.

✅ Installation

"playwright": {
"command": "npx",
"args": ["@playwright/mcp@latest"]
}

🔧 Supported Functions

These functions are exposed by playwright using MCP. playwright has more functionalities than the ones that it exposes to MCP.

  • browser_click, browser_type, browser_navigate
  • browser_take_screenshot, browser_snapshot, browser_pdf_save
  • browser_tab_list, browser_tab_select, browser_tab_close
  • …and many more

💡 Real Use Cases

  • Asked Cursor to debug console errors in my e-commerce app
  • Asked Cursor to test flows like “Add to Cart”, “View Product Details”
  • Used it for:
    • Clicking through workflows
    • Filling out forms
    • Scraping content
    • Capturing screenshots for visual debugging

⚠️ Limitations

  • Doesn’t read network logs or API errors
  • Click interactions does not work reliably with iframes

2. Browser MCP

This is a lightweight adaptation of Playwright, still MCP-compatible, but simpler.

✅ Installation

  • Install Chrome extension (manual or via GitHub release)
  • Cursor config:
"browsermcp": {
"command": "npx",
"args": ["@browsermcp/mcp@latest"]
}

💡 Why It’s Useful

Unlike Playwright, Browser MCP can control your already open browser tab, without launching a new browser instance. This is helpful for debugging apps you’re already running in Chrome.

🔻 Downsides

  • Fewer features than Playwright
  • Better suited for lightweight debugging, not complex automation

3. Browser Tools MCP

This tool focuses entirely on browser introspection and debugging, rather than control.

Think of it as DevTools for your AI.

✅ Installation

  • Install Chrome Extension
  • Start middleware:
npx @agentdeskai/browser-tools-server@latest
  • Cursor config:
"browser-tools": {
"command": "npx",
"args": ["@agentdeskai/browser-tools-mcp@1.2.0"]
}

🛠️ Supported Functions

These are exposed by browsertools using MCP.

  • getConsoleLogs, getConsoleErrors, getNetworkLogs, takeScreenshot
  • runAccessibilityAudit, runPerformanceAudit, runSEOAudit, runNextJSAudit
  • wipeLogs, runDebuggerMode, runBestPracticesAudit

💡 What I Could Do

  • Refresh app and automatically check network + console errors
  • Ask Cursor to analyze latency issues or API failures
  • Run full Lighthouse-style audits on performance and SEO

📊 Comparison: Which One to Use?

Use CaseBest Tool
Browser automation + basic debugging🟢 Playwright
Full DevTools-style debugging🟢 Browser Tools MCP
Debugging current browser tab with minimal setup🟡 Browser MCP

🧠 Final Thoughts

Playwright is phenomenal — not just for browser debugging, but for automation and testing at scale. If it added rich debugging support (like network logs and audits), it could become the one tool to rule them all.

Meanwhile, Browser Tools MCP fills that debugging gap beautifully today, while Browser MCP hits a sweet spot between the two.


🔮 Looking Ahead

I believe browser assist tools will eventually be natively integrated into code assist platforms like Cursor, eliminating the need for users to manually install and configure MCP plugins. In the future, these platforms will likely support a range of built-in agents that work seamlessly across different environments — web, mobile, desktop — and integrate with tools like databases, APIs, and SaaS platforms out of the box.

There’s also a new class of tools like Anthropic’s Computer Use and OpenAI’s Operator, which aim to control not just browsers but the entire computer environment. It feels inevitable that these worlds — browser automation, LLM-powered agents, and full computer control — will start to converge.

Exciting times ahead. ⚡

🚀 One Month with Vibe Coding: Building Real Apps with AI Assistants

Over the past few months, Vibe coding has been gaining serious traction—and I couldn’t resist diving in myself. I’ve been using AI coding assistants for a while, but I wanted to go deeper and really test what these tools can do in a realistic, end-to-end software development project.

So, I spent the last month building a full-featured ecommerce web and mobile app using some of the most talked-about Vibe coding platforms: Cursor, Windsurf, Lovable, Bolt, and Replit. It was a fun and empowering journey—there’s a real sense of accomplishment in being able to build software applications on your own. I also learned that working with the current generation of tools definitely requires a good deal of patience.

In this blog, I’ll walk you through:

  • My experience building and deploying the applications
  • What worked, what didn’t, and what broke halfway 😅
  • How each tool stacks up in terms of usability, flexibility, and reliability
  • Whether tools like these mean we still need software engineers (spoiler: yes—but it’s complicated)
  • Where I think this whole Vibe coding trend is heading next

🌍 Coding Assistant Landscape: Then vs Now

AI coding assistants have come a long way. Here’s a quick look at how things evolved:

⏰ The Old School

  • Classic autocomplete tools like IntelliSense or TabNine helped speed up typing but weren’t context-aware.
  • Low-code/no-code platforms (e.g., Bubble, Wix, Zapier) let users drag and drop components, but required scripting for anything complex.

🧠 The New Era: Vibe Coding

  • Powered by LLMs (Large Language Models)
  • Can write, refactor, debug, and deploy apps using natural language queries
  • Opens the door for non-developers to build apps
  • Empowers developers to skip boilerplate and focus on design, logic, and systems thinking

💡 What is Vibe Coding?

Vibe coding refers to using AI-powered tools to build software via natural language prompts, mixed with lightweight manual coding. It’s all about staying in the flow and letting the assistant do the heavy lifting.

💡 The Experiment

Although I started my career as a developer, I haven’t been actively coding in the last decade. Instead, I’ve focused on architecture, reviews, testing, and product design. That said, I wanted to push these Vibe tools beyond simple demos or prototypes.

So, I picked a moderately complex use case: an Ecommerce application with a web frontend and mobile app, complete with backend, auth, payment, and roles.

✨ Features Implemented

- User authentication (sign-up, login, password reset, Google login)
- Roles: Admin, Seller, Customer
- Admin: manage users, view orders, seller capabilities
- Seller: add products
- Customer: browse catalog, filter/sort, add to cart, checkout
- Order history
- Payment integration with Razorpay

🚀 Tech Stack Used

Frontend: React
Backend: Node.js + Express
Database: MongoDB
Deployment: Vercel / Render / Netlify depending on tool

🏗️ Environments

- Web app
- Mobile app (via Expo)
- Both local and production deployments

🔧 Tool-by-Tool Breakdown

Each tool was tested with the same requirements and judged based on ease of use, flexibility, ability to debug, and ability to deploy real features.

🧪 Cursor

🛠️ Plan: Paid ($20)

💻 Used With: MongoDB Atlas, Render/Vercel for deployment, Claude 3.7 model

Highlights:

  • Full tech stack flexibility
  • Supports both web and mobile
  • Git & database migration support
  • Wrote unit tests and debugged APIs
  • Workflow suits developers

⚠️ Challenges:

  • Terminal tracking is weak
  • Frequent application crashes
  • Manual debugging needed

📦 Artifacts:

Windsurf

🛠️ Plan: Free and Paid version

💻 Used With: Claude 3.7 & Gemini, Vercel/Render for cloud, Cloudinary for images

Highlights:

  • Better terminal/session management
  • Console log debugging is stronger

⚠️ Challenges:

  • Hard to course-correct from incorrect assumptions
  • Hit credit limits fast (Ran out of credits with paid version in 3 days)

📦 Artifacts:


⚡ Bolt

🛠️ Plan: Free

💻 Used With: React + Vite, Supabase, Netlify

Highlights:

  • Blazing fast startup because it runs as web container
  • Fully in-browser

⚠️ Challenges:

  • Can’t run backend services (e.g., Express, MongoDB) because of running as web container
  • Not suitable for full-stack use cases

📦 Artifacts:

  • Incomplete app prototype (Ran out of free credits)

😍 Lovable

🛠️ Plan: Free and then Paid ($20)

💻 Used With: React + Supabase, auto-deploy on Lovable Cloud

Highlights:

  • Very easy to use
  • Seamless production deployment

⚠️ Challenges:

  • Slower code generation speed

📦 Artifacts:

🛠️ Replit

🛠️ Plan: Free

💻 Used With: Ghostwriter AI, browser IDE, MongoDB Atlas

Highlights:

  • Easy to set up
  • Great for fast testing

⚠️ Challenges:

  • Cloud-only with less system-level flexibility
  • Not ideal for large production apps

📦 Artifacts:

  • Did not complete(ran out of free credits)

📊 Tool Comparison Snapshot

FeatureCursorWindsurfReplitLovableBolt
Ease of UseMediumMediumEasyEasyEasy
Dev EnvironmentLocalLocalCloudCloudCloud
Deployment OptionsManualManualBuilt-inBuilt-inManual
Tech Stack FlexibilityHighHighMediumLimitedLimited
Target UsersDevsDevsAllNon-devsNon-devs

🧠 My Take: Cursor gives you the most power; Lovable gives you the most convenience.

❌ What Needs Work

🛠️ Debugging:

Most tools still rely on you reading console logs and piecing things together manually. (My pick: Use Operator framework to understand what’s happening in browser and fix issues automatically)

🐌 Speed:

Long wait times and retries can break the flow.

🧩 Fragility:

Small changes can break other parts of the app. There’s no real “awareness” of architectural dependencies.

📐 Lack of modularity:

Encouraging reusable design and clean code still needs a human architect.

📘 Pro Tips: Making Vibe Coding Work

📋 Define clear requirements

Roles, pages, workflows, error states — lay it all out before prompting.

🧭 Use guardrails (rules/constraints)

Many tools let you enforce language, style, and folder structure.

🎯 Stick to common stacks

React, Node, Python, SQL — that's where LLMs shine.

💡 Use models wisely

Claude 3.7 was the most consistent for me, especially on multi-step flows. Experiment with models and find the best one for your use case.

🧪 Debug like a dev

Logs > terminal > DB traces. Be ready to dive in.

🔄 When stuck, reboot

Sometimes starting fresh saves more time than untangling broken AI logic. Keep regular checkpoints to go back to stable point. 

🧠 Is Software Engineering Dead?

Nope. But it’s definitely shifting.

🧠 What Vibe Coding Does Well:

  • Speeds up boilerplate
  • Empowers solo builders
  • Makes prototyping fast

🚧 What It Still Needs Help With:

  • Scaling apps
  • Clean architectures
  • Advanced debugging
  • Enhancing existing production apps

🧑‍💻 Developers won’t disappear. They’ll evolve. The future engineer:

  • Uses AI to generate & validate code fast
  • Designs smart systems
  • Oversees quality, reusability, and security

💬 “It’s not about coding less. It’s about coding smarter.”


Docker features for handling Container’s death and resurrection

Docker containers provides an isolated sandbox for the containerized program to execute. One-shot containers accomplishes a particular task and stops. Long running containers runs for an indefinite period till it either gets stopped by the user or when the root process inside container crashes. It is necessary to gracefully handle container’s death and to make sure that the Job running as container does not get impacted in an unexpected manner. When containers are run with Swarm orchestration, Swarm monitors the containers health, exit status and the entire lifecycle including upgrade and rollback. This will be a pretty long blog. I did not want to split it since it makes sense to look at this holistically. You can jump to specific sections by clicking on the links below if needed. In this blog, I will cover the following topics with examples:

Handling Signals and exit codes

Continue reading Docker features for handling Container’s death and resurrection

Netconf Python ncclient

In my earlier blogs, I had covered basics of Netconf and Yang and how to use Netconf to configure Cisco devices. Recently, I came across this Python ncclient library that simplifies the configuration/monitoring of Networking devices that supports Netconf. Using ncclient library, we can programmatically configure and monitor devices using Netconf. I also found out that Cisco Openstack Neutron plugin uses ncclient library to program the Nexus switches.

I have used Cisco Nexus 3k switch and Cisco VIRL NXOS switch for the examples in this blog.

In my earlier blog on configuring Cisco Nexus devices using Netconf, I covered the following netconf requests.

  1. “get” request using filter to display configuration.
  2. “edit-config” request to change configuration.
  3. “exec-command” to execute raw CLI requests.

In this blog, I will cover the above same tests using Python ncclient library. Even though the examples below are tried from Python interactive shell, the same can be executed as a Python program as well.

First step is to import the ncclient library and create a connection:

Continue reading Netconf Python ncclient

Arista Eapi and pyeapi

I had covered basics of Arista EoS and vEoS in my previous blog. Arista’s Eapi gives programmatic approach to manage Arista devices. Arista’s Pyeapi Python  library is built on top of Eapi. In this blog, I will cover the following:

  • Eapi
  • Pyeapi library

I have used Arista vEoS for trying out all examples below without needing a physical Arista device. That shows the power of virtual device.

There is lot of similarity between Arista’s Eapi and Cisco’s NXAPI. I covered NXAPI in 1 of my earlier blogs. Arista’s Eapi is equivalent to Cisco’s NXAPI, Arista’s Pyapi library is equivalent to Cisco’s Pycsco library. Arista’s Eapi provides http/https access to the Arista router/switch through which we can send standard CLI commands and the output is received in JSON/XML formatted output. There is no need to do screen scraping with this approach, this makes it devops friendly. Arista’ Pyeapi is available as a github project.

Eapi:

To enable Eapi in Arista device, do “management api http-commands” in config prompt. Following is the output in my Arista vEoS switch:

Continue reading Arista Eapi and pyeapi