Tag Archives: technology

VLAs Are Winning. World Models Will Win.

A perspective from the data layer of humanoid robot training

I recently spent time working on egocentric video data — first-person footage of humans doing everyday things with their hands — and how it could be used to train humanoid robots. It’s a narrow problem, but it forced me to answer a bigger question: what do these models actually need to learn, and why is it so hard to give it to them?

That work pulled me into the two architectures competing to become the brain of the next generation of robots: Vision-Language-Action models and world models. I’m not a researcher in either. But sitting at the data layer gives you a particular vantage point — you see what these models consume, where they’re data-hungry, and where more data stops helping. This post is my read on where the field is heading, from that vantage point.


What Comes After LLMs?

LLMs learned the statistical structure of text. The next wave of AI has to learn the statistical structure of the physical world — how objects move, how forces act, what happens when you push, pour, or grasp. The vehicle for that transition is the humanoid robot.

For sixty years, robotics meant programming a machine to do one thing precisely, in a cage, because it couldn’t adapt to anything outside its parameters. What changed is the same thing that changed everything else: transformers that generalize across modalities, vision-language models that reason jointly over what they see and what they’re told, and compute cheap enough to train at scale. Teaching a robot a task used to be a years-long research project. Companies are now doing it in months.

From LLM to VLM to VLA

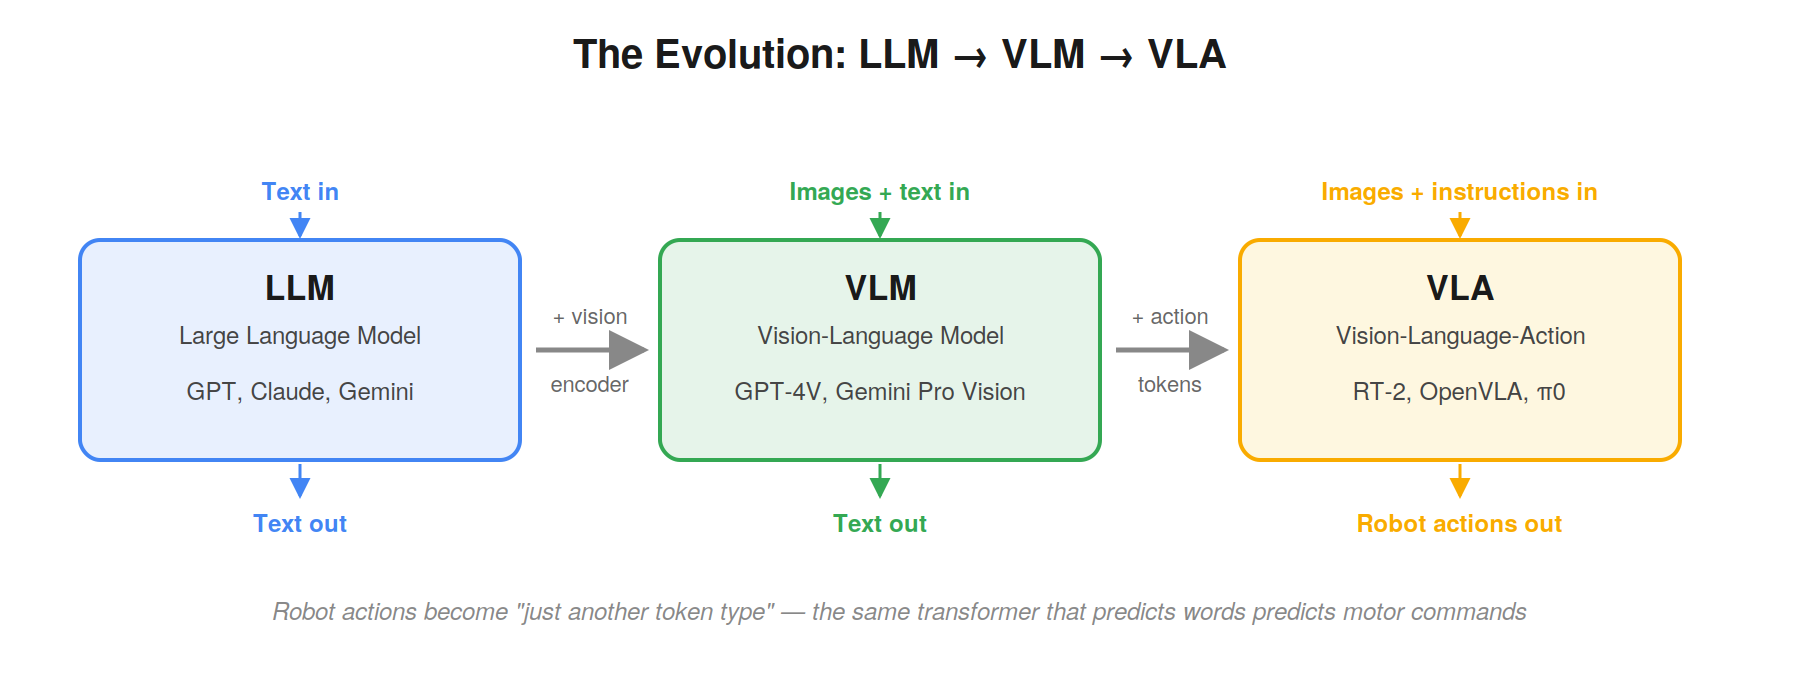
The path to today’s robot brains is a straight line through three architectures:

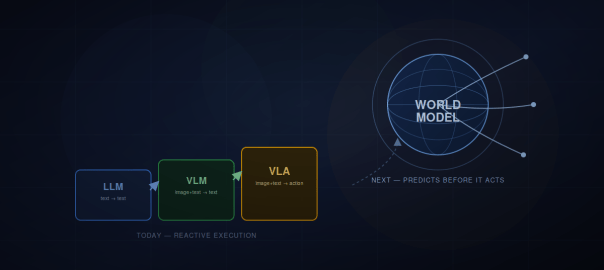
LLM → VLM → VLA

An LLM takes text in and produces text out. A VLM (vision-language model) adds a vision encoder — now the model takes images and text in, and produces text out. It can describe what it sees, answer questions about a scene, reason about spatial relationships.

VLA takes the final step: images and language instructions in, robot actions out. The key insight — first demonstrated at scale by Google’s RT-2 in 2023 — is that robot actions can be treated as just another token type. Discretize continuous motor movements into tokens, and the same transformer that predicts words can predict actions. Everything the model learned from web-scale image data transfers into control: a robot that never saw a banana in its training demonstrations can still pick it up, because it knows what bananas look like from the internet.

The lineage since then: RT-1 proved robotics transformers work at scale (2022), RT-2 brought web-scale generalization (2023), OpenVLA open-sourced the recipe (2024), and Physical Intelligence’s π0 pushed it furthest with diffusion-based action generation (2024).

And the results are genuinely impressive. Physical Intelligence’s demos are the ones that made me stop and pay attention: a robot folding laundry — deformable objects, one of the classically hard problems in manipulation — and clearing a table into a dishwasher. Most striking, doing this in homes it had never seen. That last part matters more than the tasks themselves: the promise of a VLA is precisely that it generalizes to environments outside its training data, the way an LLM answers questions it was never explicitly trained on.

Where VLAs Hit a Wall

But working at the data layer, you start to see the shape of the ceiling. Three failure modes show up consistently:

Long-horizon tasks. Compound errors are brutal: 95% per-step reliability gives you 60% success on a ten-step chain. Folding a shirt is one skill; cooking a meal is a sequence of dozens, and today’s VLAs degrade sharply as the chain grows.

Instruction drift. As a task progresses, irrelevant observations dilute the model’s attention to the original instruction. The robot does things that are locally reasonable but globally wrong — it forgets what it was trying to do.

Generalization limits. The environment generalization is real but shallow. Change the physics of the task — not just the room — and success rates collapse. More demonstrations help less and less.

The common thread: a VLA is fundamentally reactive. It maps what it sees to what it should do next. It has no mechanism for asking “what happens if I do this?” before doing it. And that question, I’ve come to believe, is the whole game.


World Models: Learning to Predict, Not Just React

A world model learns to simulate: given the current state of the world and an action, predict what the world looks like next. Where a VLA asks “what should I do given what I see?”, a world model asks “what will happen if I do this?” — and can plan through imagined futures before committing to real ones.

Yann LeCun has been arguing for this direction longer than almost anyone, and his JEPA architecture is worth understanding because it’s a genuinely different bet from the transformer lineage above.

The obvious way to build a predictive model is to predict the future in pixel space — generate the next video frame. JEPA (Joint Embedding Predictive Architecture) rejects this. Its core idea: most of the pixel-level future is unpredictable and irrelevant. The exact ripple pattern of spilling water, the flutter of a curtain — no model can predict these, and no robot needs to. JEPA instead predicts in representation space: it learns abstract embeddings of world state and predicts how those embeddings evolve. It learns that the glass will fall without simulating every photon of the falling. That’s much closer to how humans model the world — we predict consequences, not video frames. LeCun’s blunt version of the argument: you cannot get to physical intelligence by scaling next-token prediction, because the world is not made of tokens. JEPA is now the foundation of his post-Meta startup, AMI Labs.

Fei-Fei Li’s World Labs comes at it from a different angle: spatial intelligence. Her June 2026 taxonomy splits world models into three functions — renderer (generate visual representations), simulator (model how objects respond to forces), and planner (reason over action sequences). Their product Marble generates persistent, navigable 3D environments: a robot training in one can approach the same shelf from different angles and find the same objects in the same places, because the geometry is consistent rather than regenerated per frame.

NVIDIA’s Cosmos attacks the problem I lived inside: data. Nobody has enough real robot demonstrations. Cosmos uses video world models to generate physically plausible synthetic training data. The model problem and the data problem become the same problem — better world models generate better data, which trains better robots.


The Philosophical Fork

Underneath the company logos, the field has split on one question: where does world understanding live?

The structure camp — LeCun, World Labs, Cosmos — says you must build it explicitly. A separate, inspectable model of how the world works, with policies plugged into it.

The scale camp — Physical Intelligence and the VLA lineage — believes world understanding emerges inside the weights if you train on enough diverse data, the same way LLMs developed reasoning nobody explicitly built. Some researchers claim to find world-model-like internal representations when they probe VLAs. I’m skeptical of how far that goes. A VLA translates observations into motions; nothing in its architecture simulates the world or checks a plan against predicted consequences. Calling that an implicit world model is, for now, the scale camp’s hope more than a demonstrated fact.

Google DeepMind’s Gemini Robotics is the most interesting data point, because it splits the difference architecturally. It pairs two models: Gemini Robotics-ER, an embodied reasoning model that plans multi-step tasks, calls tools, and can pull live context (their demo: sorting trash into bins using recycling rules fetched from the web), and the Gemini Robotics VLA, which turns each planned step into motor commands. To be precise, ER isn’t a world model — it doesn’t simulate physics; in Fei-Fei Li’s taxonomy it’s a planner, not a simulator. But the design concedes the structural point: reactive execution alone isn’t enough, and the reasoning layer has to be explicit and separate.

The open ecosystem is converging the same way. Hugging Face’s LeRobot has become the de facto open toolkit, NVIDIA’s GR00T models are openly available for post-training, and Cosmos integration is bringing world-model-generated synthetic data to teams that can’t collect real data at scale.


My Take: VLAs Are the Present, World Models Are the Future

VLAs work today and will keep improving. For well-defined tasks over short horizons, they’re a real solution now, and the laundry-folding demos aren’t tricks.

But the ceiling is structural, not incremental. Long-horizon planning, genuine generalization, acting safely in novel situations — these require predicting consequences before acting, and a reactive observation-to-action mapping has no place to put that capability. You can’t fine-tune your way to a simulator.

World models have their own hard problems — sim-to-real gaps, compute cost, learning accurate physics from video. But these look to me like engineering problems on the right path, whereas the VLA ceiling looks like the wrong abstraction for the long game.

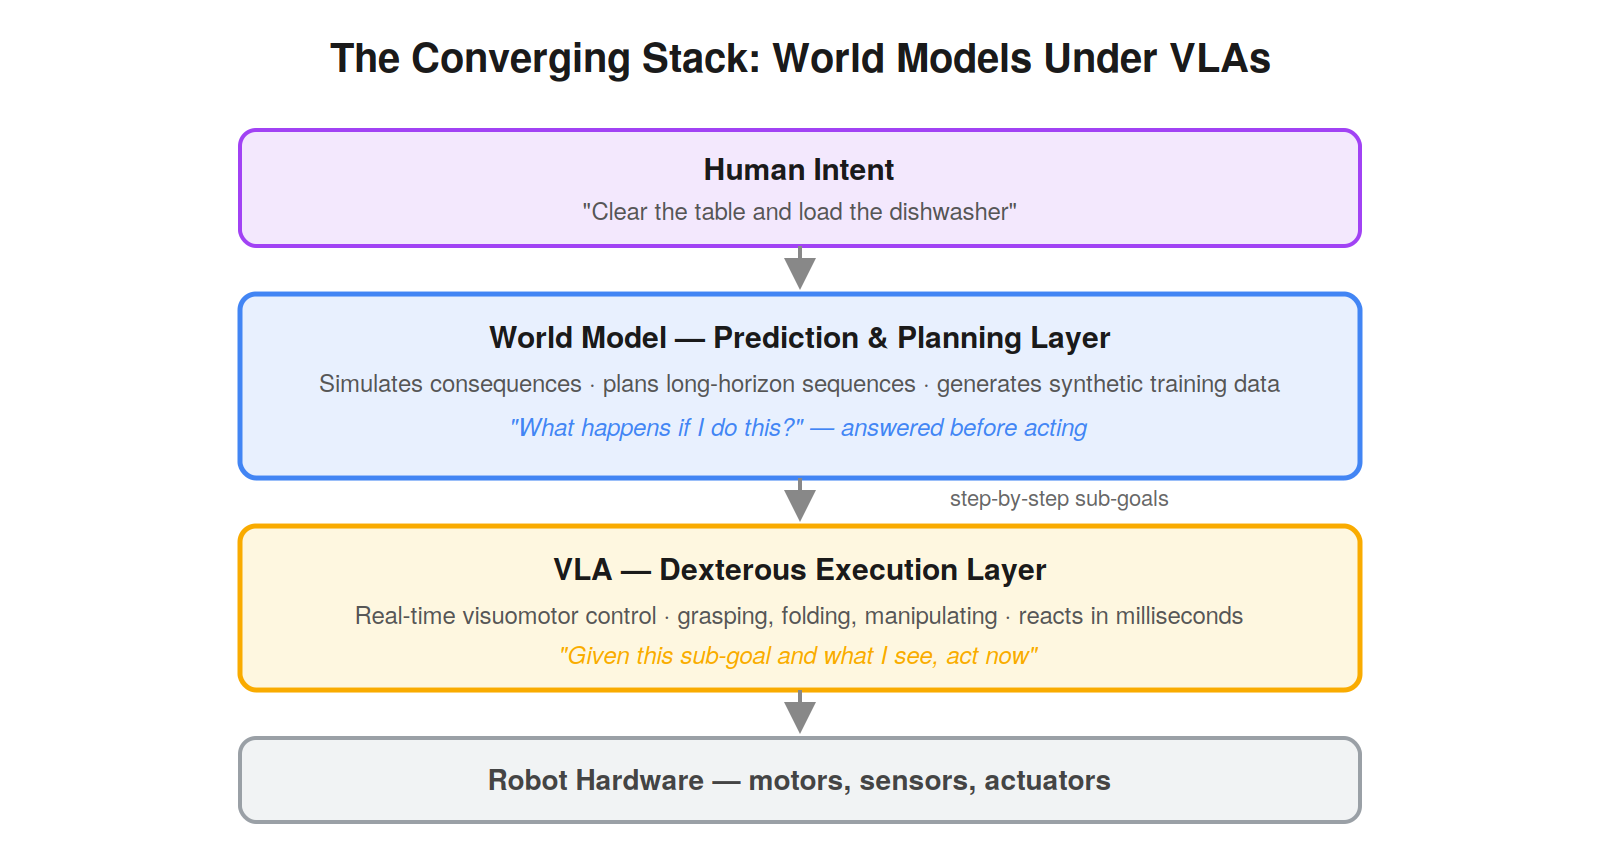
My prediction: world models won’t replace VLAs — they’ll become the layer underneath them. World models handle prediction, planning, and synthetic data generation; VLAs handle dexterous real-time execution. Gemini Robotics’ reasoner-plus-executor split is an early, partial version of this stack, and I expect the rest of the field to converge on it whether or not anyone names it.

Watching what these models need from their training data is what convinced me. VLAs are data-hungry in a way that suggests they’re memorizing behavior rather than understanding the world — and the physical world is too varied to memorize. At some point, a robot has to stop pattern-matching and start predicting.

That’s what world models are built to do. That’s why I think they win.


AI Assistants Have Many Interfaces. Context Is the Real Product.

AI assistants are no longer just chat windows. The same assistant now appears as a web app, desktop app, mobile app, browser extension, IDE extension, command-line tool, local agent, and cloud worker.

That is powerful, but it creates a new problem: deciding which interface to use, and keeping context alive when moving between them.

This post is based mostly on my experience with OpenAI and Anthropic products: ChatGPT, Codex, Claude, Claude Code, and their web, desktop, IDE, CLI, mobile, browser, and cloud interfaces. I also touch briefly on Gemini and browser-extension-style workflows, because they represent another way people are starting to interact with AI.

The question I am interested in is not just which model is better. It is: which interface should I use, when should I use it, and why does context still get lost when I move between them?

The OpenAI Interfaces

InterfaceHow I think about it
ChatGPT webBest for general thinking, writing, research, analysis, and normal assistant workflows.
ChatGPT mobileUseful when I am away from my laptop. Also useful as a controller for connected Codex hosts.
ChatGPT Voice ModeExcellent for brainstorming. It feels like a real-time conversation, not just dictation.
Codex desktop appMy default for local agent work. Best when the task needs local files, terminal commands, browser sessions, or writing changes on my Mac.
Codex VS Code extensionUseful for bigger projects inside the IDE, especially when I want to work across multiple agents or keep the workflow inside one editor.
Codex CLIPowerful for terminal-native workflows, but I do not use it much because I prefer seeing code and diffs visually.
Codex Web / CloudUseful when the repo is on GitHub and I want a small bounded change, PR-style task, or cloud execution without relying on my laptop.

The Codex desktop app is the OpenAI interface I use most for local work. For anything that needs access to local files, local folders, terminal commands, browser sessions, or writing changes on my Mac, the desktop app is my default.

It gives me a practical local agent environment where I can see what is happening, approve actions, inspect changes, and let the assistant work inside my machine.

The Codex VS Code extension is useful when I am already inside the IDE, especially for bigger projects where I want a single editor surface and may work across multiple agents or threads.

The Codex CLI is powerful, but I personally do not use it much. I prefer the feel of seeing the work visually while changes are being made.

The Codex Web / Cloud mode is different. It is useful when the work is already in GitHub and I want to make a small change, run a bounded task, or delegate something in a PR-style workflow.

In this mode I do not need a local workspace, and execution does not happen on my laptop. The assistant works in the cloud against the repository.

That has obvious advantages. If my laptop is not available, or if I want something long-running to continue without depending on my machine staying awake, cloud execution makes sense. It also works well when the task is self-contained and the repository can build and test cleanly in a cloud environment.

But cloud is not a replacement for local work in every case. If the task depends on unpushed local files, local credentials, desktop apps, browser sessions, local databases, or my Mac setup, the desktop app is still more convenient.

The Anthropic Interfaces

InterfaceHow I think about it
Claude webGood for general Claude chat, writing, thinking, analysis, and projects.
Claude mobileUseful for mobile access and remote workflows, but not a full replacement for desktop/project context.
Claude desktop appUseful, but the experience feels split across Chat, Cowork, and Code.
CoworkUseful for local desktop-style tasks, especially for non-technical users, but I do not fully understand why it needs to be separate from Chat.
Claude Code CLIMy main serious Claude coding workflow, especially inside VS Code.
Claude Code in VS CodeUseful when I want Claude close to the code editor.
Claude Code web/cloudGood when I want execution to happen in the cloud rather than on my local machine.
Dispatch / Remote ControlUseful ideas, but they do not feel like one unified control layer yet.
Browser extensions / browser usageUseful, but not the best long-term workflow yet because the integration does not feel smooth enough.

Claude has a similar spread of interfaces, but the experience feels more fragmented to me.

There is Claude web for general chat and projects. There is the Claude mobile app. There is the Claude desktop app, which separates the experience into areas like Chat, Cowork, and Code. There is Claude Code CLI, Claude Code in VS Code, and Claude Code on the web.

For serious coding, my main Claude workflow is Claude Code CLI inside VS Code. That combination feels powerful because I get the capabilities of the CLI while still keeping the editor open and visible.

Claude’s other modes are useful too. Cowork can help with local desktop-style tasks. Claude Code web provides a cloud coding mode when I want the execution to happen away from my machine. Dispatch and Remote Control are useful ideas for sending or steering work from another device.

But the product feels more split. The pieces are good, but I often feel the boundaries between them.

Voice Is Another Interface

One interface I do not want to ignore is voice.

ChatGPT Voice Mode is one of the most useful non-coding interfaces for me. It is especially good for brainstorming. Speaking to the assistant and getting a real-time spoken response feels very different from typing, or even from using a dictation tool.

Tools like Wispr Flow are useful because they let me speak instead of type. But that is still mostly a better input method for a text conversation. It is not the same as a real-time voice conversation.

ChatGPT Voice Mode feels closer to a true conversational interface. It feels less like “generate text, then read the text aloud,” and more like a direct voice interaction.

Claude also has voice capabilities, but in my usage it does not feel as natural as ChatGPT Voice Mode. It feels more like speech-to-text followed by a spoken response. That may not be the exact implementation, but from a user experience standpoint the difference is noticeable. The delay and response style make it less useful for live brainstorming.

I would also like to see this kind of voice experience inside the Codex app. If I am already working in a local agent workspace, being able to brainstorm with Codex by voice would be very useful. I may not want voice for every coding task, but for planning, debugging, architectural discussion, and reviewing tradeoffs, it would be a natural interface.

Mobile As A Controller Interface

Another interface that I find useful is ChatGPT mobile as a controller for Codex.

From the ChatGPT mobile app, I can connect to Codex running on my Mac or Windows machine and access the projects and threads available on that connected host. I can continue work, send follow-up instructions, approve actions, and review results from my phone.

That is a powerful pattern. The phone is not trying to become the full development environment. It is controlling the Codex environment already running on my machine.

As long as that host is awake, online, paired, and signed in, I can continue threads, approve actions, and inspect results. The permissions still belong to the host-side Codex session.

This is different from Codex Web, where the work happens in the cloud against GitHub. Both are useful, but they solve different problems.

Claude has related ideas through Dispatch and Remote Control, but it does not feel the same to me. Dispatch is more like sending work from mobile to desktop. Remote Control is useful for steering a running Claude Code session. But the experience still feels more split between Claude mobile, Claude desktop, Claude Code, Cowork, and Claude Code web.

What I would like is a more unified control layer: mobile, web, desktop, local machines, and cloud environments should feel like different surfaces over the same underlying work context.

Local vs Cloud

The way I think about local and cloud is simple.

Use local when the machine matters.

Use cloud when the shared repository or online workspace is the source of truth.

Local is better when I need my files, my terminal, my browser, my desktop apps, my local setup, or visual feedback. This is why I use the Codex desktop app so much.

Even though it runs with sandboxing and permissions, once I allow the right operations, it can work with my Mac and browser fairly smoothly. Compared with some other local agent experiences, this makes Codex feel more convenient for my daily workflow.

Cloud is better when the task is centered around a shared online source such as GitHub. If the code is pushed, the task is bounded, and the assistant can work in a clean environment, cloud agents are very useful.

They are especially good for small fixes, dependency updates, tests, review follow-ups, PR-style tasks, and background work that should not depend on my laptop staying awake.

The hybrid model is probably the most realistic. I may explore and develop locally, push a branch, then ask a cloud agent to do a bounded follow-up. Or I may use cloud for a small GitHub change while continuing deeper work locally.

The key is discipline: local and cloud workflows work best when the shared source of truth is clean and the assistant is given a clear task.

My Current Workflow

My personal workflow today is roughly this.

For OpenAI, I mostly use the Codex desktop app when the task needs local access or local file changes. It gives me the best balance of visibility, control, and convenience.

For bigger projects inside the editor, I use the Codex VS Code extension, especially when I want to work across multiple agents or keep the whole workflow inside one IDE.

I use Codex Web / Cloud selectively. If something is already on GitHub and I want a small change or a bounded task, it is a good fit. I do not use it as my main development environment, but I see the value clearly.

For general thinking, writing, research, and brainstorming, I use ChatGPT web, mobile, and Voice Mode. Those are still very useful interfaces. But they are separate from the local Codex app context, and that separation matters.

For Claude, I primarily use Claude Code CLI inside VS Code for bigger coding projects. That feels like the strongest Claude coding workflow for me right now.

I also use browser-based tools across Claude, Gemini, and Codex-style workflows, but I see room for improvement there. The browser is important, but the current extension-style experience does not yet feel like the final form.

What OpenAI Gets Right

What I like about Codex is that it feels like a unified local agent workspace.

In the Codex desktop app, I can ask questions about the project, inspect files, make changes, run commands, review diffs, manage threads, and use local browser/computer tools from one place. That reduces the number of decisions I have to make before starting work.

The local desktop app is especially useful because it works with my actual machine. It is sandboxed, and permissions still matter, but once I approve the right operations, it can interact with my Mac and browser smoothly enough for real work.

ChatGPT mobile controlling connected Codex projects is also a strong pattern. It shows what a good cross-device AI interface can look like. The mobile app becomes a control surface over the environment where the work is actually happening.

ChatGPT Voice Mode is another strong interface. For brainstorming, it is one of the best ways to interact with an AI assistant.

What Anthropic Gets Right

Claude Code CLI is very strong. Used inside VS Code, it gives me a powerful workflow while still letting me see the project in the editor. For bigger projects, this works well.

Claude also has powerful separate modes. Chat, Cowork, Code, CLI, web, mobile, Dispatch, Remote Control, and IDE integration all have a reason to exist. The pieces are good.

Claude Code web/cloud is useful when I want execution to happen in the cloud rather than on my machine. Dispatch and Remote Control are also interesting because they recognize that users want to start or steer work from different devices.

What I Would Like To See Improved In Claude

My issue with Claude is not capability. It is product shape.

As a user, I would prefer one universal Claude experience where chat, cowork, and code feel like modes of the same workspace rather than separate places.

I can understand Code being a specialized mode because coding has its own environment, tools, permissions, and workflows. But the separation between Chat and Cowork is less obvious to me.

Claude Cowork seems designed to make agentic desktop work easier for non-technical users. That makes sense. Not everyone wants to use a terminal or think in terms of repositories, branches, commands, and diffs.

But if I am chatting with Claude and the discussion turns into a task, why should I need to move into a different mode? Ideally, Cowork would feel like a capability inside the same Claude workspace rather than a separate place. The assistant should be able to move from discussion to action naturally, while still asking for the right permissions when it needs to touch files, apps, or the computer.

I would also like Claude’s voice experience to feel more natural for live brainstorming. In my usage, ChatGPT Voice Mode feels closer to a real-time conversation, while Claude voice feels more like speech-to-text followed by a spoken response.

Where The Interfaces Still Break Down

The issue is not that there are many interfaces. Different interfaces are useful for different jobs.

Voice is good for brainstorming. Desktop is good for local work. IDE is good for deep project work. Cloud is good for background execution. Mobile is good for steering work.

The problem is that the context does not always travel with me.

A few examples:

ChatGPT voice to Codex

If I brainstorm an idea in ChatGPT Voice Mode on mobile or web, that conversation does not naturally appear inside the Codex desktop app. If the brainstorming leads to an implementation task, I need to manually restate the context in Codex.

Codex desktop to ChatGPT mobile

This works better. If Codex is running on my Mac and the machine is awake, online, paired, and signed in, I can access those Codex projects and threads from ChatGPT mobile. This is one of the best examples of a useful cross-device AI interface.

Codex desktop to ChatGPT web

This is where the continuity feels incomplete. I can control connected Codex hosts from ChatGPT mobile, but I do not get the same connected-host control surface from ChatGPT web. Since I often work from a browser too, I would like the web interface to become another control surface for the same Codex host context.

ChatGPT web or mobile to Codex desktop

The reverse direction is also incomplete. General ChatGPT conversations, projects, and voice brainstorms do not automatically become available as working context inside Codex. That matters because many tasks start as thinking or planning before they become implementation.

Claude Chat, Cowork, and Code

In Claude, the fragmentation feels different. Claude has Chat, Cowork, Code, Claude Code CLI, Claude Code web, mobile, Dispatch, and Remote Control. Dispatch is useful because I can send work from mobile to desktop, and Remote Control is useful for steering a session. But it does not feel like one shared workspace where the same context naturally follows me across Claude web, desktop, mobile, and Code.

Claude Code local vs cloud

Claude Code has both local and cloud-style workflows. Local Claude Code is useful when I want the work to happen inside my own machine or IDE. Claude Code web/cloud is useful when I want the task to run away from my machine, usually against a GitHub-backed environment.

That separation makes sense technically. Local work and cloud work have different permissions, files, tools, and execution environments. But from a user experience standpoint, I still want the context to move more naturally between them. If I plan something in Claude chat, start work in Claude Code CLI, and later move to Claude Code web, I do not want to reconstruct the whole task manually.

The Real Problem Is Context Continuity

The missing piece is not one universal interface. I actually want multiple interfaces.

What I want is a shared context layer underneath them.

If I brainstorm in voice, I should be able to continue in desktop. If I start work in a local agent, I should be able to inspect it from mobile and web. If I delegate work to the cloud, the result should be easy to pull back into the local or conversational context.

If I switch from Claude web to Claude Code, or from ChatGPT to Codex, I should not have to reconstruct the entire task history manually.

The best current example of this working is ChatGPT mobile controlling Codex projects on a connected machine. That shows the direction I want: mobile is not replacing the desktop environment; it is becoming a control surface for it.

The next step is making that idea more universal across web, desktop, mobile, voice, IDE, local agents, and cloud agents.

At the same time, permissions should remain local to the right environment. I do not want every interface to have every permission. Local files, desktop apps, browser sessions, and computer control should stay tied to the machine where permissions were granted. Cloud work should stay in the cloud. Mobile should control what it is allowed to control.

But the reasoning context, project context, and user intent should travel better across these surfaces.

Where I Think This Is Going

The future of AI tools is not just better models. The models will keep improving, but the interface and context layer may matter just as much.

The winning product will be the one that lets me move between local, cloud, IDE, web, browser, desktop, mobile, and voice without constantly re-explaining what I am doing.

For me, that is the real product: not just the assistant, not just the model, and not just another interface.

The real product is context continuity.

My Multi-Agent Coding Setup to Lower LLM Cost

AI coding tools are now good enough that the question is no longer “Should I use them?” For me, the more useful question is: how do I use them without letting LLM cost grow unnecessarily?

The obvious answer is to use cheaper models. That helps, but it is not the full answer. In practice, the bigger unlock is designing the coding workflow so that I can switch between tools and models without changing the way I work.

My setup is based on separating three things that often get blurred together:

  • Editor: where I view and manually edit code.
  • Harness: the coding agent layer that reads files, edits code, runs commands, applies patches, and manages repo context.
  • Model: the LLM doing the reasoning underneath the harness.

Once these are separated, I can optimize cost more intelligently. I can use premium models when reasoning quality matters, and use lower-cost models for exploration, boilerplate, summarization, first-pass refactors, or less risky changes.

The Architecture

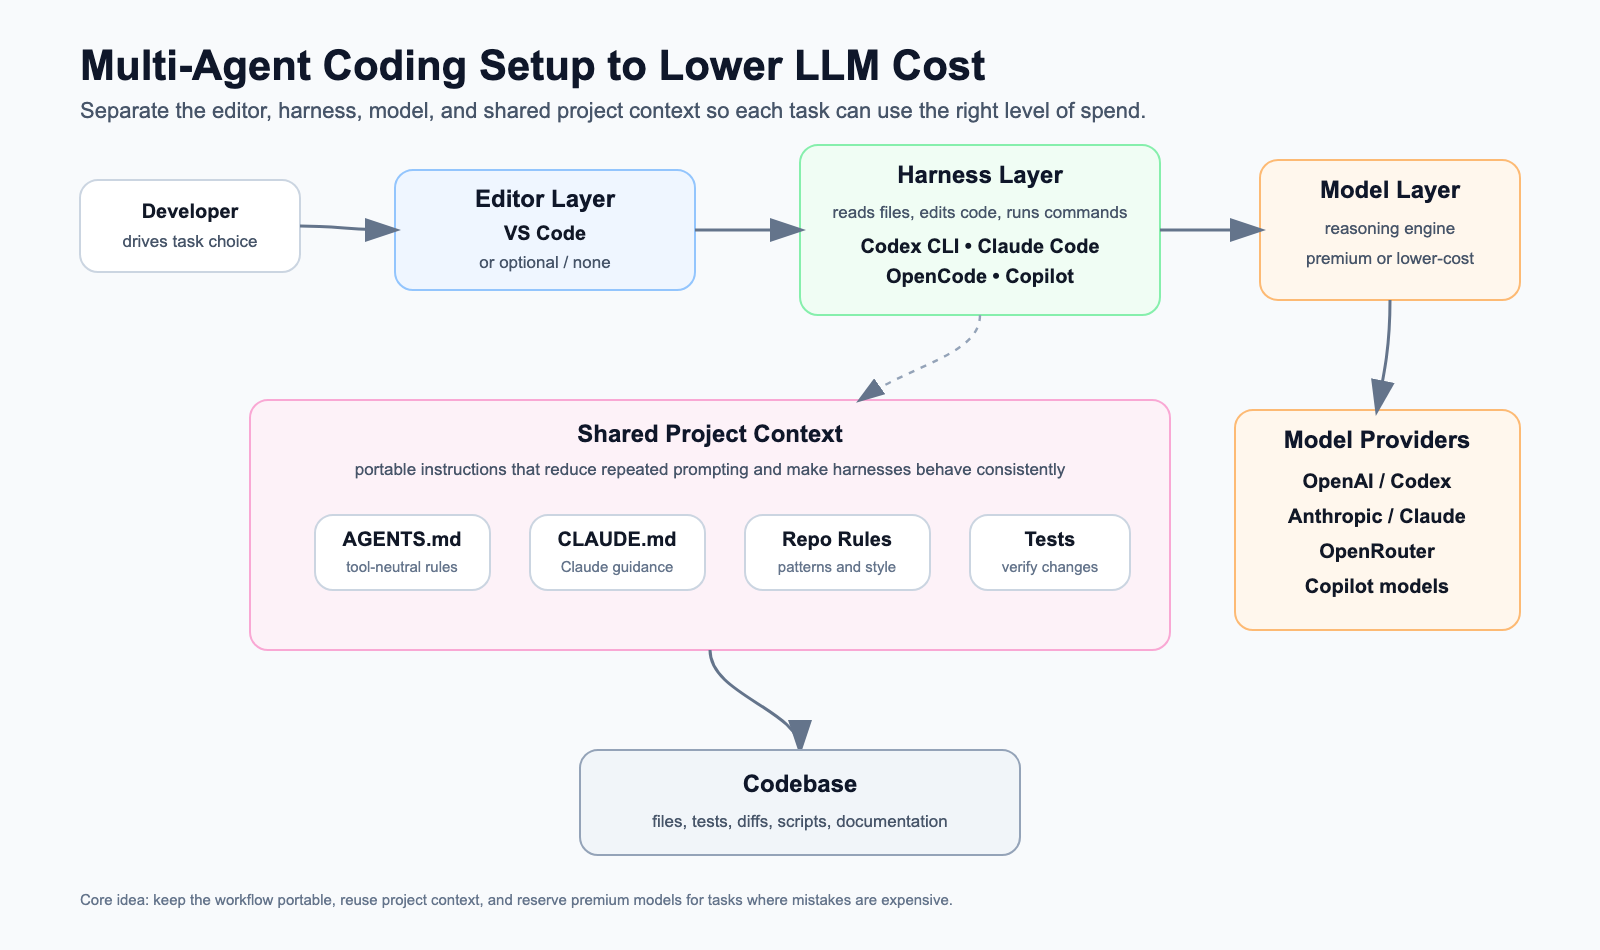
At a high level, my setup looks like this:

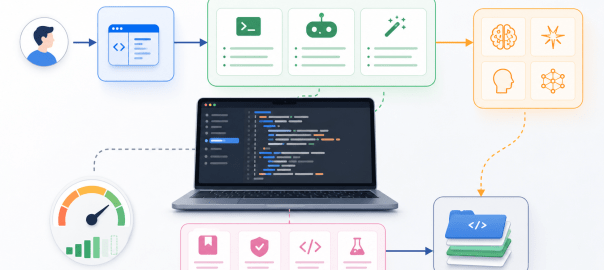
The important part is that the editor, harness, and model are not the same thing.

VS Code is usually my editor. Codex, Claude Code, OpenCode, Copilot, and VS Code extensions are the harness layer or harness-like coding environments. Claude, GPT/Codex models, GLM, Qwen, DeepSeek, and other models are the reasoning engines underneath.

That distinction matters because cost optimization becomes easier when the harness is portable and the model is replaceable.

Shared Project Context

The foundation of the setup is shared project context.

I try to keep repo-specific guidance in files such as:

  • AGENTS.md
  • CLAUDE.md
  • architecture notes
  • test commands
  • coding conventions
  • reusable task prompts

This avoids re-explaining the project every time I switch tools. The goal is simple: if I move from Claude Code to Codex, or from Codex to OpenCode, the new harness should still understand the important repo conventions.

This also saves tokens. Instead of dumping long explanations repeatedly into every chat, I keep durable instructions close to the codebase.

Approach 1: VS Code as Editor, Harnesses Through Extensions

This is the setup I use most often for complex projects.

Here, VS Code is the editor. It is where I read code, navigate files, review diffs, and make manual edits.

The AI harness is usually provided through VS Code extensions or integrations.

Examples:

Editor: VS Code
Harness: Copilot extension / Codex extension or CLI integration / Claude extension / OpenCode extension
Model: OpenAI / Claude / Copilot-supported models / OpenRouter-supported models
Context: AGENTS.md / CLAUDE.md / repo docs / prompts

This setup works well for me because I still want to see the code clearly. I like reviewing changes in the editor, understanding the file structure, and staying close to the diff. Maybe that is old-fashioned, but for larger projects it helps me avoid blindly accepting agent output.

The cost benefit comes from keeping VS Code constant while changing the harness or model depending on the task.

For example:

  • I may use Copilot for quick inline completions.
  • I may use Claude through a VS Code extension for complex reasoning-heavy changes.
  • I may use Codex for agentic repo work.
  • I may use OpenCode when I want more model flexibility.

The key point is that VS Code is not the whole AI coding system. It is the editor. The harness and the model can still vary underneath.

Approach 2: Harness-First Workflow

The second setup is when I work directly inside the harness.

This applies to tools like:

  • Codex CLI
  • Claude Code
  • OpenCode app

In this workflow, there may not be a separate editor involved at every step. The harness becomes the main interface. It inspects files, proposes changes, applies patches, runs tests, and iterates.

Editor: Optional / secondary
Harness: Codex CLI / Claude Code / OpenCode app
Model: Native model for that harness, or configurable provider if supported
Context: AGENTS.md / CLAUDE.md / repo docs / prompts

I use this less for complex projects because I prefer to look at the code and review changes directly in the editor. But it works well for smaller modifications, scripts, quick utilities, and contained tasks where I can verify the output easily.

For small projects, the harness-first approach can be efficient because the agent can inspect files, make changes, run commands, and iterate without needing much manual navigation.

Cost-wise, this also helps because the harness can do local exploration. It can search files, inspect only what matters, and avoid loading unnecessary context.

Approach 3: Harness Plus OpenRouter for Model Flexibility

The third setup is where the harness/model separation becomes most explicit.

Some harnesses can be configured to talk to OpenRouter or other compatible model providers. That means I can keep the same coding workflow but change the model underneath.

Editor: Optional
Harness: Codex CLI / Claude Code / OpenCode
Model: OpenRouter-routed models
Context: AGENTS.md / CLAUDE.md / repo docs / prompts

For example:

Codex CLI harness
|
v
OpenRouter provider
|
v
z-ai/glm-5.2, Claude, Qwen, DeepSeek, etc.

This is useful for experimentation and lower-cost first passes. I do not need every task to use the strongest model. Some tasks are mostly repo search, summarization, simple code generation, or mechanical refactoring. Those are good candidates for cheaper models.

Then, when I need better reasoning, I can move back to a premium model.

That said, I do not personally rely on this approach much for daily coding. It may be stable enough for some workflows, but the interface between a coding harness and a third-party model router can change. Codex, Claude Code, or OpenRouter can update their API behavior, headers, tool-calling assumptions, or model compatibility. If that breaks, the workflow breaks.

So for me, Approach 3 is useful to know and useful for experiments, but it is not my default daily setup.

Using OpenRouter with Codex CLI

Codex can be configured with profiles. That lets the default codex command keep using the normal OpenAI/Codex setup, while a separate command uses OpenRouter.

Create:

~/.codex/openrouter.config.toml

Example config:

model_provider = "openrouter"
model = "z-ai/glm-5.2"
model_reasoning_effort = "medium"
[model_providers.openrouter]
name = "OpenRouter"
base_url = "https://openrouter.ai/api/v1"
env_key = "OPENROUTER_API_KEY"
wire_api = "responses"
http_headers = { "HTTP-Referer" = "https://chatgpt.com/codex", "X-Title" = "Codex" }

Add your OpenRouter key:

echo 'OPENROUTER_API_KEY=your_key_here' >> ~/.codex/.env

Add a shell alias:

alias codex-openrouter='codex --profile openrouter'

Now:

codex

uses the normal Codex/OpenAI setup, while:

codex-openrouter

starts Codex through OpenRouter using the configured model.

Inside Codex, verify the active configuration with:

/status

To use a different OpenRouter model for one run:

codex --profile openrouter -m anthropic/claude-sonnet-4.6

The important point is that I do not have to replace my main setup. I keep the default Codex workflow intact and add OpenRouter as a separate profile.

Claude Code with OpenRouter

At a high level, the idea for Claude Code is similar: configure the harness to talk to an OpenAI-compatible endpoint or route requests through OpenRouter, where supported.

The exact setup depends on how Claude Code exposes provider configuration at that time. This is one reason I treat this approach as experimental rather than my default daily workflow.

The pattern is:

Claude Code harness
|
v
OpenRouter or compatible endpoint
|
v
Selected model

If you use this path, I would treat it as a flexible experiment rather than a guaranteed stable interface. The harness, provider, or model compatibility can change.

How I Think About Model Routing

I do not try to use the cheapest model for everything. That can backfire. A cheap model that creates bad code, misses context, or causes extra cleanup may cost more in time than it saves in tokens.

Instead, I route tasks by risk and complexity.

For example:

TaskModel Strategy
Inline completionsCopilot or editor-native tools
Repo explorationLower-cost model or configurable harness
BoilerplateLower-cost model
Simple refactorStart with lower-cost model
Complex debuggingPremium model
Architecture decisionsPremium model
Final reviewStrongest available model

The pattern is:

Use cheaper models for reversible work. Use stronger models when mistakes are expensive.

That single rule handles most cases.

My Actual Usage Pattern

My own usage looks roughly like this.

Approach 1 is my default for complex projects.

I use VS Code as the editor and switch between harnesses through extensions or integrations. I prefer this because I can inspect code, review diffs, and stay oriented.

Approach 2 is useful for smaller changes.

I use harness-first tools like Codex CLI, Claude Code, or OpenCode for scripts, contained edits, and smaller projects where the blast radius is low.

Approach 3 is mostly experimental for me.

OpenRouter gives useful model flexibility, but I do not depend on it heavily for daily coding because the connection between the harness and the model provider can change.

Where the Savings Come From

The savings are not just from cheaper tokens.

They come from a few habits:

  • keeping project context reusable
  • avoiding repeated explanations
  • using harnesses that can inspect the repo directly
  • starting with cheaper models for low-risk work
  • reserving premium models for hard reasoning
  • avoiding huge chat histories when a fresh session with repo instructions is enough
  • choosing the right harness for the task

The most expensive workflow is often the one where I paste too much context into a chat, ask an unclear question, get a partial answer, then spend more tokens correcting it.

A good harness plus good project context reduces that waste.

What about smaller Models That can run locally?

One more workflow I am watching closely is smaller models that can run locally.

I have tried a few Qwen and DeepSeek models through Ollama. My Mac has 48 GB RAM, so it can run some reasonably capable local models. But for the coding tasks I care about, the quality has not yet been strong enough for me to use them as a primary workflow.

That said, I expect this to improve. Smaller models are getting better, and coding harnesses like OpenCode can make this workflow practical if they integrate cleanly with local runtimes such as Ollama.

If this becomes good enough, the stack could look like this:

Editor: VS Code or optional
Harness: OpenCode
Model: Smaller coding-capable model running through Ollama
Cost: No per-token API cost

That would be a meaningful cost-saving path. It would not be completely free in an absolute sense, because there is still hardware cost, electricity, latency, memory pressure, and quality tradeoff. But the marginal API cost per coding task could be zero.

For now, I see this as promising but not yet my default for serious coding work. I expect that to change as smaller coding models improve.

The Tradeoffs

This setup is not free.

There are tradeoffs:

  • Different harnesses support different features.
  • Some models are better at tool use than others.
  • OpenRouter compatibility can vary by model and API behavior.
  • Cheaper models may need tighter prompts and smaller tasks.
  • Switching tools too often can hurt flow.

So I do not treat this as a rigid system. It is a practical routing strategy.

If a task is important, ambiguous, or risky, I use a stronger model. If a task is routine, exploratory, or easy to verify, I am comfortable using a cheaper model.

Final Thought

My approach to lowering LLM coding cost is not just “use cheaper models.”

It is:

Make the harness portable, make the project context reusable, and make the model replaceable.

Once those layers are separated, I can choose the right level of spend for each coding task.

VS Code can remain my editor. Codex, Claude Code, OpenCode, or Copilot can act as the harness. OpenAI, Anthropic, OpenRouter, or other providers can supply the model.

Over time, smaller models that can run locally may become another important part of this setup. If a model running through Ollama can provide good enough coding quality through a harness like OpenCode, then some workflows could move from lower-cost API models to zero marginal API cost local inference.

That flexibility is what lowers cost without forcing me to give up the benefits of high-quality AI coding tools.

🖥️ Running Local LLMs: Experiments and Insights

✨ Summary

Large Language Models (LLMs) have powered the AI wave of the last 3–4 years. While most are closed-source, a vibrant ecosystem of open-weight and open-source models has emerged.

As a long-time AI user, I wanted to peek under the hood: how do GenAI models work, and what happens when you actually run them locally on your laptop?

In this blog, I’ll cover:

  • How GenAI models are built ⚙️
  • Why local inference matters 🚀
  • My experiments with Qwen, Llama, and GPT-OSS on my Mac 💻

🔄 Hybrid Model Inference

Computing has gone through cycles: centralized → decentralized → hybrid. I believe AI inference is following the same path:

  • Early computing → Mainframes (centralized)
  • PCs/laptops → Decentralized
  • Today → Cloud + Edge (hybrid)

👉 Most model inference currently happens in the cloud (huge infra needed).
👉 But smaller, specialized models now run on edge devices (laptops, even mobiles).

⚠️ Training won’t realistically move to the edge — it’s too compute-heavy and usually a one-time process.
Inference is moving local — it’s repeated, latency-sensitive, and can benefit from privacy/cost savings.


💡 Use Cases of Running Models Locally

  • Reduce latency: Voice assistants, live translation, autonomous vehicles
  • 💰 Reduce cost: Developer workflows, consumer electronics
  • 🌍 Offline use: Remote fieldwork, disaster response
  • 🔒 Privacy: Healthcare, enterprise security
  • 🛠️ Customization: LoRA adapters, RAG integration

🏗️ How GenAI Models Are Created

LLMs typically follow the Transformer architecture and are built in two stages:

  1. Pre-training: Learn general language patterns from massive datasets
  2. Post-training (fine-tuning): Teach task-specific skills (chat, reasoning, coding, etc.)

Result → A model ready for inference.


🧩 What an AI Model Contains

  • Weights: Learned numerical parameters (quantized models = smaller + faster)
  • Tokenizer & Vocabulary: Convert text ↔ tokens
  • Config: Architecture, layer counts, hidden sizes, etc.

🗂️ Common formats: Hugging Face / Transformers, GGUF, ONNX, Apple MLX.


🔁 How Generation Works (Simplified)

  1. Tokenization → Text → tokens
  2. Forward pass → Model processes tokens → probability distribution
  3. Decoding → Pick next token (greedy, sampling, top-k/top-p, etc.)
  4. Loop → Append token → repeat until done
  5. Detokenize → Tokens → final response

📊 Comparing Models

Common Evaluation Axes

  • Technical specs: Parameters, memory, speed, context length
  • Quantitative benchmarks: MMLU (knowledge), ARC (science), HumanEval (coding)
  • Qualitative: Creativity, domain knowledge, licensing

🔍 Open-Weights Model Comparison

I installed these 3 models in my mac, more details on it further down…

FeatureQwen2.5:7B-InstructLlama3:latestGPT-OSS:20B
Model Size7B8B20B
File Size4.7 GB4.7 GB13 GB
Key AdvantageMultilingual (29+), strong structured outputReasoning + code gen optimizedLarge, strong reasoning
Hardware Need8GB+ GPU8GB+ GPU16GB+ GPU
Typical UseMultilingual chat, summarizationGeneral-purpose, coding, creative writingAdvanced reasoning, tool use
LicenseApache 2.0Meta custom (check site)Apache 2.0

🔓 Open Weights vs Open Source models

Often confused! Here’s the difference 👇

ActionOpen SourceOpen Weights
Run inference
Fine-tune (adapters)
Full retraining
Audit code/data
Commercial useUsually allowedOften restricted
RedistributionUsuallyRestricted
Modify & republish

👉 Takeaway: Open weights let you use and adapt, but open source lets you rebuild.


💻 Using Open Weight Models Locally

On my MacBook Pro (32 GB RAM) I installed models using Ollama:

  • Qwen2.5:7B-Instruct
  • Llama3:latest
  • GPT-OSS:20B
ollama list
NAME                   ID              SIZE      MODIFIED    
qwen2.5:7b-instruct    845dbda0ea48    4.7 GB    3 weeks ago    
llama3:latest          365c0bd3c000    4.7 GB    3 weeks ago    
gpt-oss:20b            aa4295ac10c3    13 GB     3 weeks ago   

Install Ollama:

brew install ollama

Download a model:

ollama pull gpt-oss:20b

Run it:

ollama run llama3

…and you can start chatting!


🧪 My Experiments

⚖️ Use Case 1: Local LM Arena

Inspired by lmarena, I built a local version:

  • User query → Sent to multiple models
  • A “judge” model scores responses
  • Models get ranked

Following is a screenshot of the application:

The 2 models compared here are qwen and llama and gpt-oss is grading the response.

💡 Example: Qwen scored 9/10, Llama scored 7/10, as judged by GPT-OSS.


🎛️ Use Case 2: Tuning Model Parameters

I tested how model parameters affect their responses:

ParameterRoleBest Use
TemperatureControls randomness0.1–0.3 → factual, 0.7+ → creative
Top-PRestrict to top probability massLower → focused, Higher → diverse
Top-KConsider top K tokensLow (10–40) → predictable, High (100+) → diverse
Repeat PenaltyDiscourage repetition1.05–1.1 → natural
Stop SequencesCut off responsePrevent drift/hallucination
SeedFix randomnessDebugging / reproducibility

👉 Lowering temperature/top-p/top-k + good prompts = fewer hallucinations.

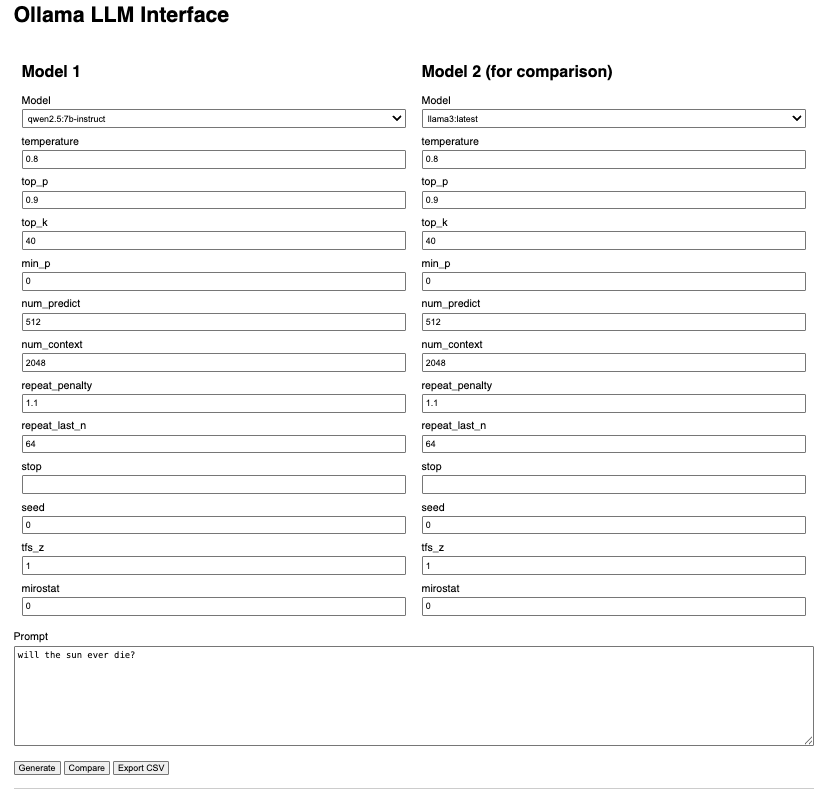
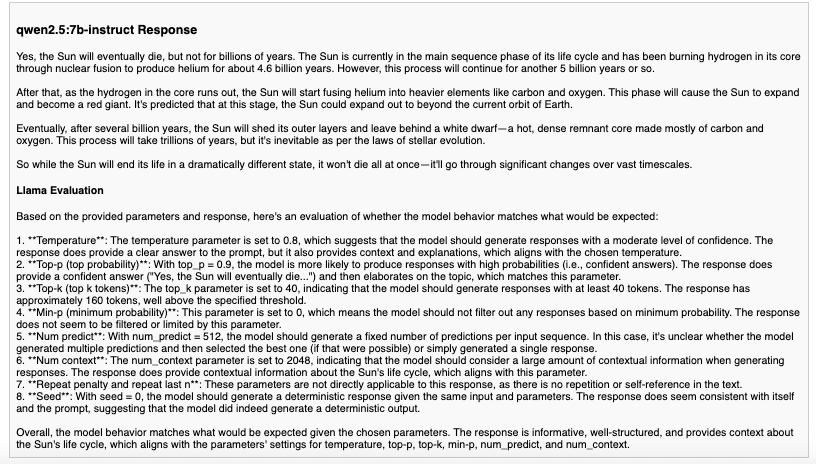
I created an application where we can specify these model input parameters and check how the responses vary. I used another model to evaluate if the responses provided are inline with the model parameters.

I was able to experiment and get the parameter combinations for providing consistent response or for reducing hallucinations. 

Following is a screenshot of the application:


Following is the response evaluation output:


🛠️ Use Case 3: Modifying Base Models

Tried LoRA adapters → freeze base model + insert tiny trainable matrices.
⚠️ Didn’t fully succeed due to library issues, but worth exploring for cheap fine-tuning.


📖 Glossary (Quick Reference)

  • Parameters: Learned weights/biases
  • Tokens: Atomic input/output units
  • Context length: Max tokens a model can process at once
  • Embedding: Numeric vector for tokens/context
  • Transformer: Model architecture with self-attention
  • Pre-training: Large-scale language learning
  • Fine-tuning: Specialization for tasks
  • Quantization: Lower precision → smaller, faster models

🚀 Closing Thoughts

Local LLMs are moving from curiosity to practical tools. With tools like Ollama and LM Studio, you can:

  • Experiment with models directly on your laptop 💻
  • Balance privacy, latency, and cost 🌍
  • Customize outputs for your own use cases 🛠️

And with ongoing advances in quantization and small yet powerful models, local inference is only going to get better.

AI Browsers Are Here — My Experience with Perplexity’s Comet

I have been using Perplexity’s Comet browser for the past two weeks, and it has completely changed the way I use browsers 🌐. I’ve been a Chrome user for as long as I can remember, but after trying out Comet for two weeks, I finally made it my default browser ✅.

Comet functions not just as a browser, but also as an AI assistant/agent 🤖 that automates many browser-based tasks. In this blog, I’ll share what AI browsers are, my experiences with Comet, and the use cases where I found it most useful.


❓ What is an AI Browser?

An AI browser integrates an AI agent directly into the browsing experience. This agent is aware of the activity in your tabs 🗂️ and provides recommendations and automations ⚡.

In addition to Comet from Perplexity, there are other AI browsers like Dia, Brave, and Opera. While I haven’t tried them personally, my research suggests that Comet offers much deeper AI integration 🔗.

Compared to ChatGPT’s agent, Comet runs locally on your machine 💻 and can directly control the browser. This makes it more secure 🔒 than agents like ChatGPT, where credentials are sent to external servers.


🌟 Why Did Perplexity Enter the Browser Space?

  • Most of us spend 60–70% of our workday inside browsers 🖥️.
  • Browsers are no longer just for websites; they’re the front door to SaaS apps and even AI IDEs like Replit.
  • By embedding AI into a browser, Perplexity ensures “stickiness” 📌 — you’ll keep coming back.

Building on top of Chromium (open source) was a smart move 🧠, making migration from Chrome relatively easy.


📥 Getting Comet

I joined the waitlist 📝 as soon as it opened. Currently, Comet is available to Max customers ($200/month 💸) and a limited set of Pro users. Luckily, through Airtel, I got access as a Pro subscriber 🎉.

Installed it on my MacBook 🍎, and ran it side-by-side with Chrome for two weeks.


🔄 Migration from Chrome to Comet

The migration experience was mixed:

  • ✅ Extensions came through (though not all worked perfectly).
  • ✅ Some Chrome settings migrated.
  • ❌ Bookmarks didn’t import properly.
  • ❌ Passwords, sessions, cookies, and profiles were not migrated 🔑.
  • ⚠️ Web3 wallets had to be re-imported manually.

💡 Use Cases

The more I used Comet, the more possibilities I discovered. The simplest one? “Summarize this page for me” 📝.

🛒 Shopping

  • Bigbasket
    • Query: Order toor dal (½kg), guava juice (6), almonds (200g), walnuts (200g), cilantro (100g), carrots (½kg).
    • ✅ Comet found them and added to cart. If multiple options exist, it picks randomly unless you specify (“pick cheapest” 💰).
  • Amazon: Show me all sports-related purchases I made last year 🏏
  • Comparison: Find cheapest price for Sony Bravia 55” TV across Amazon & Flipkart 📺

☁️ SaaS

  • GCP Console: Find logs with errors between 6 PM and 10 PM
  • Firebase: Check if anonymous authentication is enabled 🔐
  • YouTube: Show the videos with most views from my subscriptions in last 30 days ▶️
    • It auto-scrolls, gathers stats 📊, and summarizes.
  • Gmail: Find important unanswered emails ✉️
  • Google Calendar: Schedule a 30-min meeting with <X> tomorrow 📅
  • Google Sheets: Create a pivot table 📈 (took retries, but worked).

🌍 Social

  • X (Twitter): Show me which people I follow are from India 🇮🇳
  • LinkedIn: Make a chart of my posts vs. view counts 📊

🔗 Multi-Tool Workflows

  • Amazon.in → List vegan chocolates 🍫 that deliver in 1 day → Export to Google Sheets
  • Flipkart → Find laptops under ₹50,000 💻 with 16GB RAM → Compare specs → Export to Sheets
  • Swiggy → Find vegan restaurants near Indiranagar 🥗 → Filter for 30-min delivery → Export menu highlights to Sheets
  • The Times → Summarize top 3 EV policy articles this month ⚡🚗 → Export to Google Docs

✅ Pros vs ❌ Cons

Pros
✨ Easy migration (based on Chromium)
✨ AI “superpowers” while browsing
✨ No switching between browser ↔ AI agents
✨ Tab grouping & multi-agent parallelism
✨ Can search across multiple tabs 🔍

Cons
⚠️ Partial/inaccurate outputs (AI issue)
⚠️ Slow on complex websites 🐢
⚠️ Weak compared to Chrome in syncing & performance
⚠️ Doc editing in Google Docs is buggy
⚠️ Not available for mobiles 📱
⚠️ Security risks from prompt injection attacks 🛡️


🏁 Final Thoughts

I love the Comet browser for its AI-driven, agentic capabilities 🤖. After two weeks, I switched my default from Chrome to Comet.

I still keep Chrome as backup 🔙 for extensions and performance, but Comet shines in automation and research workflows 🌟.

Security remains a concern ⚠️ — malicious websites could hijack the AI agent — but as Comet integrates with more tools, its superpowers will only grow stronger 💪.

The Rise of CLI-Based AI Coding Agents: Claude code vs Gemini CLI

Introduction

I have been a Cursor user for vibe coding for 3 months. I was very skeptical about using Claude Code and Gemini CLI at first, since I wasn’t comfortable with the idea of using a terminal as an AI agent. But in the last 1–2 months, I’ve been trying them both — and it completely changed my opinion.

In this blog, I’ll share my experiences of using them, my favorite pick between the two, and a comparison of the three broad categories of AI-assisted coding approaches that exist today.


The Three Approaches to AI-Assisted Coding

I see broadly 3 kinds of AI-assisted coding approaches:

  • Chat interface with canvas → ChatGPT, Claude
  • IDE integrated AI tools → Cursor, Windsurf, Replit, Lovable
  • CLI-based AI agent tools → Claude Code, Gemini CLI, Warp
🧑‍💻 Category💬 Chat Interface🛠️ IDE Integrated Assist⚡ CLI-based AI Agent
Where it operatesBrowserStandalone IDE or browser (Cursor uses IDE, Lovable uses browser)Terminal or IDE
Use casePrototyping, small functions, quick answers, “throwaway weekend projects.”Augmenting the core coding loop: writing, refactoring, debugging.Automating workflows: multi-step tasks, system commands, project-wide changes.
Vibe coding stylePure “vibe coding” (conversational prompting).Hybrid of “vibe coding” + “developer assist.”Agentic + autonomous (give AI a goal and let it execute).

For a vibe coder like me, a CLI-based AI agent inside VS Code works perfectly — I get the best of both IDE and terminal with AI agent powers.


My Project: A 2-Way Translator App 🌍

To test these tools, I built a translation application.

When I visited Vietnam a few months back, I noticed cab drivers and restaurants using Google Translate effectively. But one problem stood out: only one device could be used for back-and-forth communication.

So, I decided to build a two-way translation application that solved this problem.

I drafted the following prompt (with ChatGPT’s help):

Global Translator App – MVP Requirements (Web Application)

  • Build a web app that lets two users communicate in real time via text translation.
  • Users connect via QR code or unique ID.
  • Support both text and speech.
  • Translate automatically for seamless conversation.

(Details moved to the appendix 👇)

Pre-requisites:

  • Google Translate API with GCP
  • Firebase backend

Claude Code vs Gemini CLI ⚡

🔎 Feature🤖 Claude Code🌐 Gemini CLI
📍 Location of useStandalone terminal or inside VS Code. In VS Code, Claude Code has IDE context — lets you select code and ask about it.Standalone terminal only. In VS Code, Gemini CLI has no IDE context (though Google offers Gemini Code Assist for IDE, without terminal capability).
💻 Terminal capabilityExcellent — can view files, execute commands, analyze outputs.Limited — shell commands can’t run in foreground, stateless (no persistent cd), no command completion.
⚙️ AI agent capabilityStrong coding performance; required multiple iterations but reliable.Decent, though not as strong as Claude Code.
🧪 Debugging & TestingSuperb. With terminal + MCP integration, I could run unit tests from both terminal and frontend.Limited debugging/testing due to terminal restrictions and weaker MCP tool support.
🔌 MCP integrationVery good. I integrated Playwright (UI automation) + Firebase.Okay. Playwright struggled (e.g., no 2-browser instance support). Firebase worked fine.
💸 Cost & model$20/month plan (Sonnet). Didn’t use Opus ($200/month). Sometimes hit daily quota limits.Free with generous limits (Gemini 2.5 Pro).

Verdict so far: Claude Code > Gemini CLI for most features, especially debugging and testing.
But Gemini CLI’s pricing (free) and generous usage limits are a big plus.

If Google can merge Gemini CLI with Code Assist and improve Playwright integration, it will become a fantastic package. On the other hand, Claude Code really needs a more flexible pricing tier between $20 and $200.


Project Output

  • Translation app built with Claude Code → [Demo link here]
  • Translation app built with Gemini CLI → [Demo link here]

Flow of the app:

  1. User logs in with a username (no auth to keep simple).
  2. Picks language + connects with another user via QR code or username.
  3. Supports both text + voice translation in real time.
  4. Built as a PWA → works on web + mobile.

Debugging & Testing with Claude Code 🔍

This is where Claude Code really shines:

  • Console errors are debugged + fixed automatically.
  • AI agent generates unit test cases, executes them, finds failures, and fixes them.
  • Even frontend integration testing works — thanks to MCP integration:
    • It inspects browser console logs.
    • Takes screenshots to analyze UI/UX issues (!).

I even asked Claude Code to:

  • Make a 90-second demo video of the app.
  • Simulate two users chatting with translations in the app. It worked beautifully.

Demo video created by Claude

Global Translation – User1

Global Translation – User2


Summary ✨

AI-assisted coding has matured tremendously in the last year and is now a top revenue driver among AI apps.

In my first blog on Vibe coding, I complained about limited debugging and testing with the AI coding tools. With these new coding agents, that problem feels largely solved.

Next, I’d love to see AI agents:

  • Do better system design.
  • Produce more modular code.
  • Integrate smoothly with existing codebases.

Between Claude Code and Gemini CLI → Claude Code wins hands down 🏆.
But I’m confident Gemini CLI will close the gap soon.


Appendix

Detailed prompt given for the translation application:

Tech Stack

  • Frontend Framework: React (or a similar modern JavaScript framework like Vue/Angular, but React aligns with future React Native plans)
  • Backend: Firebase (Firestore/Realtime Database for real-time chat, Authentication, Cloud Functions for server-side logic if needed)
  • Translation API: Google Cloud Translation API
  • QR Code: Open-source JavaScript libraries for QR code generation and scanning (e.g., qrcode.react, html5-qrcode)
  • Authentication: Anonymous sign-in (extendable to Gmail sign-in later)
  • Chat History: Local browser storage (e.g., LocalStorage, IndexedDB – no cloud sync for MVP)
  • Encryption: Not required for MVP
  • UI/UX: Simple, intuitive, and modern chat interface inspired by leading web messaging apps (e.g., WhatsApp Web, Telegram Web)
  • Dark Mode: Full support for dark mode from MVP

Core Features (MVP)

  • User Onboarding
    • Anonymous sign-in (no registration required for MVP)
    • Generate a unique user ID and QR code for each user upon entering the app
    • Users can choose and save a unique username, which is validated against a central Firestore database to prevent conflicts.
  • Connection Mechanism
    • QR Code Scanning: Allow users to scan another user’s QR code using their device’s webcam/camera (if available and permission granted).
    • Manual ID Entry: Provide an option to manually enter another user’s unique ID to initiate a chat.
    • Display your own QR code for others to scan.
    • The application remembers the last 5 friends you’ve connected with, allowing for quick selection from a dropdown menu.
  • Progressive Web App (PWA):
    • The application is designed to be installable on mobile and desktop

devices, offering an app-like experience with potential offline capabilities.

  • The layout is optimized to adapt and display correctly across various screen sizes, including iOS and Android mobile browsers.
  • Chat Interface
    • Real-time text chat between two users.
    • Each user selects their preferred language from a dropdown/selector. This language is the language to be used by the friend on the other side. 
    • Messages are automatically translated to the recipient’s language using Google Translate API.
    • Show both original and translated text in the chat bubble.
    • Support for dark mode.
    • Friend Online Status (Basic): It displays whether a friend is currently “Online” or “Offline” (with a “Last seen” timestamp). Note: The “offline” status is not automatically updated on browser close in the current setup.
  • Session Management
    • One-to-one chat sessions.
    • Simple chat history stored locally in the browser.
  • Language Support
    • Initial support for: Hindi, Telugu, Tamil, Kannada, English, and French.
  • Misc
    • A version number is displayed on the screen, making it easy to identify the deployed application version.

Non-Functional Requirements

  • Responsive and intuitive UI/UX, adapting well to different screen sizes (desktop, tablet, mobile browsers).
  • Fast translation and message delivery.
  • Minimal data usage.
  • Accessibility support.
  • Dark mode support.
  • Cross-browser compatibility (Chrome, Firefox, Safari, Edge).

Future Extensions (Post-MVP)

  • Native mobile applications (Android & iOS) using React Native.
  • Gmail sign-in and user profiles.
  • Speech-to-text and text-to-speech for voice communication.
  • Discover nearby users (if feasible for the web, e.g., using WebRTC data channels or location APIs).
  • Group chats.
  • Persistent chat history with cloud sync.
  • End-to-end encryption.
  • Support for additional languages.

🚀 A Guide for B.Tech CS Students to kickstart your AI journey

👋 Introduction

My daughter will be starting her B.Tech in Computer Science at MIT, Manipal this year. As a huge AI proponent, I often share the latest AI trends and tools with my family. When my daughter decided to pursue CS, she asked me several questions about AI, which inspired this blog. I hope this guide helps any student planning to specialize in CS and AI.


📚 Core Fundamentals for CSE Students

Before diving into AI, it’s crucial to master the basics. These are some of the building blocks for everything you’ll do in computer science. Following links will give you an overview of the basics before you deep-dive.


📝 General Advice for Students

In addition to doing your coursework, following tips can help you to be more practically prepared for the industry .

  • Start with Fundamentals: Focus on math, programming, data structures, and algorithms.
  • Build a Portfolio: Work on projects, participate in Kaggle competitions and hackathons, and maintain GitHub repositories.
  • Network: Join AI clubs, attend meetups, and connect with peers and professionals on LinkedIn.
  • Stay Updated: Follow AI news, research, and trends.
  • Internships: Real-world experience is invaluable—seek internships early.

🛠️ Tools to Try Out

Following is just a sample collection at this point of time. The tools change so fast so it’s very important to keep yourself updated with the latest.

  • Chatbots: ChatGPT, Gemini (Try ChatLLM, an aggregator of chatbots and other AI tools collection, its very handy)
  • Vibe Coding: Cursor, Windsurf, Replit, Pythagora (see my earlier blog for more)
  • Image Generation: DALL-E(OpenAI), Midjourney
  • Video Generation: Google Veo
  • ML Platforms: Google AI Studio(Good to experiment with Google AI models), Kaggle(Kaggle competitions are good, good for datasets and notebooks), Hugging Face(Marketplace for models, datasets and easy to share the ML work with others)
  • Automation: Zapier (AI orchestration platform connecting different AI and non-AI tools and platforms)

Note: “Vibe coding” refers to using AI-powered coding environments that help you code faster and more intuitively.


🤖 Exploring AI Domains & Career Paths

Here’s a quick overview of different AI roles, what they do, prerequisites, and how to get started. AI industry is still at its nascent stage, these roles can change as the technology matures.

RoleWhat They DoPrerequisitesHow to Get In
AI ResearcherDevelop new AI models/algorithms, advance the field, publish researchStrong math (linear algebra, stats), deep ML/DL, Python, PyTorch/TensorFlow, research skills, academic writingAdvanced courses (Master’s/PhD), join research labs, open-source, publish papers, attend conferences
ML EngineerBuild, optimize, and deploy ML models in production; manage ML systemsProgramming (Python, C++/Java), ML frameworks, software engineering, cloud (AWS/GCP/Azure), MLOps basicsEnd-to-end ML projects, internships, open-source, learn CI/CD, Docker/Kubernetes, model deployment
Data Engineer/ScientistBuild data pipelines, clean/process data, extract insights, visualize findingsPython, SQL, data wrangling, statistics, data viz, ML basics, big data tools (Spark, Hadoop)Data science/engineering courses, Kaggle, portfolio projects, internships, learn data tools and visualization
AI Application EngineerIntegrate AI models into real-world apps/products; focus on APIs and UXProgramming (Python, JS, etc.), API development, front/back-end, basic ML, UX/UIBuild AI apps, hackathons, internships, learn REST APIs, cloud deployment
AI Security & SafetyEnsure AI systems are secure/safe; address ethical, legal, and risk concernsSecurity fundamentals, cryptography, adversarial ML, AI ethics, risk, regulations, ML basicsCybersecurity/AI ethics courses, CTFs, follow AI safety research, join labs/organizations
AI Product ManagerDefine vision/strategy for AI products; bridge tech and business teamsAI/ML concepts, product management, communication, business acumen, user researchStart as engineer/analyst, PM courses, AI projects, internships, develop leadership/communication
AI Hardware SpecialistDesign/develop hardware/software (GPUs, TPUs, SDKs) for AI training/inferenceECE/CS, digital design, computer architecture, parallel computing, C/C++, CUDA, ML basicsECE/CS courses, hardware internships, FPGA/GPU projects, hardware-software co-design, follow NVIDIA/AMD/Intel

🧑‍💻 AI Basics for Students

Following is just a sample to get started with AI basics.


🤔 How Should College Students Use AI (and How Not To)?

  • Don’t: Use AI chatbots to solve class assignments directly—this can kill creativity and hinder learning.
  • Do: Use AI as a learning tool to explore new ideas, get feedback on completed assignments, and clarify concepts after self-study.
  • Tip: Treat AI as a personalized teacher—seek help only after you’ve tried solving problems yourself.

🔄 Staying Updated with AI

  • Curate Resources: Make a repository of your favorite podcasts, blogs, and YouTube channels.
  • Hands-On Practice: Try new AI tools and work on personal projects.
  • Mix Coding Styles: Combine “vibe coding” (AI-assisted) with traditional coding to strengthen your skills.

💡 Is AI Going to Take My Job?

A typical software engineer spends only 30–40% of their time coding; the rest involves architecture, design, spec reviews, cross-functional discussions, integration testing, and release processes. While AI can assist with coding, these other activities are equally critical and difficult to automate.

Even within coding, engineers must structure code, manage module interactions, choose technologies, debug, test, scale, and deploy—tasks that require human judgment. AI coding tools can boost productivity by 30–40% today, and possibly up to 70% in the next 1–2 years. However, over-reliance on these tools can erode core skills, and poorly organized AI-generated code can become hard to maintain.

There’s no substitute for strong design and coding fundamentals. Use AI tools as an assistant, not a replacement.

Jevons Paradox: If coding becomes much easier and cheaper, we’ll see more coding projects and more coders, not fewer. The demand for skilled engineers will grow as we automate more of the world.

For the next 5–10 years, CS engineers will remain essential. If AI ever surpasses humans in all aspects (AGI), it won’t just be engineers—every profession will be affected.


🌱 Final Thoughts

CS or CS with AI specialization are fields of endless possibility. Stay curious, keep building, and remember: the journey is as important as the destination. Embrace change, focus on fundamentals, and use AI as a tool to amplify your learning and creativity.


Wishing all new B.Tech CS students an exciting and rewarding journey ahead!


Picture with my lovely daughter!

Are Smart Glasses the Future of AI? My Hands-On Review of Meta AI Glasses

Honestly, I never believed smart glasses would become a mainstream AI form factor—until I bought the Meta Ray-Ban Smart Glasses two weeks ago! 😎 This gadget had been on my wishlist for a while, but it wasn’t available in India, and even if you managed to get one from abroad, the app didn’t work well here. Thankfully, Meta launched these glasses in India a month ago, and you can now buy them online or from certified optical dealers. In this blog, I’ll share my hands-on experience from the past two weeks.

Why Glasses? The Hands-Free Advantage 🙌

The first thing I realized: glasses are a fantastic form factor when you want to go hands-free and avoid constantly reaching for your phone or laptop. Google tried this a decade ago, but the tech just wasn’t ready. (More on Google’s new AI glasses later!)

I mostly use the glasses outdoors—while walking, running, or cycling. Indoors, I didn’t find much need for them.

Design & Comfort 🕶️

The design is sleek and modern, not clunky at all. They look like regular sunglasses, so you won’t stand out in a crowd (unless you want to!). However, after a few hours, they do feel a bit heavy, and I sometimes want to take them off for a break.

Use Cases: Where Smart Glasses Shine ✨

Photos & Videos 📸🎥
The 12MP ultra-wide camera delivers good quality photos and up to 3-minute videos. While it’s not quite smartphone-level, the hands-free capture is a game-changer—especially for impromptu moments or when you’re on the move. There’s even blur compensation to keep your shots clear. Selfies are a bit tricky, but you can always take them by holding the glasses like a phone.

Music, Podcasts & Calls 🎶📞
With 5 microphones and 2 speakers, the audio quality is impressive. The directed audio keeps you aware of your surroundings—crucial for outdoor activities. Personally, listening to music made my uphill cycling sessions much more enjoyable! 🚴‍♂️

The AI Edge: Meta AI in Your Glasses 🤖

The real magic is in the AI. Meta AI uses the latest Llama models, giving you robust speech-to-text and general chatbot capabilities. While Llama isn’t quite at OpenAI’s level, it works well for most queries. The best part? Multimodal capability! You can ask questions about what you’re seeing. For example, I spotted a tree with unique flowers, asked the glasses to identify it, and got an accurate answer. This feature will be super useful when traveling or reading foreign text.

Live Speech Translation 🌍🗣️

Currently, live translation supports French, Spanish, and Italian. It works best if both people have Meta glasses (for two-way translation), but even one-way translation is handy. I tested it with my daughter’s French and while watching a French video—worked well as long as the audio wasn’t too fast.

Cons & Limitations ⚠️

  • The glasses are a bit heavy and feel bulky after extended use.
  • Occasionally, they freeze and need a restart.
  • Battery life is about 3–4 hours—okay for most outings, but longer would be better.

Pro Tips for Buyers 📝

  • If you need prescription lenses, get the AI glasses fitted accordingly (external vendors can help).
  • If you don’t need a prescription, consider transition lenses for both indoor and outdoor use. I use reading glasses, so transition lenses are perfect for me.

Some pictures and videos that I took 📸🎥

Cycling clip

357CE2C1-65CC-41B4-B16C-398939BADBDB
25007A9D-B670-43E6-AA6A-ED4AF2204D09
3419F8F8-2010-4751-AD29-FC3C0A6A8AAE
55AE6054-A2C7-4A54-8928-B127E1113761

Final Thoughts & Google Glasses Comparison 🥽

After seeing Google’s latest demo at I/O, I’m excited for their upcoming glasses, especially with XR and virtual screen features. That could be a game-changer, but it’s likely a year away and pricing is still unknown.

For now, I absolutely love my Meta AI glasses. Priced between ₹29,000–₹35,000, they’re a solid investment for the features you get. I’m convinced glasses will be a major new form factor for AI—though not the only one.


Would I recommend them? Absolutely, if you love trying new tech and want a taste of the future—hands-free! 🚀

AI Security and Safety Ecosystem

The field of artificial intelligence (AI) has seen explosive growth over the past two years, with its potential for future advancements appearing virtually limitless. However, with this rapid expansion comes a growing wave of challenges and risks. From AI-generated scams to deepfakes and data breaches, many people have either directly experienced or heard about the darker side of AI technology. This blog delves into the critical aspects of AI security and safety, exploring the threats posed by AI and the mechanisms we can use to prevent and mitigate them.

This blog will cover the the following AI aspects:

  • AI Security and Safety and their relationship
  • Technology landscape
  • Key trends for the future 
  • Regulations

Security and Safety

AI security focuses on protecting AI systems from external attacks. For example, a hacker might use a prompt injection attack to manipulate the model into producing inappropriate outputs or leaking sensitive personal information (PII). On the other hand, AI safety addresses the prevention of harmful uses of AI systems. An example of a safety concern is a bad actor using AI to create deepfakes for fraudulent purposes.

AI security and safety are closely interconnected, with one often influencing the other. For instance, an AI security breach such as data poisoning—where malicious actors inject harmful data into a model—can undermine the safety of an application using that model. Conversely, an AI safety issue, such as inherent bias in a model, can be exploited by hackers to carry out attacks (e.g., using the model’s bias to impersonate or favor certain groups), thereby creating security vulnerabilities.

AI security summary

AI security builds upon existing cybersecurity practices, with specific enhancements tailored for AI systems. It can be categorized into three fundamental layers:

  1. Usage Security: This layer focuses on securing the interaction between users and AI systems. A common example is a jailbreak attack using prompt injection, where hackers craft malicious prompts to manipulate the model into generating inappropriate outputs or revealing sensitive data.
  2. Application Security: This layer addresses the security of AI applications, including the models themselves. Examples include indirect prompt injections or vulnerabilities in plugins that can compromise application integrity.
  3. Platform Security: This layer involves securing the underlying infrastructure of AI systems. For instance, in a data poisoning attack, malicious actors alter training data to manipulate model outputs. Other examples include model theft, where the intellectual property of AI models is stolen.

AI safety summary

While the prospect of AI surpassing human control is still a distant reality, there are several immediate AI safety concerns that must be addressed to ensure AI is used constructively rather than destructively. AI safety, like AI security, can be categorized into three layers:

  1. Usage Safety: This layer focuses on how AI systems are utilized by end users. Examples include deepfakes, plagiarism, and copyright violations. The proliferation of deepfakes, powered by advanced technologies like Generative Adversarial Networks (GANs), has made it increasingly difficult to distinguish between real and fabricated content, contributing to a negative perception of AI.
  2. Application Safety: This layer addresses safety risks associated with AI applications. Key examples include privacy infringement and bias in AI models, which can lead to discriminatory outcomes and ethical concerns.
  3. Platform Safety: This layer pertains to broader systemic and governance issues in AI deployment. Examples include the absence of regulatory oversight and the risk of cascade failures, where interconnected AI systems amplify small errors into significant failures.

Technologies used for AI security and safety

This is an evolving space that must adapt rapidly to keep pace with the latest AI trends.

  • Usage: For AI security, techniques like input validation and filtering can help ensure that only sanitized data is fed into AI systems. For AI safety, approaches such as moderated outputs, bias auditing, explainable AI, and human-in-the-loop systems play a crucial role in ensuring responsible use.
  • Application: Model watermarking is a valuable AI security measure to prevent model theft. For AI safety, techniques like differential privacy for safeguarding sensitive data and reinforcement learning with human feedback to align AI behavior with ethical standards are widely used.
  • Platform: For AI security, leveraging technologies like blockchain, homomorphic encryption, and trusted execution environments (TEEs) enhances the integrity and confidentiality of AI systems. For AI safety, establishing robust governance frameworks and compliance tools is essential to mitigate risks and ensure ethical deployment.

AI systems require comprehensive monitoring and analysis to remain secure and reliable. Machine Learning Detection and Response (MLDR) uses machine learning to identify real-time threats and provide automated responses, enabling proactive and efficient risk management.

AI Security landscape

The companies provided are not an exhaustive list, it’s just a sample list.

AI safety landscape

The companies provided are not an exhaustive list, it’s just a sample list.

Key Trends for the Future

AI Watermarking


Watermarking is a critical technique for protecting content creators by ensuring ownership of their digital creations and mitigating issues like deep fakes. In the context of AI, two primary techniques are used for watermarking:

  1. Statistical Watermarking:
    This method involves adding imperceptible data to AI-generated content, which can later be detected by specialized tools.
    • Example: For text-based models, specific word substitutions are made based on their probability. In images, certain pixel values are adjusted according to spatial or frequency domain rules.
    • Audio Example: Frequencies beyond human perception are added to sound files.
  2. Machine Learning Watermarking:
    Here, the AI model itself is modified to embed unique markers in its outputs, enabling easy identification of model-generated content.
    • Examples: Neural network-based watermarking, adversarial watermarking.

Challenges include resistance to tampering, ease of detection, and maintaining content quality.
Example in Action: Google SynthID embeds imperceptible watermarks into images produced by its AI models, and Gemini applies this to all GenAI outputs. Huggingface also offers open-source AI watermarking tools.circumvented by users or because users won’t prefer using chatgpt in that case.  

Data Provenance

Data provenance involves tracking the origin and modifications of data. By embedding metadata into content or storing it externally on an immutable ledger like blockchain, we can ensure the integrity of data used in AI training and generation.

  • Applications:
    • Ethical AI training through verified datasets.
    • Preventing copyright violations by ensuring proper attribution.
  • Examples:
    • Adobe Content Credentials and CAI: Adobe products attach provenance metadata to creations, and the CAI open standard enables cross-platform use.
    • Initiatives like C2PA and Data Provenance Initiative aim to standardize these practices.

Explainable AI(XAI)

AI often functions as a “black box,” making it hard to verify if outputs are accurate or hallucinated. XAI bridges this gap by providing transparency and fostering trust.

  • Key Techniques:
    • Interpretable AI Models: Linking AI outputs to specific inputs and reasoning.
    • LIME (Local Interpretable Model-Agnostic Explanations): Offers localized approximations for complex models.
    • SHAP (Shapley Additive Explanations): Uses game theory to assess the contribution of model parameters.

Homomorphic encryption

Homomorphic encryption enables computations on encrypted data without needing decryption, ensuring privacy while processing sensitive information.

  • Examples of Use: Medical data analysis, financial forecasting.
  • Popular Libraries: Microsoft SEAL and Zama’s Concrete.
  • Challenges: Performance overhead and complexity. Innovations are underway to make this technology more efficient.

Additionally, Zero Knowledge Proofs (ZKP) offer privacy-preserving mechanisms, such as proving ownership of a license without revealing personal details like age or ID number.

Blockchain and AI

Blockchain, with its decentralized and immutable ledger, offers transformative benefits for AI in several key areas:

Data Provenance: Blockchain enables the transparent tracing of data inputs used in model training, ensuring the integrity and security of the data. By maintaining a complete history of data modifications on the blockchain, it prevents tampering and builds trust in AI systems. Additionally, contributors of data can be rewarded through smart contracts, fostering ethical and transparent data sharing.

Example: Ocean Protocol facilitates data traceability and monetization in a decentralized manner.

Decentralized and Federated Learning: By distributing data and training processes across multiple nodes, blockchain supports decentralized or federated learning, which enhances data privacy and reduces risks associated with centralized storage.

Example: SingularityNET enables decentralized AI model training while maintaining data security and privacy.

Content Verification and Deep Fake Prevention: Blockchain can be used to track AI-generated content and the data that contributed to it. This traceability ensures accountability and helps combat issues like deep fakes by verifying content authenticity.

Example: Numbers Protocol and Adobe’s Content Authenticity Initiative (CAI) provide solutions for tracking and verifying AI-generated content.

Differential privacy

Differential privacy ensures that AI systems use input data without exposing individual details. By adding noise to data, it minimizes the risk of re-identification.

Adding/removing a single data point does not significantly affect model outputs.

Examples:

Google TensorFlow Privacy incorporates noise to protect sensitive information.

Human in the loop training(HILT) and Reinforced learning with human feedback(RLHF)

HILT integrates human oversight during both training and inference, ensuring models align with user needs.
RLHF fine-tunes models by using human feedback to develop reward systems, enhancing their performance and alignment with human values.

Examples: ChatGPT’s alignment process leverages RLHF for improving responses.

Regulations

AI regulations are still in their early stages, but they are essential for ensuring both the security and safety of AI systems. Effective regulations must strike a delicate balance—minimizing the potential harms of AI while fostering innovation. Different regions have adopted varying approaches to AI governance. For example, the European Union has implemented strict regulatory measures, while countries like the United States and the United Kingdom have opted for a more lenient or flexible approach. To ensure that AI development remains responsible and beneficial, a collaborative effort is required across nations, industries, and organizations. This global cooperation will help establish standardized guidelines and best practices, ensuring AI is developed and deployed safely, ethically, and effectively.

NIST AI risk management framework

The National Institute of Standards and Technology (NIST) has developed an AI Risk Management Framework to guide the design, development, and deployment of trustworthy AI systems. This framework focuses on accuracy, reliability, robustness, privacy, and security of AI systems.

EU AI act

This act classifies AI applications into unacceptable risk, high risk, limited risk, and minimal risk. For example, health care applications have a much higher risk and it has much higher AI regulations. 

References