This blog is a continuation of my previous blog on Vault. In the first blog, I have covered overview of Vault. In this blog, I will cover some Vault use cases that I tried out.
Pre-requisites:
Install and start Vault
I have used Vault 0.6 version for the examples here. Vault can be used either in development or production mode. In development mode, Vault is unsealed by default and secrets are stored only in memory. Vault in production mode needs manual unsealing and supports backends like Consul, S3.
Start Vault server:
Following command starts Vault server in development mode. We need to note down the root key that will be used later.
vault server -dev
As the name suggests, development mode is strictly for trying out Vault.
Enable authentication backends
Here, we enable authentication backends needed for this usecase. “Token” backend is enabled by default. We can enable backends by “vault auth-enable “. Following command lists the enabled authentication backends for the use cases in this blog.
$ vault auth -methods
Path       Type      Default TTL  Max TTL  Description
approle/   approle   system       system
github/    github    system       system
token/     token     system       system   token based credentials
userpass/  userpass  system       system
Enabling secret backends
Next, we enable secret backends needed for this use case. We have enabled “mysql”, other backends are enabled by default. Following command lists the enabled secret backends for the use cases in this blog.
$ vault mounts
Path        Type       Default TTL  Max TTL  Description
cubbyhole/  cubbyhole  n/a          n/a      per-token private secret storage
mysql/      mysql      system       system
secret/     generic    system       system   generic secret storage
sys/        system     n/a          n/a      system endpoints used for control, policy and debugging
Use Cases
Use case 1 – AWS backend
This use case is for getting dynamic AWS IAM access keys. AWS Identity and Access Management (IAM) provides granular access to AWS account based on user and group. AWS allows creation of IAM policy to restrict access to specific AWS resources. AWS IAM credentials being present in configuration file exposes a security risk. Vault allows dynamic creation of AWS IAM credentials with specific lease period so that the application can either revoke the credential after use or Vault will automatically delete the IAM credential after lease expiry.
Following is the workflow:
- Register AWS root credentials with Vault.
- Create IAM policy based on the access needed.
- Create AWS role in Vault with the IAM policy created before.
- Get dynamic AWS IAM credentials using the role created in previous step.
Pre-requisite:
We need to have AWS account to try this. Creating new IAM account does not have AWS charges.
Example:
Following command configures the lease period for AWS IAM dynamic keys.
$ vault write aws/config/lease lease=1200s lease_max=3600s
Success! Data written to: aws/config/lease
In the above command, we have configured lease period as 1200 seconds, this causes secret deletion after 20 minutes.
Following AWS IAM policy allows the user to touch only EC2 resource in AWS.
policy.json:
{
  "Version": "2012-10-17",
  "Statement": [
    {
      "Sid": "Stmt1426528957000",
      "Effect": "Allow",
      "Action": [
        "ec2:*"
      ],
      "Resource": [
        "*"
      ]
    }
  ]
}
Register root AWS key:
vault write aws/config/root \
    access_key=xxx \
    secret_key=xxx
Replace access key and secret key with your own AWS root keys.
Register IAM policy for EC2 access with Vault:
vault write aws/roles/deploy policy=@policy.json
“policy.json” is the file specified in previous step.
Following command shows the dynamic key generation from Vault:
$ vault read aws/creds/deploy
Key            	Value
---            	-----
lease_id       	aws/creds/deploy/c44fb09f-7465-d1e5-bbb1-59291013ac12
lease_duration 	20m0s
lease_renewable	true
access_key     	AKIAJQKLF72XDNV74SIQ
secret_key     	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
security_token
In the above command output, we can see that the lease duration is 20 minutes as we specified in AWS configuration. This key will become invalid after 20 minutes. Using above access and secret key, we can access only AWS EC2 services. We cannot access any other AWS service like S3 with this set of credentials.
If we list IAM users from aws IAM cli (“aws iam list-users”), we can see the new IAM user created by Vault:
    {
            "UserName": "vault-root-deploy-1475168892-6220",
            "Path": "/",
            "CreateDate": "2016-09-29T17:08:14Z",
            "UserId": "AIDAJBH4XTDI3HU5HV5I4",
            "Arn": "arn:aws:iam::173760706945:user/vault-root-deploy-1475168892-6220"
        }
Use case 2 – Passing secrets to Container
One approach to pass secret tokens to Container is by using environment variable. This approach is not secure as environment variables gets logged and this can easily get into the hands of malicious users. Vault provides a new backend called Cubbyhole to overcome this issue.
Following is the workflow for using Cubbyhole backend:
- Enable Cubbyhole secret backend. Vault enables this by default.
- Create temporary token with use count of 2. The use count specifies number of times the specific token can be used.
- Create permanent token.
- Store permanent token in temporary token’s cubbyhole.
- Pass temporary token to container application using environment variable.
- Application reads permanent token from cubbyhole using temporary token. Even if temporary token is read by malicious user later, there is no use for it since the use count for temporary token would have expired. Out of the specified initial use count of 2 for temporary token, first count is used when writing the permanent token and the second count is used when reading the permanent token.
Cubbyhole manual example
Create temporary token as shown below:
$ vault token-create --policy=policy1 --use-limit=4
Key            	Value
---            	-----
token          	a20119a5-7954-8045-e6df-01615adee8ab
token_accessor 	abd78995-788f-6158-a6b0-258b895ae870
token_duration 	720h0m0s
token_renewable	true
token_policies 	[default policy1]
In the above command, we have used use-limit of 4. This means this token would expire after 4 accesses. I have created “policy1″in Vault before-hand.
Create permanent token:
$ vault token-create
Key            	Value
---            	-----
token          	fc8576ef-0d7a-87d8-f2de-ef4ad37c6dd9
token_accessor 	1ea0240f-5512-e10d-645c-91993d860877
token_duration 	0s
token_renewable	false
token_policies 	[root]
Store permanent token in temporary token’s cubbyhole:
$ vault auth 27e83eeb-beef-cdd1-f406-92ba3fb229a7
Successfully authenticated! You are now logged in.
token: 27e83eeb-beef-cdd1-f406-92ba3fb229a7
token_duration: 2591989
token_policies: [default, policy1]
sreeni@ubuntu:~/vault$ vault write cubbyhole/app  app-token=fc8576ef-0d7a-87d8-f2de-ef4ad37c6dd9
Success! Data written to: cubbyhole/app
Retrieve permanent token using temporary token:
$ vault auth 27e83eeb-beef-cdd1-f406-92ba3fb229a7
Successfully authenticated! You are now logged in.
token: 27e83eeb-beef-cdd1-f406-92ba3fb229a7
token_duration: 2591951
token_policies: [default, policy1]
sreeni@ubuntu:~/vault$ vault read cubbyhole/app
Key      	Value
---      	-----
app-token	fc8576ef-0d7a-87d8-f2de-ef4ad37c6dd9
If we do the token read 1 more time, it will fail since token access count is exceeded:
$ vault read cubbyhole/app
Error reading cubbyhole/app: Error making API request.

URL: GET http://127.0.0.1:8200/v1/cubbyhole/app
Code: 403. Errors:

* permission denied
In the above example, I have used use count of 4 since Vault CLI does not allow 1 command to read and authenticate at the same time. First use count is used to authenticate, second is to write the permanent token, third is used to authenticate and fourth is used to read the permanent token.
Cubbyhole Programmatic example
Following example uses programmatic way to use cubbyhole using Ruby APIs. I found this complete example here.
Create temporary token with use count of 2:
temp = deployer_client.auth_token.create({ :ttl => '15s', :num_uses => 2 })[:auth][:client_token]
Create permanent token:
# permanent token can be used any number of times w/ no ttl.
perm = deployer_client.auth_token.create({})[:auth][:client_token]
Store permanent token in cubbyhole using tempoary token:
# using the first use of token #1, store the permanent token in cubbyhole
temp_client = Vault::Client.new(address: vault_address, token: temp)
temp_client.logical.write("cubbyhole/app-token", { :token => perm })
Fetch permanent token using temporary token:
# get the permanent token to use to grab real secrets
app_temp_client = Vault::Client.new(address: vault_address, token: temp)
puts "using temporary token #{temp} to access permanent token"
perm_token = app_temp_client.logical.read("cubbyhole/app-token")[:data][:token]
Cubbyhole wrap response
With Vault 0.6 version, there is a new capability called wrap response where any secret can be wrapped inside a Cubby hole.
Following is an example:
Wrap permanent token:
$ vault token-create --policy=policy1 --wrap-ttl=60s --use-limit=2
Key                          	Value
---                          	-----
wrapping_token:              	8c92f8d9-1035-d135-531e-e44396a560ec
wrapping_token_ttl:          	1m0s
wrapping_token_creation_time:	2016-09-29 09:14:52.462898166 -0700 PDT
wrapped_accessor:            	13cdb1d2-3c6c-6a36-fd19-2fab10d570b9
Unwrap permanent token:
$ vault unwrap 8c92f8d9-1035-d135-531e-e44396a560ec
Key            	Value
---            	-----
token          	1e474c4c-2f11-5c69-043d-473b218022e9
token_accessor 	13cdb1d2-3c6c-6a36-fd19-2fab10d570b9
token_duration 	720h0m0s
token_renewable	true
token_policies 	[default policy1]
In the above command, we have unwrapped using wrapping token. “8c92f8d9-1035-d135-531e-e44396a560ec” is the temporary token and “1e474c4c-2f11-5c69-043d-473b218022e9” is the permanent token.
Use case 3 – Mysql secret access
In this example, we will generate Mysql role based secrets dynamically. Following picture illustrates the flow.
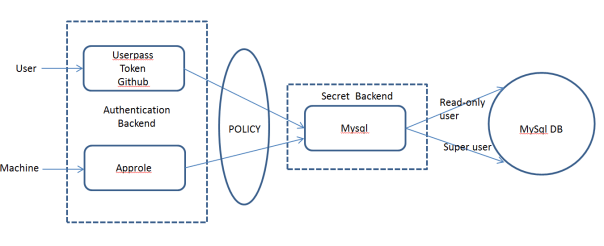
Following are the goals of this use case:
- The application will use Vault to generate username and password with specific roles to access Mysql database. “Readonly” role should be able to only read mysql database entries. “Superuser” role should be able to read and modify mysql database entries.
- mysql user credentials will be generated dynamically with a specific lease time using Vault. The application can destroy the credentials after its use. In case the application does not destroy, Vault will automatically destroy credentials after the lease time expiry of the secret.
- Different authentication backends like userpass, Token, Github and Approle will be used to achieve the same goal of dynamically generating mysql credentials. “mysql” secret backend will be used here.
Example
Start mysql server:
We will start mysql server as Docker container mapping the container port to host port.
docker run --name mysql -p 3306:3306 -e MYSQL_ROOT_PASSWORD=mysql -d mysql:latest
Port 3306 gets exposed on the host machine.
Add mysql credentials to Vault:
Following command sets up the connection to mysql server with username “root” and password “mysql”. The username and password here should match with the root credentials we used when starting mysql server.
vault write mysql/config/connection \
    connection_url="root:mysql@tcp(127.0.0.1:3306)/"
Configure mysql secrets lease duration to 1 hour:
vault write mysql/config/lease \
    lease=1h \
    lease_max=24h
Create roles for mysql access:
In this step, we will associate mysql roles for “readonly” and “modify” policy. “readonly” role is allowed only select access in mysql. “modify” role is allowed all access to the database. Following command creates roles in Vault.
vault write mysql/roles/readonly \
    sql="CREATE USER '{{name}}'@'%' IDENTIFIED BY '{{password}}';GRANT SELECT ON *.* TO '{{name}}'@'%';"
vault write mysql/roles/modify \
    sql="CREATE USER '{{name}}'@'%' IDENTIFIED BY '{{password}}';GRANT ALL ON *.* TO '{{name}}'@'%';"
Create policy for mysql:
Following is the mysql readonly policy “mysqlreadonly.json” that allows read access to “mysql/creds/readonly”.
path "mysql/creds/readonly" {
  policy = "read"
}
Following is the mysql modify policy “mysqlmodify.json” that provides read access to “mysql/creds/modify”.
path "mysql/creds/modify" {
  policy = "read"
}
Write the policy to Vault:
Following set of commands writes the JSON policy specified in previous section to Vault.
vault policy-write mysqlmodify mysqlmodify.json
vault policy-write mysqlreadonly mysqlreadonly.json
Using Token based authentication
In this section, we will use token based authentication scheme to access mysql secrets.
Following 2 commands creates tokens for the 2 types of users:
vault token-create --policy=mysqlmodify
vault token-create --policy=mysqlreadonly
Following output shows the results:
$ vault token-create --policy=mysqlmodify
Key            	Value
---            	-----
token          	92456126-c387-199b-fb51-306eb1eeb921
token_accessor 	e44602ad-397d-e4b4-826a-c540e0e16853
token_duration 	720h0m0s
token_renewable	true
token_policies 	[default mysqlmodify]

$ vault token-create --policy=mysqlreadonly
Key            	Value
---            	-----
token          	778455d8-08a9-6407-4b99-c039f503b377
token_accessor 	c266a977-279f-e12f-d5b5-d17ce9e5cd2b
token_duration 	720h0m0s
token_renewable	true
token_policies 	[default mysqlreadonly]
Lets authenticate using readonly token:
$ vault auth 778455d8-08a9-6407-4b99-c039f503b377
Successfully authenticated! You are now logged in.
token: 778455d8-08a9-6407-4b99-c039f503b377
token_duration: 2591649
token_policies: [default, mysqlreadonly]
Now that we have authenticated, lets get the mysql credentails for readonly user:
$ vault read mysql/creds/readonly
Key            	Value
---            	-----
lease_id       	mysql/creds/readonly/18bfe188-f36b-88d3-d61c-5ca4842265da
lease_duration 	1h0m0s
lease_renewable	true
password       	00ee87a7-a2e8-1959-b94a-56431e6e71cf
username       	read-toke-1e1806
If we try to access credentials for modify user, we wont be able to get it since this user has access to only the readonly credentails.
$ vault read mysql/creds/modify
Error reading mysql/creds/modify: Error making API request.

URL: GET http://127.0.0.1:8200/v1/mysql/creds/modify
Code: 403. Errors:

* permission denied
Now, we can access the mysql database using the mysql client with the above credentials. We can read the database, but we are not able to modify the database as shown below.
$ mysql -h127.0.0.1 -P3306 -uread-toke-1e1806 -p00ee87a7-a2e8-1959-b94a-56431e6e71cf
Warning: Using a password on the command line interface can be insecure.
Welcome to the MySQL monitor.  Commands end with ; or \g.
Your MySQL connection id is 16
Server version: 5.7.15 MySQL Community Server (GPL)

Copyright (c) 2000, 2016, Oracle and/or its affiliates. All rights reserved.

Oracle is a registered trademark of Oracle Corporation and/or its
affiliates. Other names may be trademarks of their respective
owners.

Type 'help;' or '\h' for help. Type '\c' to clear the current input statement.

mysql> show databases;
+--------------------+
| Database           |
+--------------------+
| information_schema |
| alpha              |
| alpha1             |
| mysql              |
| performance_schema |
| sys                |
+--------------------+
6 rows in set (0.01 sec)

mysql> create database alpha2;
ERROR 1044 (42000): Access denied for user 'read-toke-1e1806'@'%' to database 'alpha2'
Now, lets authenticate as “modify” user using the appropriate token:
$ vault auth 92456126-c387-199b-fb51-306eb1eeb921
Successfully authenticated! You are now logged in.
token: 92456126-c387-199b-fb51-306eb1eeb921
token_duration: 2591261
token_policies: [default, mysqlmodify]
Now, lets try to get credentials to modify database.
$ vault read mysql/creds/modify
Key            	Value
---            	-----
lease_id       	mysql/creds/modify/85380045-5951-993c-ef3d-04f9c5b4bbed
lease_duration 	1h0m0s
lease_renewable	true
password       	5e73da55-df7b-ef04-0556-0674fc4c42f8
username       	modi-toke-42e9e3
Lets access the database and try to create a new database. Since we have used “modify” role, we are able to make changes to the database with this username and password.
$ mysql -h127.0.0.1 -P3306 -umodi-toke-42e9e3 -p5e73da55-df7b-ef04-0556-0674fc4c42f8
Warning: Using a password on the command line interface can be insecure.
Welcome to the MySQL monitor.  Commands end with ; or \g.
Your MySQL connection id is 17
Server version: 5.7.15 MySQL Community Server (GPL)

Copyright (c) 2000, 2016, Oracle and/or its affiliates. All rights reserved.

Oracle is a registered trademark of Oracle Corporation and/or its
affiliates. Other names may be trademarks of their respective
owners.

Type 'help;' or '\h' for help. Type '\c' to clear the current input statement.

mysql> show databases;
+--------------------+
| Database           |
+--------------------+
| information_schema |
| alpha              |
| alpha1             |
| mysql              |
| performance_schema |
| sys                |
+--------------------+
6 rows in set (0.00 sec)

mysql> create database alpha2;
Query OK, 1 row affected (0.01 sec)
Lease duration:
We can query the token and we can see that ttl is getting decremented. The “creation_ttl” reflects initial creation duration(720 hrs/2592000 seconds) and the “ttl” reflects pending time(2590930 seconds). The ttl for the token reflects the lease expiry of authentication token.
$ vault token-lookup 778455d8-08a9-6407-4b99-c039f503b377
Key             	Value
---             	-----
accessor        	c266a977-279f-e12f-d5b5-d17ce9e5cd2b
creation_time   	1474217534
creation_ttl    	2592000
display_name    	token
explicit_max_ttl	0
id              	778455d8-08a9-6407-4b99-c039f503b377
meta
num_uses        	0
orphan          	false
path            	auth/token/create
policies        	[default mysqlreadonly]
renewable       	true
ttl             	2590930
There is also a lease period for database authentication credentials. In this example, we have used 1 hour as the lease period. After this period, database credentials will be destroyed.
Destroy tokens and mysql credentials:
After we have accessed the database, we can revoke the secret as well as the token as shown below.
vault revoke mysql/creds/modify/85380045-5951-993c-ef3d-04f9c5b4bbed
vault revoke mysql/creds/readonly/18bfe188-f36b-88d3-d61c-5ca4842265da
vault token-revoke 778455d8-08a9-6407-4b99-c039f503b377
vault token-revoke 92456126-c387-199b-fb51-306eb1eeb921
Userpass authentication
In this approach, we will use Vault authentication using username and password.
Following 2 commands creates “readonlyuser” with “mysqlreadonly” policy and “superuser” with “mysqlmodify” policy:
vault write auth/userpass/users/readonlyuser \
    password=foo \
    policies=mysqlreadonly

vault write auth/userpass/users/superuser \
    password=foo \
    policies=mysqlmodify
Following command and the associated output shows authentication using the “readonlyuser”. We can see that the returned policy is “mysqlreadonly”.
$ vault auth -method=userpass \
>     username=readonlyuser \
>     password=foo
Successfully authenticated! You are now logged in.
The token below is already saved in the session. You do not
need to "vault auth" again with the token.
token: a6f5315a-1e97-fe03-b7e0-24505157b498
token_duration: 2591999
token_policies: [default, mysqlreadonly]
Following command and the associated output shows authentication using the “superuser”. We can see that the returned policy is “mysqlmodify”
$ vault auth -method=userpass \
>     username=superuser \
>     password=foo
Successfully authenticated! You are now logged in.
The token below is already saved in the session. You do not
need to "vault auth" again with the token.
token: 613ac80a-1fa8-7494-5212-182b4b5eadf2
token_duration: 2592000
token_policies: [default, mysqlmodify]
Using Approle authentication approach
In this approach, we will use Vault authentication using Approle.
This authentication approach is mainly used for machines where some machine property like mac address will be used to authenticate.
First step is to create the roles “readonlyuser” and “superuser” and associate with the respective policies.
vault write auth/approle/role/readonlyuser policies=mysqlreadonly
vault write auth/approle/role/superuser policies=mysqlmodify
Nest step is to create roleid for both type of roles:
$ vault read auth/approle/role/readonlyuser/role-id
Key    	Value
---    	-----
role_id	adebbe05-c929-107e-6164-e86e2dc563f7

$ vault read auth/approle/role/superuser/role-id
Key    	Value
---    	-----
role_id	6ec1966c-b00b-b37c-48db-16084bc57f64
We need to get secrets corresponding to the role as shown below.
$ vault write -f auth/approle/role/readonlyuser/secret-id
Key               	Value
---               	-----
secret_id         	ea99d1ec-ea78-cf4c-92ef-cb0964126960
secret_id_accessor	4253940a-235e-de26-ff94-0c6c1c7d339a

vault write -f auth/approle/role/superuser/secret-id
Key               	Value
---               	-----
secret_id         	1b87e79a-328d-9b10-6cd2-9b2e5e0e8dfa
secret_id_accessor	a71163ef-302b-71f4-8187-65f062d2a3e6
Now, we can authenticate using the above roleid and secretid. This will return the appropriate policies.
$ vault write auth/approle/login role_id=adebbe05-c929-107e-6164-e86e2dc563f7 secret_id=ea99d1ec-ea78-cf4c-92ef-cb0964126960
Key            	Value
---            	-----
token          	0634efb3-d630-2bcb-657a-db017873f7e6
token_accessor 	335a46dc-60ba-0973-b8f6-4e282da8bc30
token_duration 	20m0s
token_renewable	true
token_policies 	[default mysqlreadonly]

$ vault write auth/approle/login role_id=6ec1966c-b00b-b37c-48db-16084bc57f64 secret_id=1b87e79a-328d-9b10-6cd2-9b2e5e0e8dfa
Key            	Value
---            	-----
token          	2e958510-9f46-3b18-9022-45c2145edd8b
token_accessor 	c8c761d2-8264-0c86-124c-480da0b26f7a
token_duration 	20m0s
token_renewable	true
token_policies 	[default mysqlmodify]
Typically, roleid would be a property of the machine programmed into it by some configuration management system.
Using github authentication
In this approach, we will use Vault authentication using Github.
Github authentication scheme is used for user based authentication. Following are some internals on this scheme:
- Github has concept of organizations, teams and members. Organization can have many teams and each team can have many members.
- The first step in this scheme is generation of personal access token for the github user account. This token is needed while authenticating to Vault.
- In this scheme, when user tries to authenticate to Vault, Vault contacts github server with specified username and authentication token. Github returns the teams that this specific user is part of. Vault will then return the policy associated with the specific team.
Following is the Org structure that I created in github along with policy returned by Vault.
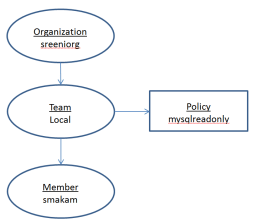
When user “smakam” logs in, github returns team “local” to Vault. Vault would then identify policy associated with team “local”.
Following commands creates the organization, team and associates policy with the team.
vault write auth/github/config organization=sreeniorg
vault write auth/github/map/teams/local value=mysqlreadonly
Following command shows the output when we try to authenticate using token for user “smakam”. Here, we get policy returned as “mysqlreadonly”.
$ vault auth -method=github token=xxxx
Successfully authenticated! You are now logged in.
The token below is already saved in the session. You do not
need to "vault auth" again with the token.
token: 4803ddf8-e419-d1e5-7aae-8d2d42834966
token_duration: 2591999
token_policies: [default, mysqlreadonly]


In your example under “Cubbyhole manual example”, the temporary token which is generated (a20119a5-7954-8045-e6df-01615adee8ab) is never used in the following steps (e.g. “Store permanent token in temporary token’s cubbyhole”) which should require that temporary token, instead you show use of a different temporary token (27e83eeb-beef-cdd1-f406-92ba3fb229a7). You should fix this issue in your example, as it make it very confusing for those trying to follow the example.
Very true! Its ok for who understands all this methods but you must know that this article will read beginners and its confusing for them.
Thanks Jim, I spent a lot of time wondering the same until I read your comment.