AI coding tools are now good enough that the question is no longer “Should I use them?” For me, the more useful question is: how do I use them without letting LLM cost grow unnecessarily?
The obvious answer is to use cheaper models. That helps, but it is not the full answer. In practice, the bigger unlock is designing the coding workflow so that I can switch between tools and models without changing the way I work.
My setup is based on separating three things that often get blurred together:
- Editor: where I view and manually edit code.
- Harness: the coding agent layer that reads files, edits code, runs commands, applies patches, and manages repo context.
- Model: the LLM doing the reasoning underneath the harness.
Once these are separated, I can optimize cost more intelligently. I can use premium models when reasoning quality matters, and use lower-cost models for exploration, boilerplate, summarization, first-pass refactors, or less risky changes.
The Architecture
At a high level, my setup looks like this:
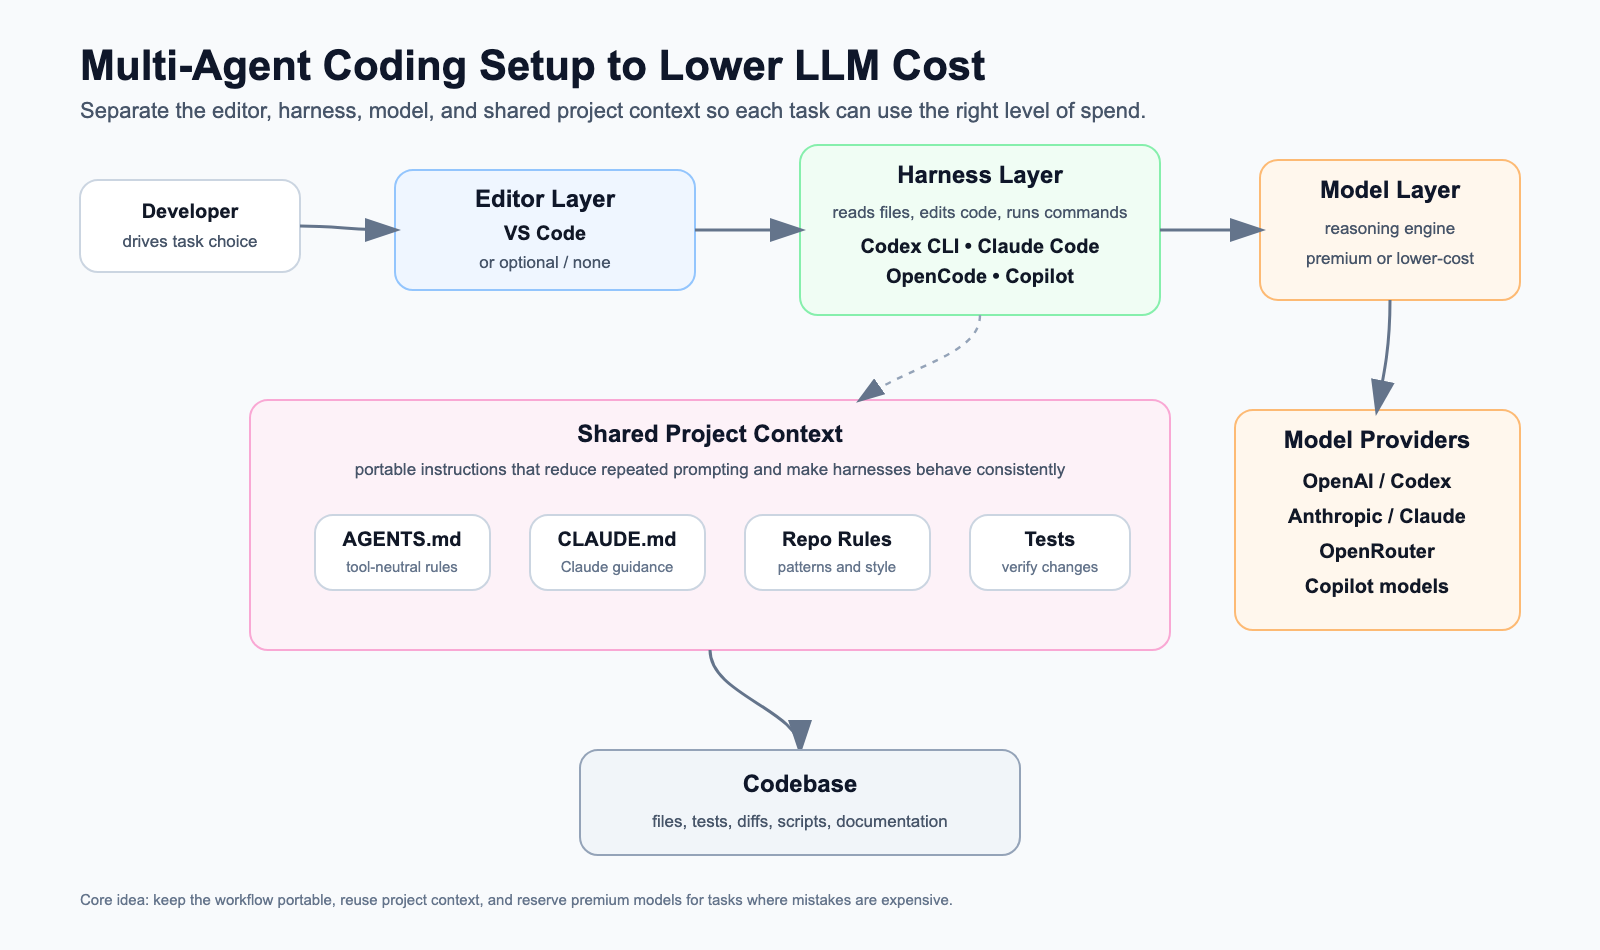
The important part is that the editor, harness, and model are not the same thing.
VS Code is usually my editor. Codex, Claude Code, OpenCode, Copilot, and VS Code extensions are the harness layer or harness-like coding environments. Claude, GPT/Codex models, GLM, Qwen, DeepSeek, and other models are the reasoning engines underneath.
That distinction matters because cost optimization becomes easier when the harness is portable and the model is replaceable.
Shared Project Context
The foundation of the setup is shared project context.
I try to keep repo-specific guidance in files such as:
AGENTS.mdCLAUDE.md- architecture notes
- test commands
- coding conventions
- reusable task prompts
This avoids re-explaining the project every time I switch tools. The goal is simple: if I move from Claude Code to Codex, or from Codex to OpenCode, the new harness should still understand the important repo conventions.
This also saves tokens. Instead of dumping long explanations repeatedly into every chat, I keep durable instructions close to the codebase.
Approach 1: VS Code as Editor, Harnesses Through Extensions
This is the setup I use most often for complex projects.
Here, VS Code is the editor. It is where I read code, navigate files, review diffs, and make manual edits.
The AI harness is usually provided through VS Code extensions or integrations.
Examples:
Editor: VS CodeHarness: Copilot extension / Codex extension or CLI integration / Claude extension / OpenCode extensionModel: OpenAI / Claude / Copilot-supported models / OpenRouter-supported modelsContext: AGENTS.md / CLAUDE.md / repo docs / prompts
This setup works well for me because I still want to see the code clearly. I like reviewing changes in the editor, understanding the file structure, and staying close to the diff. Maybe that is old-fashioned, but for larger projects it helps me avoid blindly accepting agent output.
The cost benefit comes from keeping VS Code constant while changing the harness or model depending on the task.
For example:
- I may use Copilot for quick inline completions.
- I may use Claude through a VS Code extension for complex reasoning-heavy changes.
- I may use Codex for agentic repo work.
- I may use OpenCode when I want more model flexibility.
The key point is that VS Code is not the whole AI coding system. It is the editor. The harness and the model can still vary underneath.
Approach 2: Harness-First Workflow
The second setup is when I work directly inside the harness.
This applies to tools like:
- Codex CLI
- Claude Code
- OpenCode app
In this workflow, there may not be a separate editor involved at every step. The harness becomes the main interface. It inspects files, proposes changes, applies patches, runs tests, and iterates.
Editor: Optional / secondaryHarness: Codex CLI / Claude Code / OpenCode appModel: Native model for that harness, or configurable provider if supportedContext: AGENTS.md / CLAUDE.md / repo docs / prompts
I use this less for complex projects because I prefer to look at the code and review changes directly in the editor. But it works well for smaller modifications, scripts, quick utilities, and contained tasks where I can verify the output easily.
For small projects, the harness-first approach can be efficient because the agent can inspect files, make changes, run commands, and iterate without needing much manual navigation.
Cost-wise, this also helps because the harness can do local exploration. It can search files, inspect only what matters, and avoid loading unnecessary context.
Approach 3: Harness Plus OpenRouter for Model Flexibility
The third setup is where the harness/model separation becomes most explicit.
Some harnesses can be configured to talk to OpenRouter or other compatible model providers. That means I can keep the same coding workflow but change the model underneath.
Editor: OptionalHarness: Codex CLI / Claude Code / OpenCodeModel: OpenRouter-routed modelsContext: AGENTS.md / CLAUDE.md / repo docs / prompts
For example:
Codex CLI harness | vOpenRouter provider | vz-ai/glm-5.2, Claude, Qwen, DeepSeek, etc.
This is useful for experimentation and lower-cost first passes. I do not need every task to use the strongest model. Some tasks are mostly repo search, summarization, simple code generation, or mechanical refactoring. Those are good candidates for cheaper models.
Then, when I need better reasoning, I can move back to a premium model.
That said, I do not personally rely on this approach much for daily coding. It may be stable enough for some workflows, but the interface between a coding harness and a third-party model router can change. Codex, Claude Code, or OpenRouter can update their API behavior, headers, tool-calling assumptions, or model compatibility. If that breaks, the workflow breaks.
So for me, Approach 3 is useful to know and useful for experiments, but it is not my default daily setup.
Using OpenRouter with Codex CLI
Codex can be configured with profiles. That lets the default codex command keep using the normal OpenAI/Codex setup, while a separate command uses OpenRouter.
Create:
~/.codex/openrouter.config.toml
Example config:
model_provider = "openrouter"model = "z-ai/glm-5.2"model_reasoning_effort = "medium"[model_providers.openrouter]name = "OpenRouter"base_url = "https://openrouter.ai/api/v1"env_key = "OPENROUTER_API_KEY"wire_api = "responses"http_headers = { "HTTP-Referer" = "https://chatgpt.com/codex", "X-Title" = "Codex" }
Add your OpenRouter key:
echo 'OPENROUTER_API_KEY=your_key_here' >> ~/.codex/.env
Add a shell alias:
alias codex-openrouter='codex --profile openrouter'
Now:
codex
uses the normal Codex/OpenAI setup, while:
codex-openrouter
starts Codex through OpenRouter using the configured model.
Inside Codex, verify the active configuration with:
/status
To use a different OpenRouter model for one run:
codex --profile openrouter -m anthropic/claude-sonnet-4.6
The important point is that I do not have to replace my main setup. I keep the default Codex workflow intact and add OpenRouter as a separate profile.
Claude Code with OpenRouter
At a high level, the idea for Claude Code is similar: configure the harness to talk to an OpenAI-compatible endpoint or route requests through OpenRouter, where supported.
The exact setup depends on how Claude Code exposes provider configuration at that time. This is one reason I treat this approach as experimental rather than my default daily workflow.
The pattern is:
Claude Code harness | vOpenRouter or compatible endpoint | vSelected model
If you use this path, I would treat it as a flexible experiment rather than a guaranteed stable interface. The harness, provider, or model compatibility can change.
How I Think About Model Routing
I do not try to use the cheapest model for everything. That can backfire. A cheap model that creates bad code, misses context, or causes extra cleanup may cost more in time than it saves in tokens.
Instead, I route tasks by risk and complexity.
For example:
| Task | Model Strategy |
|---|---|
| Inline completions | Copilot or editor-native tools |
| Repo exploration | Lower-cost model or configurable harness |
| Boilerplate | Lower-cost model |
| Simple refactor | Start with lower-cost model |
| Complex debugging | Premium model |
| Architecture decisions | Premium model |
| Final review | Strongest available model |
The pattern is:
Use cheaper models for reversible work. Use stronger models when mistakes are expensive.
That single rule handles most cases.
My Actual Usage Pattern
My own usage looks roughly like this.
Approach 1 is my default for complex projects.
I use VS Code as the editor and switch between harnesses through extensions or integrations. I prefer this because I can inspect code, review diffs, and stay oriented.
Approach 2 is useful for smaller changes.
I use harness-first tools like Codex CLI, Claude Code, or OpenCode for scripts, contained edits, and smaller projects where the blast radius is low.
Approach 3 is mostly experimental for me.
OpenRouter gives useful model flexibility, but I do not depend on it heavily for daily coding because the connection between the harness and the model provider can change.
Where the Savings Come From
The savings are not just from cheaper tokens.
They come from a few habits:
- keeping project context reusable
- avoiding repeated explanations
- using harnesses that can inspect the repo directly
- starting with cheaper models for low-risk work
- reserving premium models for hard reasoning
- avoiding huge chat histories when a fresh session with repo instructions is enough
- choosing the right harness for the task
The most expensive workflow is often the one where I paste too much context into a chat, ask an unclear question, get a partial answer, then spend more tokens correcting it.
A good harness plus good project context reduces that waste.
What about smaller Models That can run locally?
One more workflow I am watching closely is smaller models that can run locally.
I have tried a few Qwen and DeepSeek models through Ollama. My Mac has 48 GB RAM, so it can run some reasonably capable local models. But for the coding tasks I care about, the quality has not yet been strong enough for me to use them as a primary workflow.
That said, I expect this to improve. Smaller models are getting better, and coding harnesses like OpenCode can make this workflow practical if they integrate cleanly with local runtimes such as Ollama.
If this becomes good enough, the stack could look like this:
Editor: VS Code or optionalHarness: OpenCodeModel: Smaller coding-capable model running through OllamaCost: No per-token API cost
That would be a meaningful cost-saving path. It would not be completely free in an absolute sense, because there is still hardware cost, electricity, latency, memory pressure, and quality tradeoff. But the marginal API cost per coding task could be zero.
For now, I see this as promising but not yet my default for serious coding work. I expect that to change as smaller coding models improve.
The Tradeoffs
This setup is not free.
There are tradeoffs:
- Different harnesses support different features.
- Some models are better at tool use than others.
- OpenRouter compatibility can vary by model and API behavior.
- Cheaper models may need tighter prompts and smaller tasks.
- Switching tools too often can hurt flow.
So I do not treat this as a rigid system. It is a practical routing strategy.
If a task is important, ambiguous, or risky, I use a stronger model. If a task is routine, exploratory, or easy to verify, I am comfortable using a cheaper model.
Final Thought
My approach to lowering LLM coding cost is not just “use cheaper models.”
It is:
Make the harness portable, make the project context reusable, and make the model replaceable.
Once those layers are separated, I can choose the right level of spend for each coding task.
VS Code can remain my editor. Codex, Claude Code, OpenCode, or Copilot can act as the harness. OpenAI, Anthropic, OpenRouter, or other providers can supply the model.
Over time, smaller models that can run locally may become another important part of this setup. If a model running through Ollama can provide good enough coding quality through a harness like OpenCode, then some workflows could move from lower-cost API models to zero marginal API cost local inference.
That flexibility is what lowers cost without forcing me to give up the benefits of high-quality AI coding tools.
 Sreenivas Makam's Blog