Connecting VIRL, CML networks to outside world

This is a continuation of my VIRL, CML blog series. VIRL/CML overview is covered here. It will be good to connect VIRL, CML networks to outside world. Following are some use cases.

  • If management interface of VIRL routers are accessible from outside machines, we can run management application in the client machine and connect directly to VIRL routers. NXAPI, OnePK are some examples of management application like this.
  • Extending VIRL network to physical routers and switches. For example, we can expose 1 of the interfaces of VIRL network and that can form peering IGP relationship with a physical router.

External connectivity requirements for VIRL install using VMPlayer:

As mentioned in my earlier blog, it is necessary to install VIRL with 4 custom host-only interfaces. It is necessary to match the IP address of the custom host-only interfaces to what is mentioned in /etc/virl.ini file. If we change the IP, virl.ini needs to be modified and networking needs to be restarted. This can be done with “”vinstall rehost”

  • eth0 – NAT interface used for internet access.
  • eth1(172.16.1.x) and eth2(172.16.2.x) are used for FLAT management and inband.
  • eth3(172.16.3.x) is used for SNAT L3 access.

Following is the ipconfig VMnet* output in my host machine after creation of custom networks. VMnet3 and VMnet4 are used for FLAT management and inband. VMnet5 is  used for SNAT L3 access.

Continue reading Connecting VIRL, CML networks to outside world
VIRL Simulation – L3 connectivity Usecase

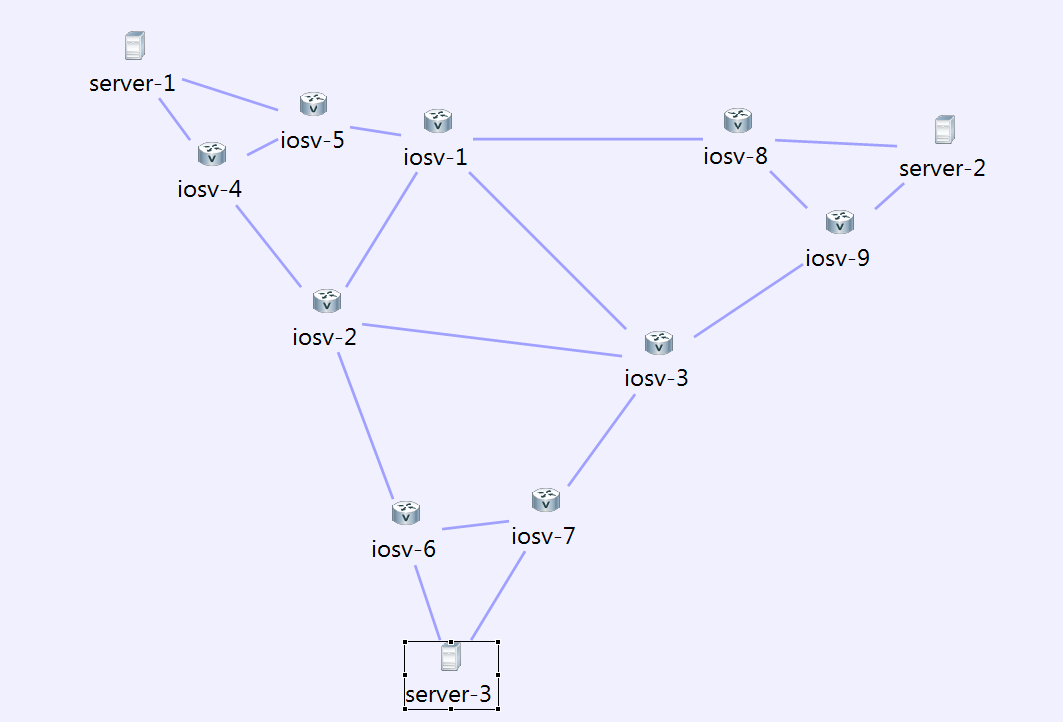
This is a continuation of my VIRL, CML blog series. VIRL/CML overview is covered here. Here, we will create a L3 IGP network running OSPF. I have used IOS nodes for all routers, we can use XR and NXOS routers as well. I didnt do it because the VM images are bigger for XR and NXOS and it slows up the simulation.

Following is the Network topology I created during the design phase. iosv[1-3] are in area 0, iosv[4-5] are in area 1, iosv[6-7] are in area 3, iosv[8-9] are in area 2.

virl7

Continue reading VIRL Simulation – L3 connectivity Usecase

VIRL and CML – Installation

This blog is part of my VIRL and CML series. VIRL/CML overview is covered here. In this blog, I will cover the installation steps and how to get started with the first simulation.

I have tried 2 approaches to install CML and 1 approach to install VIRL. Since I work at Cisco, I did not have to buy VIRL and CML software, the methods of obtaining License and installing them would be different for me compared to users purchasing this from outside. Otherwise, the steps below should be the same.

Prerequisite for installing in Laptop:

  • Use VMPlayer version 6.0.5. I had problems with other versions. I have installed VMPlayer in Windows 7.
  • It is needed to create custom networks to be able to share the VM network with the host machine. “vmnetcfg” utility is provided by default with VMWorkstation and VMfusion. To use it with VMPlayer, please refer to my other blog on VMPlayer networking. We need to create 4 custom networks. The first 2 custom network are used for Flat networks, third one is used for SNAT network, fourth one is for future use. Following image shows my networks in VMPlayer.

Continue reading VIRL and CML – Installation

VIRL and CML – Overview

CML(Cisco Modeling lab) and VIRL(Virtual Internet and Routing lab) are Network modeling platforms from Cisco. I have been trying this out for the last 2 weeks and I am very impressed by what it can do. I feel that the potential for this platform is so huge that it will create a fundamental impact in the Networking industry. Currently, the simulation is limited mainly to Cisco devices though I have seen Juniper and Vyatta images in the VM list. In the next series of blogs, I will walk through some of the following topics:

  • What is CML, VIRL? Architecture and Software components.
  • How to get started? Installation and Quickstart.
  • Examples/Use cases that I tried. L3, L2, management.

Difference between CML and VIRL:

CML is a code branch of VIRL that has been enhanced to provide more scale, VIRL has a 15 node limit. CML customers get Cisco TAC support. CML is focussed towards Enterprise customers, while VIRL is focussed on individuals and training institutions. Obviously, VIRL is much cheaper than CML. VIRL has different prices based on personal or academic use.

Since I work in Cisco, I didnt have to pay any money to try out CML and VIRL. Going forward, I will use the term VIRL to describe the Network Modeling platform. If there are any CML specifics, I will mention those.

VIRL/CML Overview:

Continue reading VIRL and CML – Overview

VMWare Player and VM Networking

VMWare Player is the Virtualization software/hypervisor provided free of charge by VMWare. Player is for personal use. Paid versions are available as VMWare Player Pro or VMWare Workstation. Following link covers the differences between different editions. I have used Virtualbox for most of my VM needs. There were few recent scenarios where I had to use VMWare Player and in this blog, I will share some things that I learnt as part of this process.

Networking Options:

  1. Bridged – This is equivalent to the Bridged option provided by Virtualbox. This is present by default. VMnet0 is used for this.
  2. NAT – This is equivalent to the NAT option provided by Virtualbox. This is available as VMNet8 in the host machine and is present by default.
  3. Host only – This is equivalent to Host only option provided by Virtualbox. The difference is that only 1 network is present by default. This is available as VMNet1 is the host machine. To change the default subnet created, we need vmnetcfg utility.
  4. Custom – This is a variation of Host only option where we can create more networks and associate with VMNet2, 3, etc. This is not available by default and we need vmnetcfg utility to create custom networks.
  5. LAN Segments – This is similar to Custom network. Here, there is no host connectivity and no dhcp servers. Advantage with LAN segment is we dont have limit on the number of networks.

vmnetcfg utility:

Continue reading VMWare Player and VM Networking

OpenNSL – Thoughts

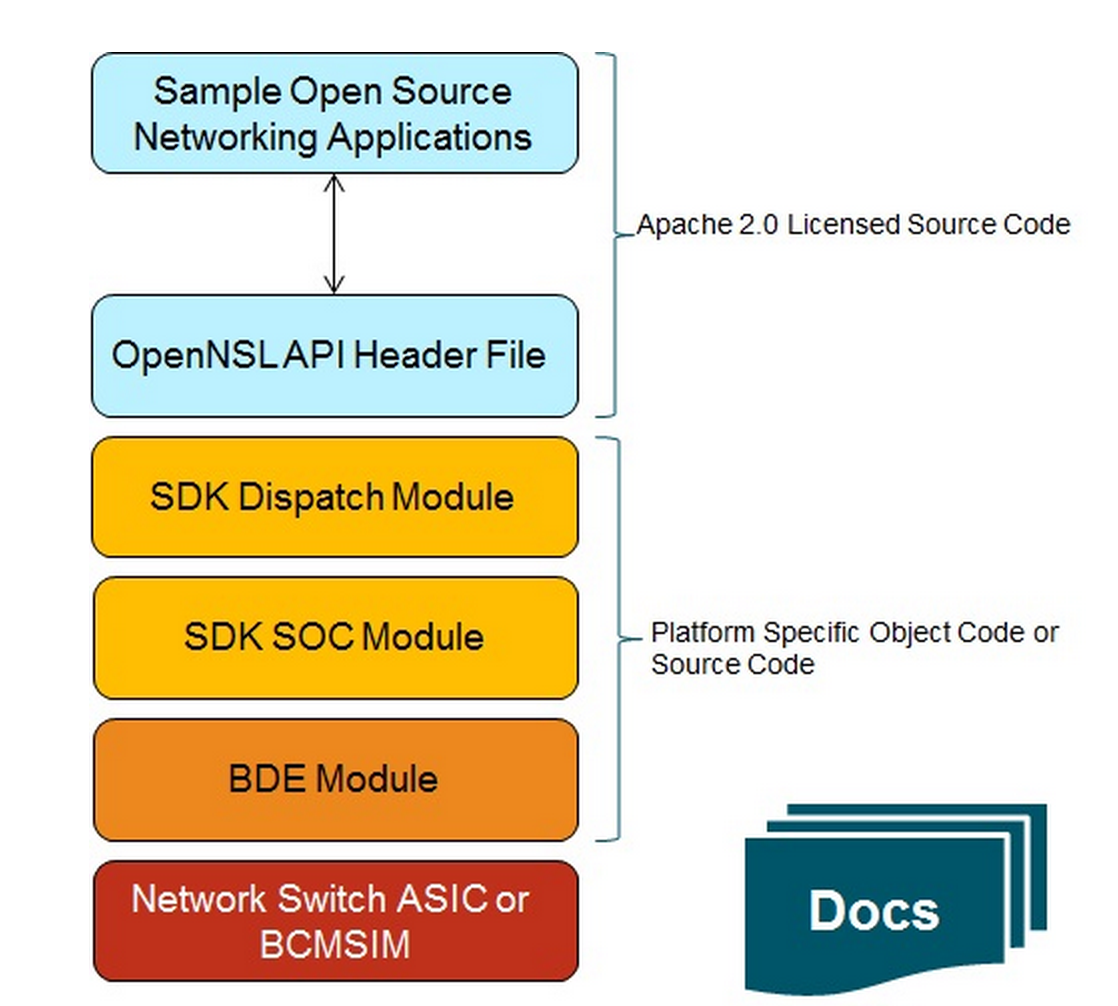
Recently, Broadcom has opensourced API for their network switching asic as part of OpenNSL project. I tried to dig little deep into what it really means and this blog is a result of that.

What is really Opensourced?

Following picture from Broadcom OpenNSL project clearly illustrates this:

opennsl1
Following are some notes:

  • OpenNSL is a layer on top of Broadcom SDK. Broadcom SDK is not opensourced, only the OpenNSL layer is opensourced.

Continue reading OpenNSL – Thoughts

Kubernetes and Google container engine

In this blog, I will cover the Google container engine service that I tried out.

Pre-requisites:

  • Need Google cloud account.
  • Install Google cloud SDK.

Google container engine is not available in the normal gcloud SDK installation. To use container engine service, we need to update preview component.

$ gcloud components update preview

I followed the 2 examples mentioned in the container engine documentation.
WordPress application:
In this example, we create a cluster which has a single master and single worker node. We create a pod running WordPress container in the cluster and expose the WordPress service to external world. Since there is only 1 pod, we dont create a service.
Following are the commands used:

Continue reading Kubernetes and Google container engine

Kubernetes on Google cloud

In this blog, I will cover the steps to run Kubernetes on Google compute VM. I used the steps mentioned here.

Pre-requisites:

  • Need Google cloud account.
  • Install Google cloud SDK.

First step is to download and unzip Kubernetes tar file from here.
Next, we create the cluster using the provided script.

export KUBERNETES_PROVIDER=gce
./cluster/kube-up.sh

The above script creates the clusters with 1 master and 4 minions. Also, it sets up all necessary services both in master and minions node.
Lets look at the VMs created:

Continue reading Kubernetes on Google cloud

Kubernetes – Overview

Earlier, I had written a blog on Docker Orchestration. This is a pretty new area and different solutions are being developed to address this problem. Few weeks back, I had written a blog on AWS EC2 Container service. Kubernetes is a Docker Orchestration engine used to manage a cluster of Containers. Google initially developed Kubernetes, currently its an open source project and source code is available here. Google Cloud’s Container engine uses Kubernetes to manage Docker Containers. Kubernetes can be used standalone or with any Cloud service like AWS, EC2.

Kubernetes basics:

Following are basic building blocks within Kubernetes:

  • Cluster(master and minion) – This is the cluster of machines where Container services are launched on. There is 1 master node and the other nodes are called as worker nodes or minions. The master node runs etcd configuration database service, scheduler to schedule the containers, api server for external clients to talk to, replication controller to manage the state of containers. The minion node runs a slave agent to talk to the master node.
  • Pods – can be a single container or a collection of containers. Containers within a pod share same characteristics and are brought up and teared down together. They are normally launched on same minion. An example could be a pod containing redis master and slave database containers. Pod configuration is defined as a json file.
  • Service – Service is an abstraction over Pod that is useful for Service discovery and exposing environment variables to other services. Example could be a database service exposing port numbers to web service.
  • Labels – Labels are used with Pods and Services for easier management of Containers through filters. Rather than managing individual Pods and Services, Containers can be managed at Label level. For example, we can say destroy all “frontend” labels.

Continue reading Kubernetes – Overview

Google Cloud – Getting started

I have used AWS for most of my Cloud related needs. Recently, I tried out Google Cloud and I will share some of my experiences with Google Cloud in this blog.

The easiest way to get started is to signup for the 60 day trial. This gives 300$ of credit to use Google Cloud for 60 days. It is necessary to register using a credit card.

Google cloud services can be accessed either using Developer’s console, CLI, SDK. It is needed to create atleast a single project to get started. First, I created a project using the Developer’s console. Developer’s console can be accessed from here.

Installing and using gcloud SDK:

Use the procedure here to install SDK.
Following are the steps that I did to install SDK in Ubuntu 14.04 VM running in Virtualbox:

Continue reading Google Cloud – Getting started